 FREE 1 to 3-Day Delivery on Orders $149+ Details
How to Install Exedy Mach 350 Stage 1 Clutch (Late 01-04 GT; 99-04 Cobra; 03-04 Mach 1) on your Ford Mustang
Tools Required
- Vehicle Jack as well as multiple Jack Stands (depending on your lift situation)
- Transmission Jack, if possible
- Safety Glasses
- Container/catch can for Transmission Fluid
- 3/8 Drive Ratchet
- Torque Wrench (absolutely necessary)
- Multiple Extensions spanning a combined length of at least 18”
- Mallet and Hammer
- Pry Bar
- Universal Joint/Swivel Accessory
- Sockets: 8mm, 10mm, 12mm (12 point), 13mm, 15mm, 17mm
- 7/8” Wrench, possibly
- Breaker Bar
- Pilot Bearing Removal tool; Slide Hammer (rent from local automotive parts store)
- Impact Wrench, if possible
- Penetrating Fluid (PB Blaster or other)
- Brake Cleaner
- Blue Thread Locker
- High heat grease of your choice
- High heat RTV Gasket Maker
- 3.2 quarts of Dextron III/Mercon ATF fluid – or the proper fluid (& capacity) required for your Mustang

Shop Parts in this Guide
1. Place your Mustang on as level a ground as you can and safely put it on jack stands. In my case, I felt it was safer to have the rear wheels on ramps and to
have 2 jack stands up front.
- Pay attention to your sub-model’s lift points and ensure you have sufficient room to work.
- SAFETY IS THE MAIN FOCUS HERE. THIS CLUTCH JOB COMES SECOND.
NOTE: before removing parts, confirm that the parts you ordered are compatible with your vehicle and sub-model. Per Exedy, check for any damage to all parts during shipping. Later on in the installation, check for proper fitment.
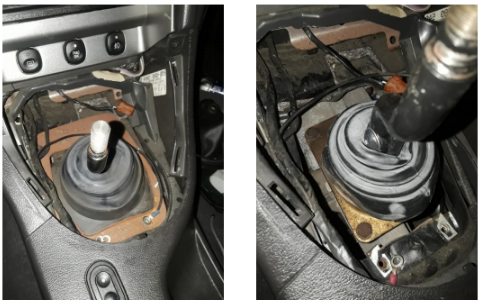
2. Start by removing the shifter from the transmission.
- Remove the shift knob and shift bezel from the dash.
- Unplug the 12V power socket plug.
- Unbolt the (4) – 8mm bolts that hold the rubber isolator boot.
- The shifter is removed by taking off the (4) – 13mm bolts; lift to remove.
i. If it is not moving, carefully tap it off from underneath the car.
ii. Place aside in a clean area and make sure you keep the gasket and
plastic shift bushing.
3. Using your 3/8” drive ratchet, remove the drain plug on your transmission and empty the fluid into your catch can. You can place cardboard underneath to catch any spills and keep your driveway clean.
4. Removing the driveshaft from the differential and transmission:
- Mark the pinion flange and driveshaft for proper reinstallation.
- Remove the (4) – 12mm, 12-point bolts.
- Place the catch can underneath the driveshaft tail end to collect leftover fluid.
- Avoid any damage to the driveshaft yoke splines by placing in a clean location.

5. If equipped, remove any exhaust components that may interfere with the removal of the transmission. Every vehicle is different in its setup, therefore inspect areas of interference. CAUTION: REMOVE THE NEGATIVE BATTERY TERMINAL BEFORE PROCEEDING WITH ANY BOLT REMOVAL THAT IS NEAR THE STARTER!
- You may need to remove your mid-pipes, O2 sensors (with 7/8” wrench), or separate the exhaust flanges at the headers such as in my case.
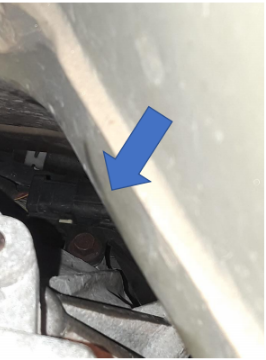
6. Remove the clutch cable from the clutch fork.
- Open the dust shield using a 10mm ratchet.
- Depending on your cable (mine required removing a lock nut using 2 –1/2” spanner wrenches) you may need to use a pry bar and carefully move the clutch fork to where you can slide the cable out.
- Remove the retaining clip on the cable and slide it completely out.
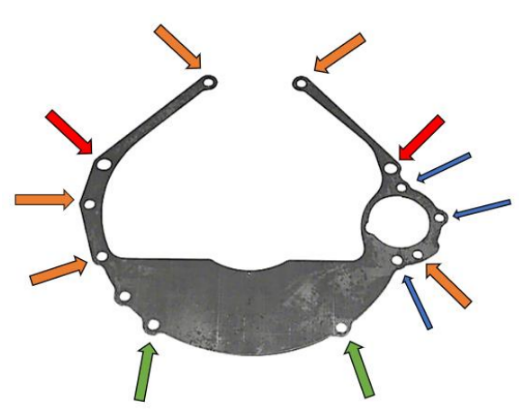
7. Remove the starter. Ensure that the battery is properly disconnected. There are 3 bolts that need to be removed (pictured in blue on the illustration with the bolt setup). Take your set of extensions and approach the top 2 bolts from behind the starter using a 13mm socket. Rest it on the A-arm or remove the wires from the starter and store in a safe place.
8. Remove the transmission from the engine. Start by breaking lose all the transmission bolts.
- Using your 13mm socket and a breaker bar/ratchet.
- The swivel/universal joint accessories will help with removing the upper-most bellhousing bolts.
- According to the diagram, a total of 9 bellhousing bolts need to be removed, not including the starter bolts:
- The red labeled bolts are the longest [2]
- The orange labeled bolts [5]
- The green labeled bolts are the shortest [2]
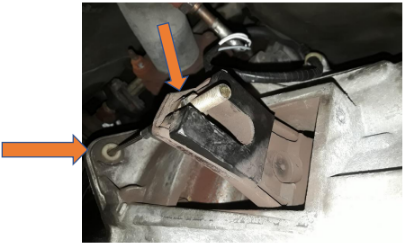
Support the transmission with either a regular vehicle jack or transmission jack; ensure that it is stable by strapping it if needed.
Remove all transmission sensors and retainers that attach to the harness.
Remove the transmission mount bolts (4) using your 15mm socket and breaker bar and then completely remove the (9) – 13mm bellhousing bolts.
CAUTION: the transmission is very heavy (about 120 lbs. for the TR3650) and
requires at least 2 people to safely remove without a proper jack.
NOTE: a common issue usually is with the transmission not separating from the engine. In that case, ensure that all the bellhousing bolts are removed, especially
the ones on the top which are hard to get to. Also check to see if any element of
the transmission is seized to the pressure plate i.e. the throw out bearing.
- Slowly pull it back off from the dowel pins, then slide completely out. This involves maneuvering it without doing damage to the input shaft as you pull it out.
INSPECT: for any cracks or deformation (warping, damage to mating surface,
etc.) to the transmission bellhousing. Also check for any damage to the input
shaft gear teeth and the shaft on which the throw-out bearing rides on.
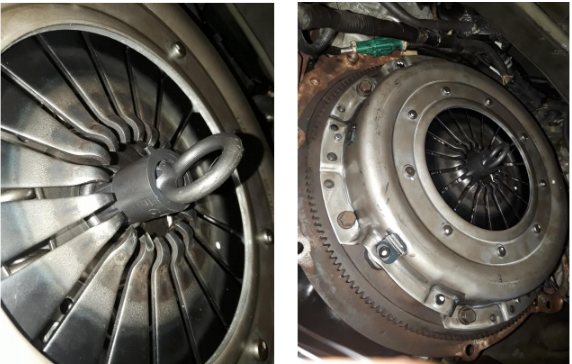
9. Taking off the old pressure plate and friction disk:
- Remove the (6) bolts that hold it in place using an impact wrench if possible and your 13mm socket; otherwise you will need to have someone counter the rotation of the crankshaft with a breaker bar on the crank pulley while you do that.
- The clutch is heavier than it appears so be cautious as you pull it off the flywheel.
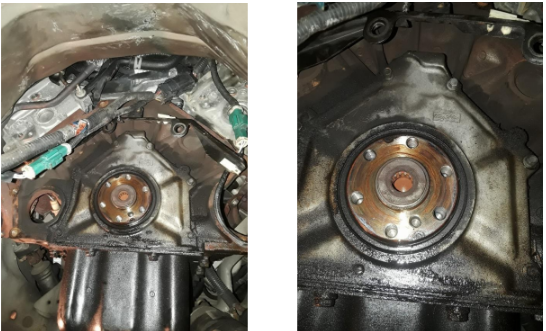
10. Remove the old flywheel.
- Take off the (6) – 17mm bolts in the same manner as your clutch.
- The flywheel is heavy and sharp so take caution when removing.
- Clean the rear side of the engine and crank.
INSPECT: for any heat cracks or heat marks on old flywheel. If you notice any signs of such degradation, then it’s time to replace your flywheel, rather than resurfacing. Furthermore, if your rear main seal is leaking oil, now is the perfect time to change it.
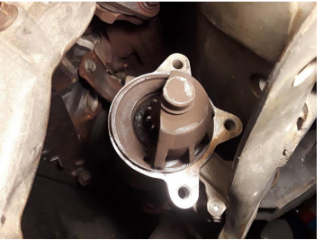
11. Remove the old pilot bearing:
- Rent a slide hammer bearing remover with the pilot bearing attachment. Find the slots on the rear of the bearing and allow the teeth of the tool to engage at those locations. Slide the hammer away from the bearing until it is knocked out of place.
- Make sure you remove all of the bearing and clean the inside cavity of the crank to allow ease of installation for the new one.
12. Reinstall the new included pilot bearing.
- Using a rubber mallet and a large enough socket to go over the flat portion of the bearing, lightly tap it in place until it is seated.
- Wipe down the face of the crank shaft.

13. Reinstall new or resurfaced flywheel.
- You should either resurface your old flywheel or purchase a new one (Note that Exedy requires this for their warranty!)
i. They recommend going with a new matching Exedy flywheel for optimal performance and clutch longevity.
ii. The maximum machining to be done is 0.03 in.
iii. NOTE: If you decide to change flywheels, keep the dowel pins from the old one!
- With brake cleaner or similar degreaser, wipe down the mating surface of the flywheel and clutch.
- Apply thread-locker and tighten the (6) – 17mm bolts in a diametrical pattern.
i. Torque to 59 ft-lbs
14. Install your new Exedy Mach 350 Stage 1 Racing Clutch.
- When holding and attaching the friction plate, avoid getting any grease on the surface (can cause slipping and premature deterioration of the clutch) NOTE: make sure the alignment tool slides freely before proceeding
- Use the supplied adjustment tool to center and hold it in place while you position the pressure plate on the flywheel, making certain the clutch aligns with the dowel pins on the flywheel. It helps to have an extra hand.
- Apply thread-locker and tighten the 6 – 13mm bolts gradually in a diametric pattern
i. Torque to 35 ft-lbs
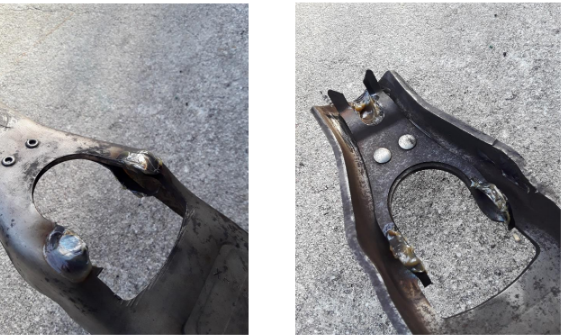
15. Remove the old clutch fork and throw-out bearing and replace with the new supplied bearing and parts.
INSPECT: the clutch fork and pivot stud for any signs of wear that may require a
replacement part. Replace if needed.
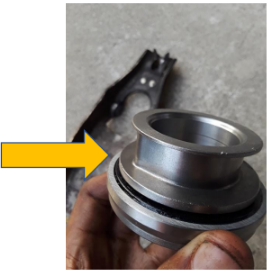
- Clean the shaft on which the throw-out bearing slides on and apply a light layer of grease.
- Also grease the inside of the bearing and all its mating surfaces with the clutch fork as pictured below:
- Slide the throw-out bearing onto the fork, ensuring it goes over the 2 metal clips on the inside of the fork. The bearing’s lobe should face the long end of the clutch fork.
- Slide the bearing and fork onto the input shaft and with the fork in place, push it onto the pivot stud until it locks (the clips should seat behind it).
- Using the supplied grease found in the kit, apply evenly on the input shaft and wipe the excess.
16. Re-position the transmission onto the engine. NOTE: Avoid misalignment by hanging the transmission on the clutch disk or pressure plate!
- To counter this, slightly lift the front of the engine (not at the oil pan) using a block of wood and a jack.
- Clean all dirt from the mating surfaces on the engine and bellhousing. NOTE: Do not reseat the transmission by bolting it up, for this can cause damage to the input shaft and may cause misalignment as well.
- Take note of the wire harness and its bracket if equipped; it goes after the bellhousing.
- Apply thread-locker and gradually tighten all (9) 13mm bellhousing bolts in a star pattern.
i. Torque to 30-38 ft-lb, depending on your transmission.
- Reinstall transmission mount.
17. Reinstall the starter.
18. Reinstall your exhaust components.
19. Re-place your clutch cable.
- Pass cable through appropriate bellhousing slot and insert retaining clip.
- Adjust cable to vehicle specifications (at the fork or at your firewall adjuster, if equipped)
i. Per Exedy, the diaphragm tip positions have changed so adjust accordingly.
20. Re-fill the transmission at the correct capacity with a Ford approved transmission fluid (can be found in service manual or on Americanmuscle.com).
- Easier to be done from the shifter area otherwise you’ll need a fluid hand pump and add in from the fill plug.
21. Reinstall your shifter.
- Add RTV gasket maker if needed and reconnect all components in reverse order.
- Torque the (4) – 13mm bolts to 23 ft-lbs.
22. Reconnect battery terminal(s).
23. Reinstall your driveshaft.
- Clean the tail end of the driveshaft and slide into the transmission.
- Attach to the pinion flange; tighten in a cross pattern.
i. Torque to 71-95 ft-lb.
24. Exedy recommends a 750-mile break-in period for your new clutch. Avoid aggressive driving, as tempting as it may be. Adjust free travel after 750 miles, 1500 miles, and then after every 10000 miles. Enjoy your new Exedy clutch!
Installation Instructions by Mario Sultan, 09/22/2018.

