 FREE 1 to 3-Day Delivery on Orders $149+ Details
How to Install Ford Performance Power Pack 1 on your Mustang
Installation Time
1 hours
Tools Required
- Laptop Computer
- USB Cable (Included)
- Procal Tuner (Included)
- Internet Connection (Wireless connection needed to if you do all the steps in the car)
- Battery charger

Shop Parts in this Guide
Familiarize yourself with the software:
First, follow the instructions on the sheet of paper that came in the box. After you download the program, open it and this window will open:
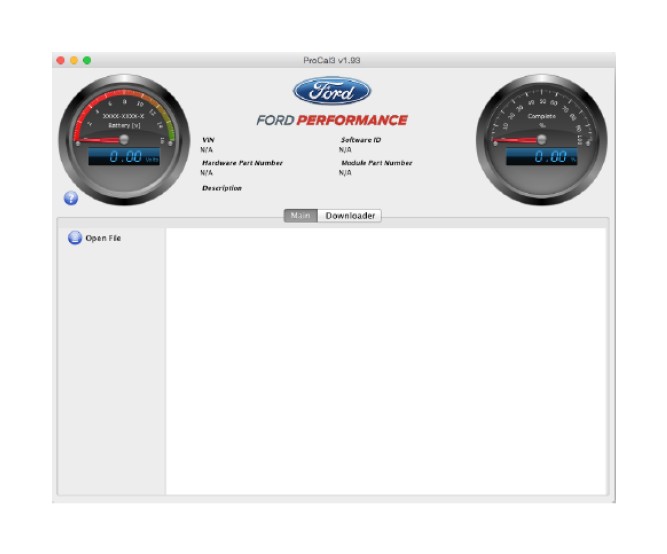
Note the following on the “Main” screen:
a. Battery gauge in the top left-hand corner of the screen displays the current battery voltage.
i. Located directly below the "Battery [v]" text on the Battery gauge is a sequence of numbers:
1. The first four digits are the ProCal 3 Customer Number
2. The next four digits are the ProCal 3 Vehicle Interface Serial Number
b. Vehicle specific data – VIN, Software ID, Hardware Part Number and Module Part Number located in the top-center of the screen is automatically populated when ProCal 3 is plugged-in and communicating with the vehicle. Note: the ignition does have to be turned “ON” to communicate with the vehicle.
c. Description – Description of the PC3 file that is currently open. The filename of the currently open PC3 file will be displayed in the title bar of the ProCal application.
d. Progress gauge in the top right-hand corner of the screen displays the % complete of the current task. NOTE: The % complete gauge will make multiple sweeps from 0%-100% during the programming process.
c. Main Tab(Most of these don’t pop up unless the Procal 3 is connected to the car with the key on/engine off)
-Open File Button – Click this button to navigate to and open a Procal 3 file, ProCal3 files have a “PC3” file extension. The PC3 files can be located anywhere on your hard disk, but are located in the “Documents\ProCal3\calibrations” folder.
- Close File Button – Click this button to close the calibration file that is currently open. This button will only appear when a PC3 file is open.
-Program Button – Click this button to flash the currently open calibration file to your vehicle’s PCM. This button will only appear when a PC3 file is open.
-Restore – Only visible when a PC3 file is open and after initial programming has taken place; clicking this button will restore the calibration that was on your vehicle before it was flashed with a performance calibration.
d. Downloader Tab
The downloader tab is used to obtain the correct calibration for the vehicle from Ford Performance. When downloading the PC3 file will be personalized to your vehicle using the VIN and Procal Unit serial number.
When downloading a PC3 file, it will be stored in the “Documents/ProCal3/calibrations” folder on a Windows computer or “home/ProCal3/calibrations” on Mac OSX based computers. The file will be named based on the calibration, VIN and Procal unit serial number, eg. <calibration>_<VIN>_<SN>.pc3. This makes it easy to identify which file belongs to a specific vehicle.
See image below for example:
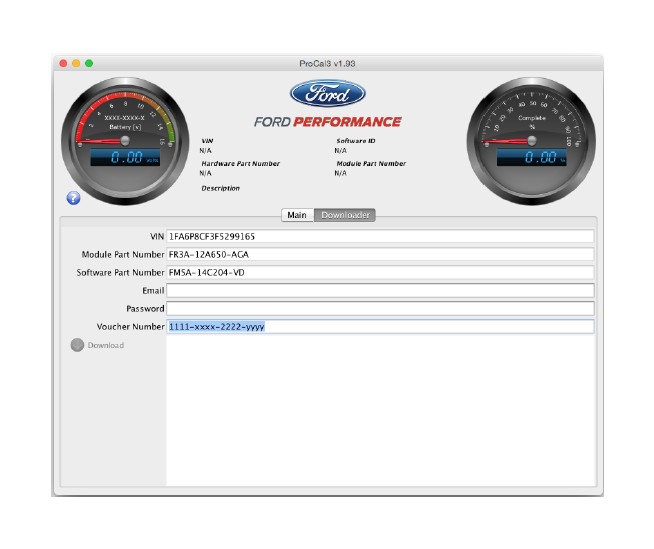
-VIN – This field automatically populates with your Vehicle Identification Number when the ProCal 3 unit is plugged-in and the vehicle is powered.
-Module Part Number – This field automatically populates with your Powertrain Control Module’s part number when the ProCal 3 unit is plugged-in and the vehicle is powered.
-Software Part Number – This field automatically populates with your Powertrain Control software part number when the ProCal 3 unit is plugged-in and the vehicle is powered.
-EMAIL – This field must be populated with the same email address that was used during the registration process. ProCal3 will automatically populate with the last entered EMAIL.
-Password – Enter the same password that was used during the registration process. The password must be entered each time you download, so do not forget your password.
-Voucher Number – Enter the voucher number received in your kit in this field.
-Download Button – Click this button to download the calibration file associated with your email, VIN, module part number and Voucher Number.
Below is an example of the “Diagnostics Tab” screen:
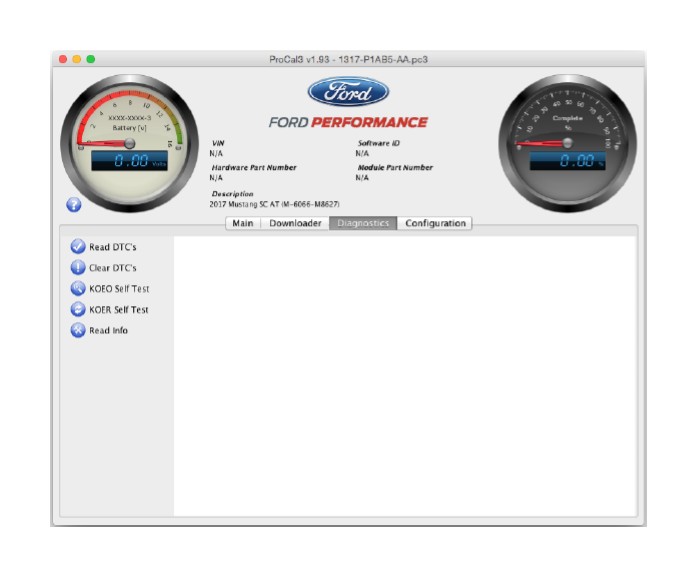
-Read DTCs Button – Click this button to read all Diagnostic Trouble Codes currently being sent by your vehicle’s PCM.
-Clear DTCs Button – Click this button to clear all Diagnostic Trouble Codes currently set in your vehicle’s PCM.
-KOEO Self-Test Button – Click this button to perform a Key-On, Engine-Off diagnostic self-test.
-KOER Self-Test Button – Click this button to perform a Key-On, Engine-Running diagnostic self-test.
-Read Info Button – Click this button to read PCM information.
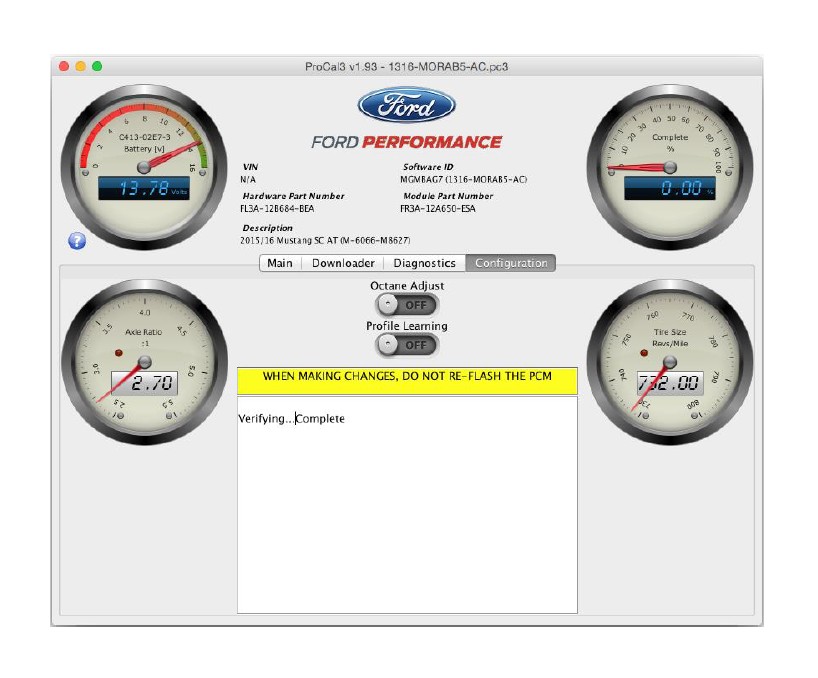
Below is an example of the “Configuration Tab” Screen:

-Octane Adjust – Switch to “ON” if spark retardation is desired
-Profile Learning – Switching to “ON” initiates a misfire monitoring relearning sequence
-Axle Ratio – ratio of driveshaft revolutions per minute to rear axle revolutions per minute
-Tire Size – The number of tire rotations per mile. This information should be available from the tire manufacturer.
-Now you can either download the file with a wired connection, or download it with a wireless connection. Make sure to download the file before proceeding further.
Installation Instructions:
1. Make sure your vehicle’s battery is fully charged (at least 12.0 volts) and all accessories (radio, interior fan, headlights, etc.) are off. Headlights on ‘auto’ will turn on during programming, so make sure the lights are fully off. I would recommend connecting a battery charger just to be safe.
2. Plug the Procal 3 into the OBD 2 port (Ford Performance calls it the “Diagnostic Link Connector(DLC). Make sure it goes in all the way.
3. Push the ignition button once with your foot OFF the pedal (do not start the engine).
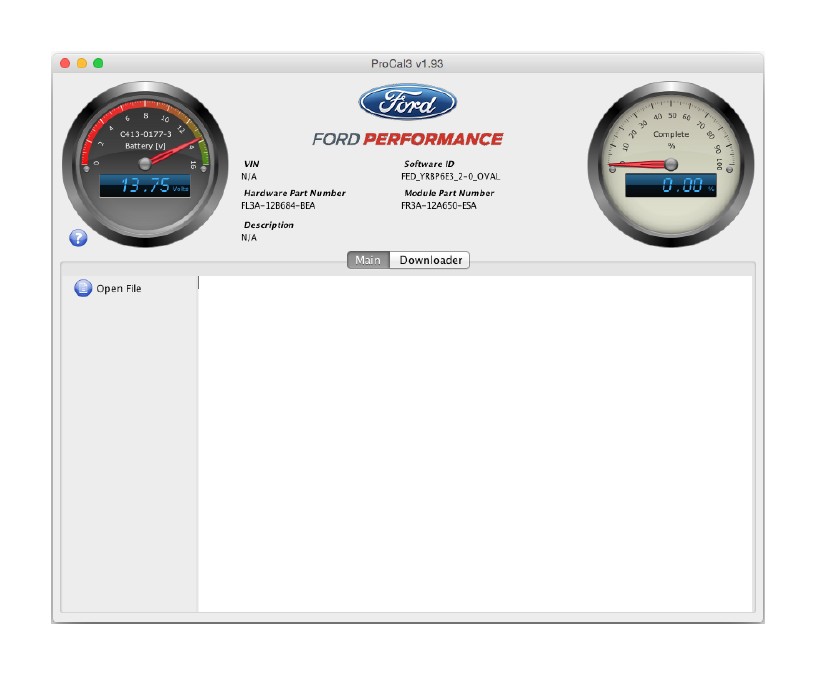
4. Now, your home screen should look like this:
5. Go to the “Diagnostics” tab and click the “Read DTCs” button. If you get any codes, make sure to fix the problems first, don’t just clear the codes. If you DO get codes, just call the Ford Performance Tech Line.
6. Once you fix any problems, click the “Clear DTCs” button.
7. Click “Read DTCs” again to double check.
Downloading the calibration file:
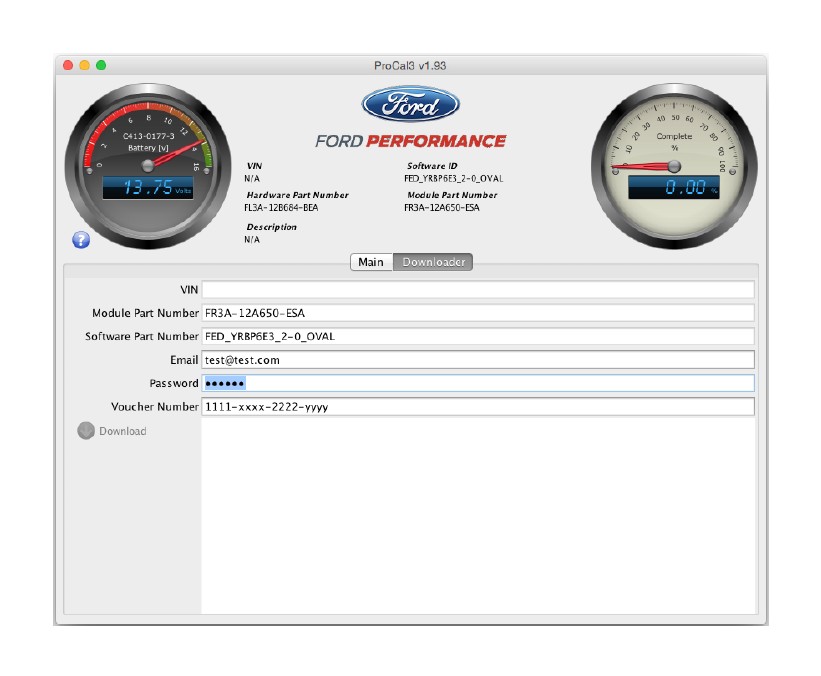
STEP 1: Navigate to the “Downloader” tab and verify that the proper VIN is displayed and Module Part Number field is populated. NOTE: If working from a previously obtained calibration file, skip to Programming Your Vehicle STEP 1.
STEP 2: Enter your EMAIL, Password, and Voucher Number; all fields on the “Downloader” tab should now be populated.
STEP 3: Click the “Download” button to begin downloading your performance calibration.
STEP 4: Upon successfully downloading the performance calibration, ProCal 3 will automatically open the downloaded file and switch to the Main Tab. The downloaded file will be saved for future reference in your “Documents/ProCal3/calibrations” folder on a Windows computer or “home/ProCal3/calibrations” on Mac OSX based computers. The Downloader tab should appear similar to this:
Programming:
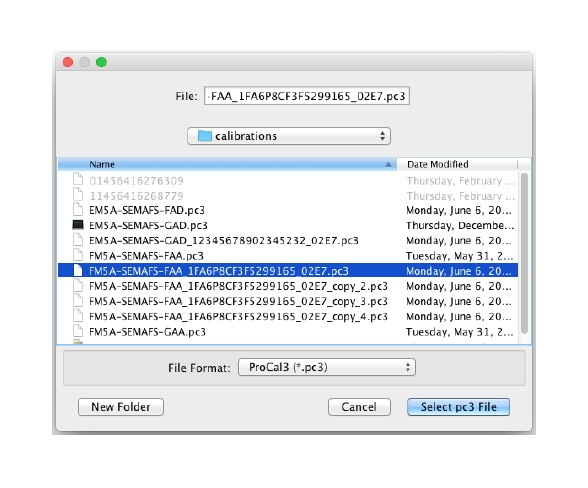
STEP 1: Navigate to the “Main Tab”, and click on the “Open” button.
STEP 2: Navigate to the performance calibration file that you downloaded. By default, ProCal 3 will look in the “Documents/ProCal3/calibrations” folder on Windows PC’s or the “<user_home>/ProCal3/calibrations” folder on a MAC that was created the first time you ran the ProCal 3 application. Double-click on the performance calibration file (should have a .pc3 extension) or single-click and then press the “Select pc3 File” button.
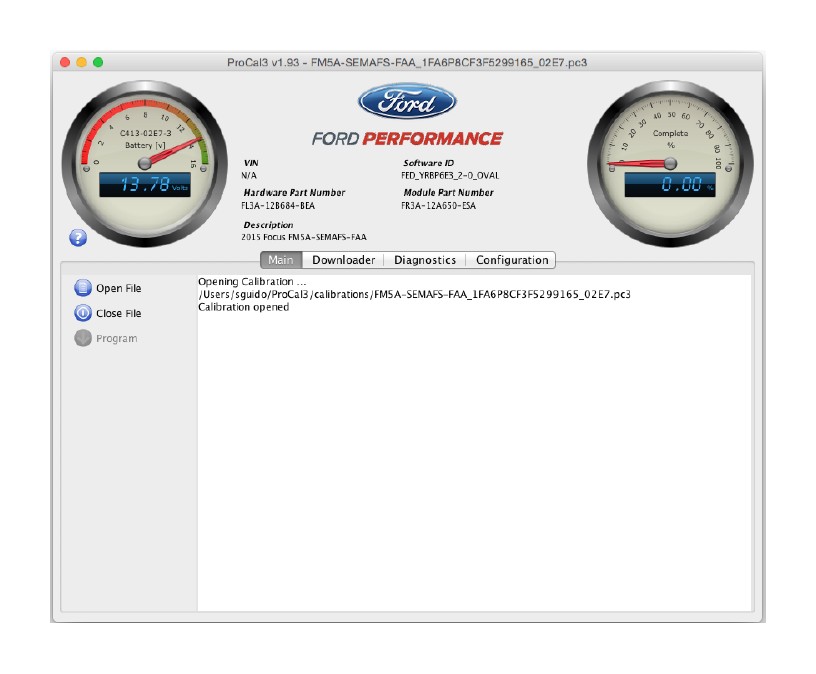
STEP 3: The “Description” field on the “Programming” tab should now display a short description of your performance calibration, similar to what is shown below.
STEP 4: After all DTCs have been repaired and cleared and the PC3 file is open, the vehicle is ready to be programmed; On the “Main Tab”, click “Program” to begin installation of your performance calibration.
STEP 5: When programming is complete, your screen should appear similar to the one shown below:
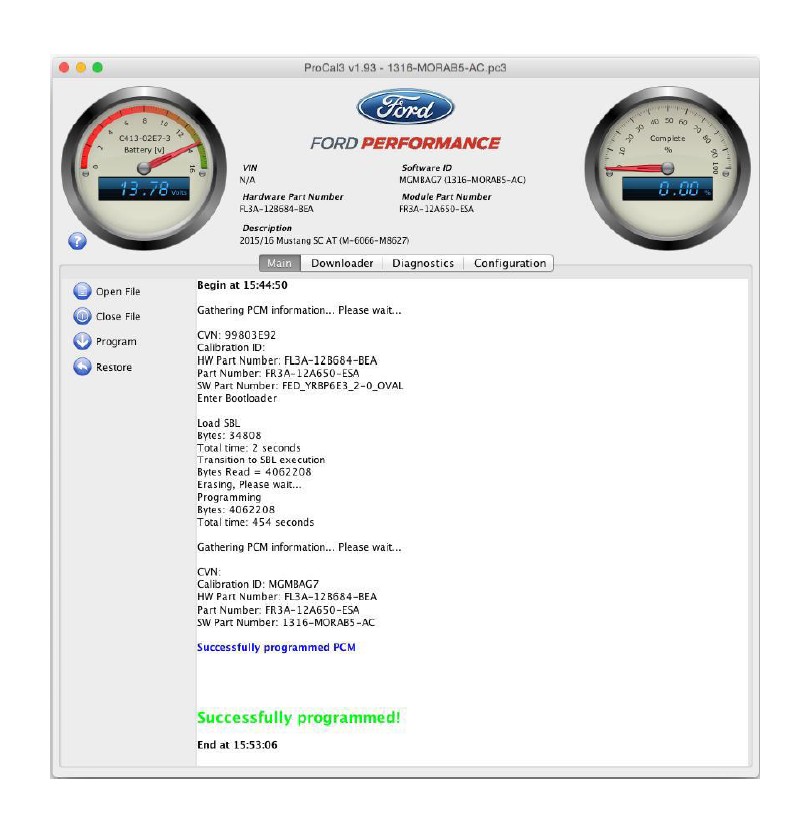
STEP 6: Once the display shows “Successfully programmed!” turn ignition key to OFF position. Wait at least 15 seconds, turn ignition key to the ON (not start) position.
STEP 7: If the vehicle has stock sized tires on the drive wheels, a stock axle ratio, and no need to modify the octane adjust parameter, the programming process is complete, the tool may be disconnected, and the vehicle is ready to drive.
Special Notes:
If you get pinging, I would recommend getting any of the Oil separators available on American Muscle. Also, I would recommend setting the Octane Adjust to “Y”. See the image below:
Just click the button under “Octane Adjust” and the program will do its thing.
If you have different size tires than what the program shows (which is pulled from the VIN). See below:
Click anywhere on the Tire Size gauge and enter the new value of the new Tire Size then press Enter.
Calculate revolutions per mile by dividing 63360 inches/mile (5280 feet/mile x 12 inches/foot) by the measured circumference of your tire (in inches).
For example, if the measured circumference of a tire on one of the vehicle's driven wheels is 84 inches, revolutions per mile for your tire size would be 754. Note that circumference should be measured as rolling circumference to account for asymmetry when the tire is loaded with the vehicle’s weight. To do this, mark the bottom edge of the tire and the ground where the marked tire edge sits. Then roll/drive the car forward or backward until the tire mark is against the ground after one revolution. Measure the distance passed on the ground to determine the rolling circumference.
Another way to calculate revolutions per mile is by utilizing the sizing information written on the side of the tire. For a tire of the size P285/35-19, calculate tire revolutions per mile as follows:
Revs per mile = 20850 / { [ (2 * 285 * 35) / 2540] 19 } = 776.4 which rounds down to 776.
After programming, if the speedometer indicates a different vehicle speed than a GPS unit, the programmed tire revolutions per mile can be adjusted to increase speedometer accuracy. For example,
If the calculated tire size is 776 revolutions per mile and a GPS unit says the vehicle is traveling 70 mph while the speedometer says 75 mph, simply multiply the calculated tire size by 75 / 70 to give 776 *
(75 / 70) = 831 revolutions per mile.
You may get a CEL with code P068A. This is normal when flashing a tune and is usually caused by the battery getting low. Just make sure the battery is charged and clear the code and it won’t come back.
The Profile Learning switch should only be switched to “ON” when the engine is reporting a misfire DTC such as P0300-P0316. By enabling this switch, the engine will prompt the driver to rev the engine to a specific rpm until the PCM relearns the fire pattern characteristics of the trigger wheel.
If get a TPMS light, this should go away after about 10 miles.
Now go out and enjoy your car!
Guide submitted by AmericanMuscle Customer Jonathan G. on 5/4/17

