FREE 1 to 3-Day Delivery on Orders $149+ Details
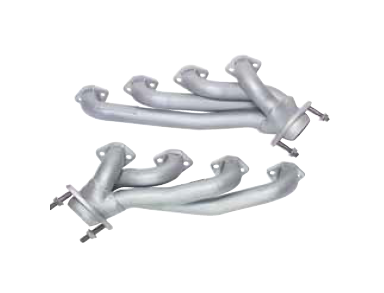
How to Install MAC Chrome Unequal Shorty Headers on your Mustang
Installation Time
1 days
Tools Required
- 7/16" Wrench
- ½" Wrench
- 9/16" Socket
- 11/16" Socket
- 3/8" Rachet & Extension
- 10mm Socket
- Flat Head Screwdriver
- Flat File
1. First disconnect the battery cables from the battery and push aside so that they will not come into contact the battery.
2. Remove the air filter cover and the filter from the stock air box and set aside. Next remove the two nuts that hold the stock air box in place and remove.
3. Next remove the MAF system by removing the two bolts with a 10mm socket located on the shock tower. Then take a screw driver and loosen the hose clamp on the throttle and remove the complete air system.
4. Next remove the spark plug wires and remove all of the spark plugs and the oil dip stick.
5. Next you will need two jack stands and a jack in order to lift the front tires off of the ground. It is possible to perform the following steps with out stands, however slight elevation of the car may be needed to gain access to the H-pipe at the header connection.
6. Next remove the nuts securing the H-pipe to the stock manifolds on both sides of the motor. You will need to remove the O2 sensor located on the passenger side of the H-pipe to gain access to the H-pipe connection.
7. Next using a 9/16" socket and rachet remove all of the manifold bolts from both sides. Next you can remove the stock manifolds form the car. Use a scraper to remove any old gasket material that may be adhered to the heads.
8. Install the MAC header on to the passenger side of the vehicle.
9. Install all of the header bolts except the back bolt on the number 4 cylinder which is a 3/8" x 1" bolt, this bolt will be used the bracket supplied in the hardware kit.
10. Install the 3/8" x 1" bolt through the off set hole on the bracket and tighten to cylinder head. Now you can take the 5/16" bolt, washer and not and attach it to the air tube to the bracket supplied in kit and tighten.
11. Next install the driver side header and tighten all of the header bolts except the back bolt on the number 6 cylinder. This bolt will be used for mounting the dip stick bracket to the cylinder head.
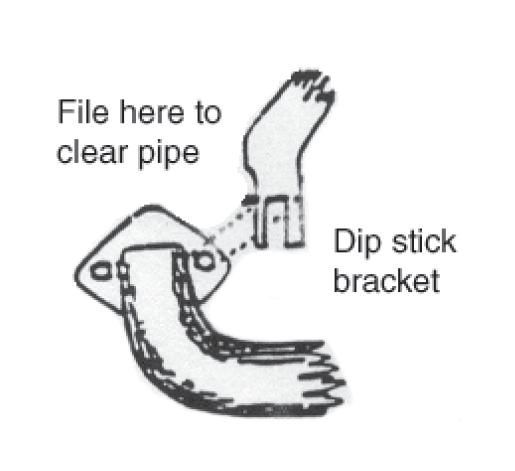
12. Now using a file remove a portion of the dip stick bracket as shown in the illustration on the other side of the page.
13. Once you have filed off the portion of the dip stick bracket you can then install the bolt through the dip stick bracket and tighten the header bolts.
14. Next attach the H-pipe to the collectors on the headers using the hardware provided in the kit. Note: When tightening the nuts on the collector to the H-pipe on both sides of the vehicle make sure that both are tightened equally to ensure a proper seal with the headers.
15. Once the H-pipe is tightened to the collectors on the headers, you can now lower the car to the ground. Replace all of the original parts back onto the vehicle in reverse order as they were removed.
16. You amy need to retighten the header bolt after several hours of driving due to expansion and contraction of the header bolts. Note: Once bolts have hardened completely you will not have to retighten again.