FREE 1 to 3-Day Delivery on Orders $149+ Details
How to install a Splice-in Lightbar Switch on your Mustang

Shop Parts in this Guide
Installation
General Instructions for Installing the LBS-1 Unit
The LBS-1 Light Bar Switch is used to automatically control the light bar inside your convertible. When the top is up, the light is disabled, so that it doesn't light up the interior of your car. When the top is down, the light is enabled so that the light bar operates normally.
An optional feature of the Light Bar Switch allows you to disable the car's original third brake light when the top is down, so that only your light bar operates. When you raise the top, the light bar turns off and the control switches back to the car's third brake light. (NOTE: Check local laws regarding the control of the original equipment third brake light).
Installation Instructions
1. Lower the convertible top to the full down position. Remove the rear seat to get to the convertible top motor and wiring harnesses.
2. Locate the power wire that goes to the third brake light. If you don't have a wiring diagram for your car, you may be able to trace the wire, by color, from the third brake light back to the rear seat area. Verify that you have the correct wire with an ohmmeter or test light.
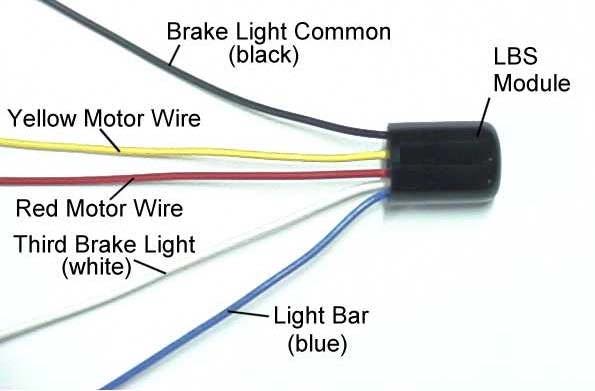
3. Using a quick splice, connect the BLACK module wire to the brake light power wire.
4. Using a wire nut, connect the BLUE module wire to the light bar power wire.
NOTE: If you are installing the light bar at this time, you will also need to make a ground connection to the light bar. Follow the manufacturer's instructions for this connection.
5. Locate the wires that power the convertible top motor. Turn the ignition switch to the RUN or ACC position to allow power to the top. Using a test light or volt meter, determine which of the motor wires goes to 12V when the top is being raised. Mark this wire. (NOTE: For the 1994-2004 Mustang, this is the RED motor wire).
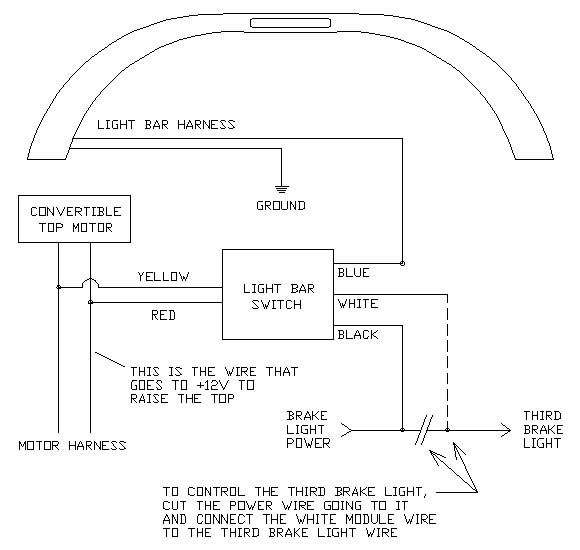
6. Using the diagram below as a reference, connect the RED module wire to the motor wire that goes to 12V (determined in Step 5, above). Use a quick splice to make this connection.
7. Using another quick splice, connect the YELLOW module wire to the other motor wire.
Optional Third Brake Light Control
If you wish, you can disable the car's original third brake light when the top is down, so that only your light bar operates. When you raise the top, the light bar turns off and the control switches back to the car's third brake light. (NOTE: Check local laws regarding the control of the original equipment third brake light).
8. Cut the brake power wire that goes to the car's original third brake light. Use a wire nut or some electrical tape to insulate the harness end of the wire.
9. Connect the WHITE wire from the module to the wire that goes to the third brake light.
Testing
Raise the convertible top and apply the brakes. The light should be disabled. If you have installed the optional third brake light function, the third brake light should be enabled.
Lower the convertible top and apply the brakes. The light bar should be enabled. If you have installed the optional third brake light function, the third brake light should be disabled.
If the light bar operation is inverted (off when it should be on, on when it should be off) then reverse the connections to the motor wires.