 FREE 1 to 3-Day Delivery on Orders $149+ Details
How To Install a Nitrous Express Nitrous Kit - Plate System on your 1996-2004 Cobra, Mach 1 Mustang
Shop Parts in this Guide
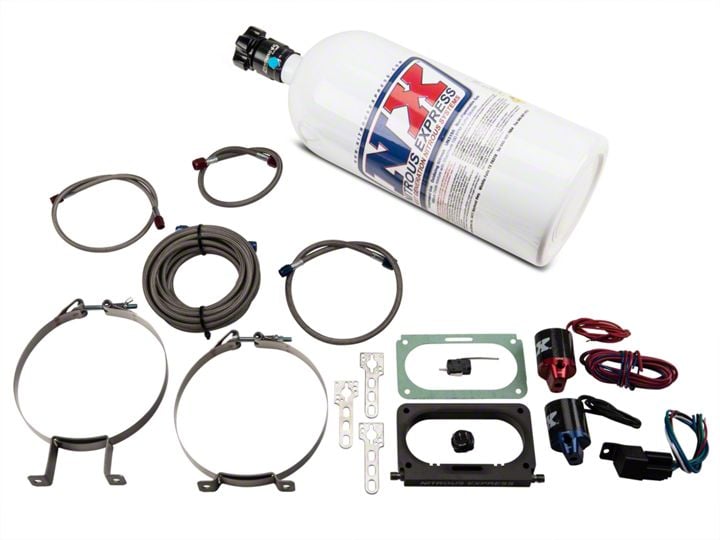
4 VALVE FORD NITROUS PLATE SYSTEM INSTALLATION INSTRUCTIONS
Congratulations on the purchase of your Nitrous Express Nitrous Plate system. Nitrous Express utilizes only the highest quality components designed for the use of liquid nitrous oxide. To properly utilize these specially designed components and obtain the trouble-free operation that this system is capable of producing, it is extremely important that you read all instructions carefully. Pay special attention to the important notes at the end of the installation steps and the tuning tips listed at the back of this instruction sheet. This Plate System is designed to operate with stock fuel pumps and no timing retard, up to the 100 horsepower setting.
On all settings above 100 horsepower the following precautions should be observed:
A. An extra capacity aftermarket fuel pump must be used, 250LPH Minimum
B. High octane race type fuel, and/or timing retard must be used to prevent detonation.
C. Increased strength internal engine components and high performance head gaskets may be required.
D. Depending on compression and fuel quality timing retard may be necessary to prevent detonation. If you have an aftermarket ECU tuner that advances the stock timing, detonation could be a problem. These aftermarket tuners can be compatible if higher octane fuel or NX Power Booster (PN # 16003) fuel additive is used.
To insure proper system assembly and operation, carefully read the following installation procedures thoroughly before beginning.
Before starting, carefully disconnect the vehicle negative battery cable. If there is any question about this operation, consult the vehicle owner’s manual!
DO NOT use any sealer on flare connections, hose, or bottle connections. Use the furnished NX red liquid thread sealer; use no other sealing compounds or Teflon tape.
Excessive tightening of parts is not necessary, snug is tight enough. If it is necessary to remove a fitting installed with the red NX sealer, heat may need to be applied to release the sealing agent.
NOTE: Due to shipping restrictions all NX nitrous bottles arrive empty. Before beginning the installation the N2O bottle should be filled by a NX accredited filling station. For filling station locations log on to www.nitrousexpress.com.
ILLUSTRATION A
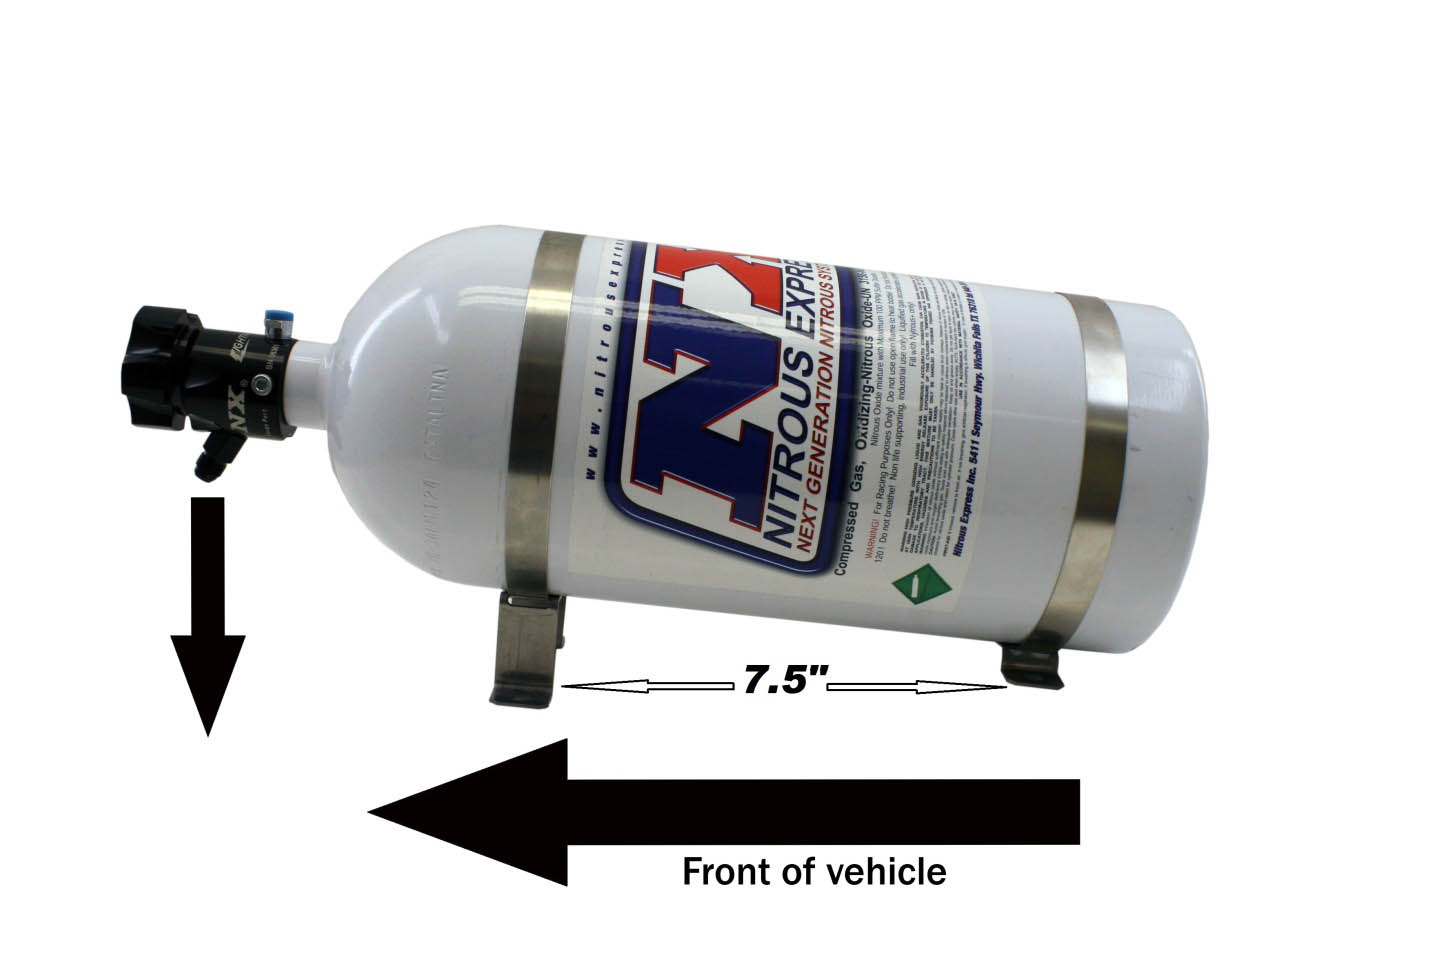
MOUNTING THE BOTTLE:
Slide bottle into bottle brackets. Use illustration A as a guide for proper alignment. Locate bottle assembly in a mounting area that will provide easy access to bottle valve for hose connection and bottle removal. Using the bottle unit as a pattern, mark and drill four 3/8” holes. Note: Before drilling holes be sure to check beneath the area being drilled for obstructions, fuel lines or fuel tank. Then secure unit to mounting surface. (Recommended minimum of four 5/16” grade five bolts). Align the bottle in the brackets so that the valve outlet is pointing downward to the mounting surface (see illustration A) and tighten the bottle bracket bolts. NOTE: This is VERY IMPORTANT so that internal siphon tube will pick up liquid nitrous.
ROUTING THE NITROUS FEED LINE:
NOTE: Place a piece of tape over the end of the hose to prevent debris from entering the feed line during the routing process.
The 15-foot 6AN nitrous feed line may be routed to the engine compartment either through the passenger compartment or under the vehicle. Route the line carefully to prevent the possibility of restricting nitrous flow. If routed under vehicle, locate and drill a 3⁄4 inch diameter hole in a suitable area near the bottle valve outlet for the main line. Starting at the bottle nipple (Do not attach line to the bottle nipple yet) route the line to the engine compartment. Following the factory fuel lines is usually the best path. Note: Keep maximum clearance between all moving parts, suspension components and hot engine components, securing the supply line where possible (“Zip Ties” are the best for securing the feed line). Be especially careful of the feed line being near any “HOT” electrical leads, one small spark will destroy the Teflon liner causing a nitrous leak.
ILLUSTRATION B
This image below is a representative throttle body, nitrous plate and intake. Your application will look different.
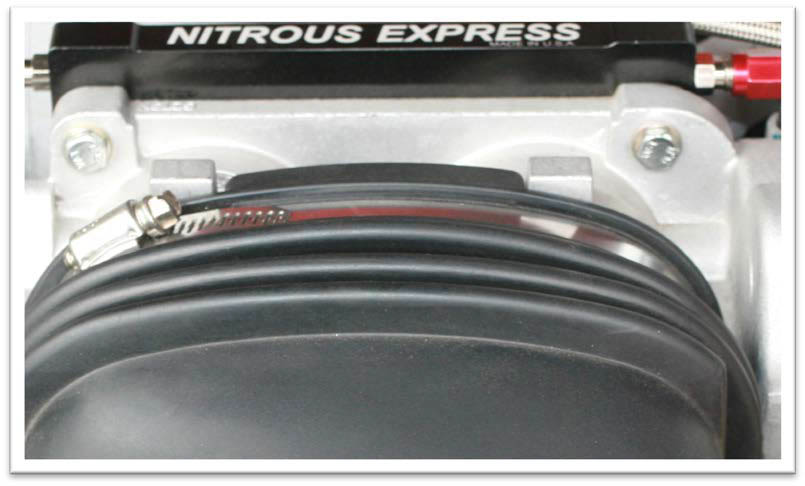
MOUNTING THE NITROUS PLATE:
Before any modifications are made under the hood, we suggest that you make a diagram of all hoses wiring and linkages.
1. Pre-assemble the nitrous plate before you begin. Select the horsepower setting that you want to start with, insert the proper nitrous jet in the fitting marked “N2O” (CAUTION: You must always use a back-up wrench when tightening the nitrous or fuel fittings, failure to do so will void the system warranty!!!!!) Connect the blue stainless feed line to the plate fitting. The nitrous fitting can be identified by the “N2O” marked on the plate. Repeat this procedure for the red fuel line (the fuel fitting will be marked “FUEL”). NOTE: Always check each jet for obstructions before installing.
2. Remove the throttle body.
3. The nitrous plate should be installed behind the throttle body. (See Illustration B). Using the supplied gasket, re-install the throttle body and nitrous plate and torque to factory specs using the provided hardware.
ILLUSTRATION C
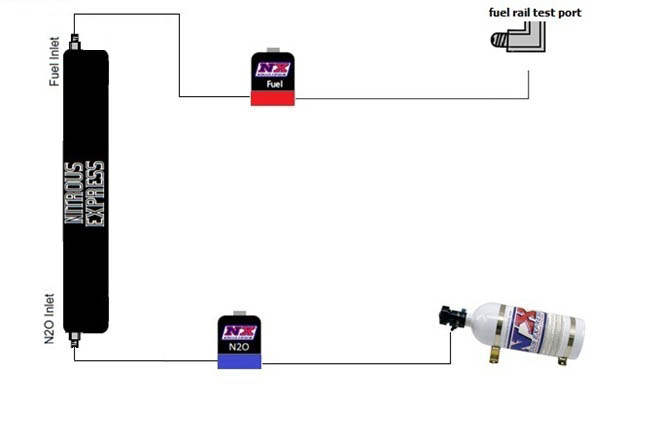
FUEL SUPPLY CONNECTION:
WARNING: THE FUEL RAIL AND/OR FUEL LINES ARE UNDER HIGH PRESSURE. USE EXTREME CAUTION WHEN DISCONNECTING ANY FUEL LINE. QUICKLY COLLECT AND PROPERLY DISPOSE OF ANY EXCESS FUEL SPILLAGE.
1. Located on the fuel rail (injector rail) is a “test port” fitting used by mechanics for checking fuel pressure. This is usually covered by a black plastic cap and is where the red fuel feed line will be connected. Note: Care should be taken to be certain the port you have selected is the “Fuel Test-Port”.
2. Remove the factory test port fitting and install the supplied Ford fuel rail adapter fitting (NX part # 16179) using NX red thread sealer. The adapter fitting is very thin so you should use very little torque when tightening.
3. If you are using aftermarket fuel rails you may be required to use a “T” fitting to tap into your vehicles fuel system. ONLY TAP INTO THE HIGH PRESSURE FUEL LINES! DO NOT TAP INTO A RETURN LINE!
4. Now connect the red fuel line from the fuel supply to the inlet side of the fuel solenoid.
ELECTRICAL HOOK-UP:
1. Mount the toggle (Arming) switch in a location that is within easy reach of and in plain sight of the driver.
2. Using 18-ga, blue wire and connectors supplied in the switch kit, connect a HOT lead (12 VDC POSITIVE) to the “Power” terminal of the toggle switch. (Use 5 amp inline fuse if desired). This power source must be controlled by the ignition switch (See wiring Schematic).
3. Connect a grounded wire to the “Ground” terminal of the toggle.
4. The system is furnished with a universal wide-open throttle switch. This WOT micro-switch is designed to work with the furnished universal mounting bracket. Its maximum capacity is 10 AMPS and should only be used to activate low amp draw accessories or in conjunction with the supplied relay.
A. Assemble the micro-switch on the mounting bracket using the supplied 3⁄4” 4-40 bolts and nuts. The switch can be mounted in several different configurations, select the position you require and tighten the bolts. Do not over-tighten; the plastic micro switch can be damaged.
B. The activation arm on the micro-switch is extra long. This allows you to twist, bend, or cut it to aid in the ease of installation.
C. The mounting bracket is made of easily bendable material and may be formed to any configuration that will allow it to place the WOT switch in the proper location. Be sure the WOT switch is only activated at wide open throttle.
5. Attach a 18-ga, jumper wire from the remaining terminal “ACC” of the master arming switch to one of the terminals on the wide open throttle switch.
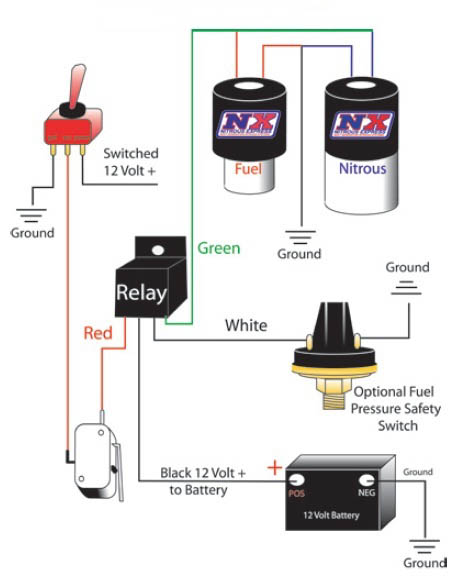
6. Using the blue 18-ga. wire supplied with the system, connect the remaining wide-open throttle terminal to the “Red” wire on the supplied heavy duty relay. (See wiring diagram).
7. Use the red 12-ga. wire to connect the “BAT” terminal of the alternator or to the post on the vehicle battery, to the “Black” wire on the heavy duty relay. (If desired a 40 amp fuse may be installed here)
8. Attach one wire from each of the Fuel and Nitrous solenoids to the “Green” wire on the relay. Note: These coils are direct current and it does not matter which wire is used. Now attach the two remaining solenoid wires to a good ground source.
9. Attach the “White” wire from the relay to ground. If using an optional fuel pressure safety switch connect the white wire of the relay to one terminal of the fuel pressure safety switch and the other terminal of the fuel pressure safety switch to ground.
11. At this point both solenoids should be tested for proper operation. Note: (Be sure the nitrous bottle is off and there is no pressure in the N2O supply line). If you are using a fuel safety pressure switch you must use a jumper wire between the NO and C terminals when testing the solenoids. To test, turn the “arming” toggle switch to the ON position and push the “activating” wide-open throttle switch. A clicking sound should be heard as the solenoids open. IMPORTANT: Make sure that both of the solenoids are clicking! If no sound is heard or only one of the solenoids is working, check all wire connections and the wiring schematic for proper connections.
12. Connect the feed line to the nitrous bottle and slowly open the valve listening for leaks. When it is confirmed that there are no nitrous leaks activate the fuel pump and check for fuel leaks. With the pump running gently break the connection between the hose from the fuel rail to the fuel solenoid to bleed any trapped air out of this line. IMPORTANT NOTE: Before continuing be sure no raw nitrous has been injected into the engine during testing of the electrical system. If ANY nitrous was accidently injected you must disconnect the coil wire(s) and rotate the engine with the starter motor for at least 10 seconds with the throttle body completely open to clear the engine of all residual nitrous. After you have verified that there is no fuel or nitrous leaks start the engine.
Note: The nitrous and fuel solenoids are rated only for intermittent duty. Do not engage either solenoid for more than 20 continuous seconds. Solenoids that have “burned or scorched” electro-magnets will not be replaced under warranty.
WIRING DIAGRAM
After a complete check and verification of all components of the system for proper installation and operation it is time to have some fun.
TESTING AND USING THE SYSTEM:
All NX systems are designed for off road use. Use extreme caution and observe all safety precautions (see your vehicles owner’s manual). Select a suitable test area; your local racetrack is best. Arm the system with the cockpit N2O arming switch. Gently launch the vehicle, gradually accelerating to wide-open throttle. When WOT is achieved a noticeable surge of power should be produced. If not stop and recheck all installation procedures. Call the factory tech line if the problem cannot be located. NOTE: All vehicles equipped with factory rev-limiters should take extreme care not to over-rev the engine. If the rev-limiter is engaged with the N2O system on, serious engine damage could result. An aftermarket RPM window switch (NX PN# 18959) should be used to disengage the N2O system 200 RPM’s before the rev-limiter activates. Your NX system is now ready for regular usage.
SAFETY TIPS:
Do not attempt to start engine if nitrous has been accidentally injected while the engine was not running. Disconnect coil wire(s) and turn motor with throttle wide open for several revolutions before attempting to restart. If it is not possible to disable the ignition then the spark plugs must be removed and the engine cleared of all nitrous before attempting to start engine.
1. Never permit oil, grease, or any other readily combustible substances to come into contact with nitrous cylinders, valves, solenoids, hoses and fittings. Oil and certain gases (such as oxygen or nitrous oxide) may combine to produce a flammable condition.
2. Never interchange solenoids or other appliances used for one compressed gas with those used for another.
3. Identify the gas content by the label on the bottle before using. If the bottle is not identified to show the gas contained, return the bottle to the supplier.
4. Do not deface or remove any markings, which are used for content identification.
5. Cylinder valves should be closed except when nitrous is actually being used.
6. Notify supplier of any condition, which might have permitted any foreign matter to enter the valve or bottle.
7. Never drop or violently strike the bottle
8. Keep valves closed on all empty bottles to prevent accidental contamination. Open the bottle valve for an instant to clear opening of any possible dust or dirt before usage. Aim bottle outlet away from all body parts. Do not point it in the direction of a person.
POWER TUNING TIPS:
Nitrous oxide works well with all applications; 4 cycle, 2 cycle, diesel, and rotary engines. Each one has individual tuning characteristics, and these tips apply generally to each one. Nitrous oxide is referred to as “Liquid Supercharging” because it, in effect, does the same thing as a mechanical supercharger, forcing more fuel and oxygen into each cylinder, thus producing more power. The biggest enemy of all supercharged, turbo charged and nitrous injected engines is “DETONATION”. The use of higher-octane fuel, and or a combination of better fuel and timing retard can control this. Remember detonation is a spark plug, head gasket and engine “KILLER”.
1. Your engine should be tuned to its maximum power prior to nitrous usage.
2. The ignition is an integral part of the nitrous system and must be able to ignite the mixture under very high cylinder pressures. The hotter the spark the better!
3. In stock engine applications and street usage the spark plugs should be at least 2 steps colder than stock. Do not use platinum tip, extended tip or any plug with multiple ground straps or split ground straps. When in doubt about heat range always go one step colder. A spark plug that is to “Hot” will cause detonation, burned plugs, poor performance, and engine damage. In competition engines always use the coldest plug available. Never use an extended tip plug in a racing engine.
4. The NX nitrous system is so advanced, (technology, engineering, and workmanship) that huge amounts of timing retard is not required. You may run as much timing as you normally would, if you have the octane required to prevent detonation. We recommend 1 degree timing retard for each 50 horsepower boost as a starting point. Your engine may need more or less depending on your combination.
5. Your fuel system is also an integral part of the nitrous system, be sure it is in top shape and all filters are clean.
6. Engine operating temperature should be between 160 and 200 degrees prior to nitrous usage.
7. Never “lug” your engine and hit the nitrous system, use the system at wide-open throttle only, nitrous should not be used below 3000 rpm’s. If you do any of the above a serious “Back Fire” could result in engine damage.
8. The better the exhaust system the better the nitrous system will work.
9. Do not attempt to drill or alter the jets, solenoids, or the tubes in the nitrous plate. These items are engineered to their maximum capability. Any modification you can make will decrease power and destroy engine parts.
10. Do not mix or attempt to match any other brand solenoids with this system. Do not attempt to mix or match any other brand plate or nozzle with this system. Do not attempt to use any other brand kit as a second stage with this system. Our nitrous technology is far superior to any of our competitors. Any attempt at this could lead to serious engine damage.
11. All of our systems are designed to operate at 1050 PSI bottle pressure. This is extremely important and cannot be stressed enough. If your bottle pressure is below 1050 PSI the system will run rich and will not produce the advertised horsepower. If the bottle pressure is above 1050 PSI the system will run lean, possibly damaging engine parts. This pressure is easily monitored by using a NX liquid filled pressure gauge (PN 15509). Note: When the ambient temperature is below 97 degrees a bottle warmer is required (PN 15940 or 15941). An NX bottle jacket (PN15945 or 15946) will help stabilize bottle pressure in the winter and summer.
CAUTION: NEVER USE AN OPEN FLAME TO HEAT A NITROUS BOTTLE. THIS IS A VERY DANGEROUS AND POTENTIALLY FATAL PRACTICE!!!!!!!!!!!
12. A purge valve (PN15600-15601) is recommended on all NX systems. When the weather begins to get hot a purge valve is worth up to a tenth of a second on a 1⁄4 mile pass. Note: The correct purging procedure for drag racing is: 1. Complete the burnout. 2. Light the pre-stage bulb. 3. Push the purge button three times, one second each. 4. Stage immediately, GO FAST.
13. If there is a question about the purity of your nitrous supply, a filter (PN15610 or 15607) should be used when refilling your bottle. Just attach the filter to your bottle when you take it to be refilled. Contaminated nitrous will cause serious damage to the nitrous solenoids and possibly to your engine. This is a lifetime renewable filter.
14. If you have questions about the suitability of your torque converter or gear ratios, call the factory tech line for the inside scoop.
15. Your nitrous bottle should be turned off when not in use (even between runs). An NX remote bottle opener (PN 11107) will make this task much easier.
16. Start with the lowest power setting in your system. Don’t try to be the track “Hero” on your first pass. Remember start out small and work your way up, NX systems produce more real horsepower than any other brand on the market today.
17. If the solenoids must be disassembled for cleaning or rebuilding always use the proper wrench (PN 15921). Do not use any clamping devise on the solenoid tower, instant non-warranty, damage will result.
18. If you run an NX system of 150 horsepower you must use a high octane racing type fuel. These are some tips to help you choose and maintain the correct fuel for your application:
A. The most important statistic you should look for in the fuel specifications is the “MON” or motor octane number. In most cases the higher the number the more timing you can run and detonation will not be a problem
B. Most V-8 or V-12 engines with stock compression will run on “93” unleaded pump gas with up to 150 horsepower boost, most 4 or 6 cylinders with stock compression can use up to 75 horsepower.
C. Racing engines with 10-1 compression or higher must run racing fuel. The higher the compression, and the higher the boost, the higher the “MON” must be.
D. With nitrous usage usually the highest “MON” available is the one that should be used.
E. All NX systems are calibrated to use fuel with .730 specific gravity or “SG”. If you use a fuel with a lower “SG” you must use a larger fuel jet to compensate for the lighter fuel. If you use a fuel with a higher “SG”, a smaller fuel jet will be required. Most unleaded pump gas is .730 SG or above.
F. Racing fuel should be stored in an airtight, dark container. Exposure to atmosphere allows very important elements to evaporate, lowering the octane of the fuel. Sunlight oxidizes the lead contained in racing fuel, since this is the most important ingredient used to raise octane it must be protected.
G. Never leave the fuel in your car between race days. This allows evaporation of the very important “High end” hydrocarbons and lowers the octane of the fuel.
H. Never buy racing fuel from an underground or vented storage tank. Always demand to see where and how the fuel is stored, a sealed drum is the only correct way.
I. AV gas or aviation fuel is not compatible with nitrous usage, don’t be tempted by the cheap price, instant engine damage will result!
J. For a fuel recommendation, contact your NX dealer.
19. All vehicles, including full competition race cars, must have an alternator to provide adequate amper-age required by today’s racing accessories. Add up all the amps required by your car, you’ll be sur-prised!
20. If you notice some of the N2O-fuel orifices are not perfectly aligned in your NX plate system, do not be concerned. This misalignment has been engineered into the system to direct fuel to specific cylinders.
21. If you have trouble with your NX system or any related parts, call your dealer first. If you still need help call the factory tech line 940-767-7694 9:00 AM - 4:00 PM Mon-Fri. We are the nitrous experts and will give straight answers to your questions.
In conclusion……….
This instruction sheet and power tuning tips are valid only for a NX system. If you have a kit from another manufacturer this information will not help you! A tune up from any other brand of nitrous kit will not work with the NX “Next Generation” technology.
DO NOT LISTEN TO:
A. YOUR BUDDY!
B. YOUR BUDDY’S FRIEND!
C. THE LOCAL NITROUS GURU!
D. ANY ARTICLE IN ANY MAGAZINE
If you follow the foregoing suggestions, your NX system will operate trouble free and provide years of thrills. ABOVE ALL REMEMBER TO RACE SAFE AND HAVE FUN!
