 FREE 1 to 3-Day Delivery on Orders $149+ Details
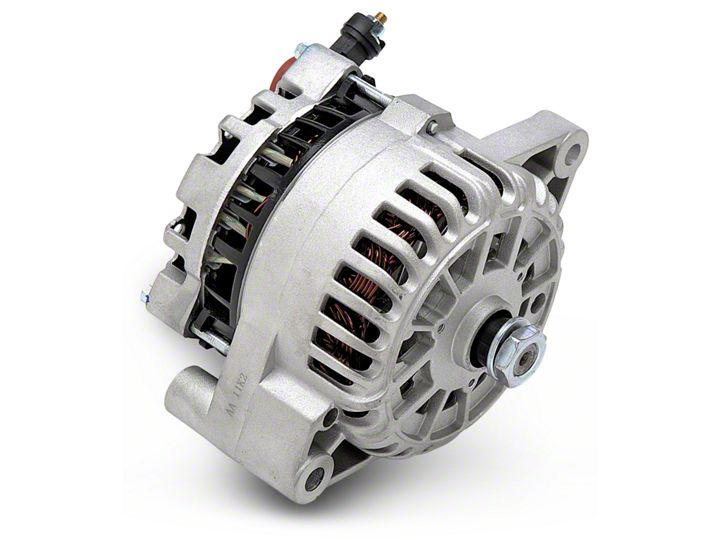
PA Performance Mustang Alternator - 130 Amp ('03-'04 Cobra) - Installation Instructions
Installation Time
2 hours
Tools Required
- Floor jack and jack stands
- Screw Driver(s)
- 8MM wrench or socket (battery terminal)
- 10MM, 13MM, 15MM sockets.
- Impact Driver
- Breaker bar / 1/2 inch drive
Shop Parts in this Guide
Installation
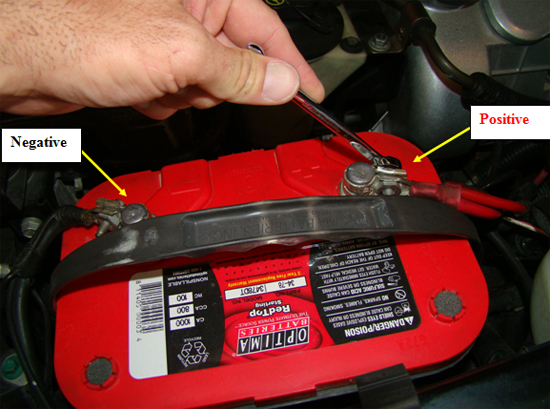
1. Disconnect the battery ground cable; then loosen and disconnect the positive (red) terminal using an 8MM.
WARNING:Batteries normally produce explosive gases which can cause personal injury. Therefore, do not allow flames, sparks or lighted substances to come near the battery. When charging or working near a battery, always shield your face and protect your eyes. Always provide ventilation. Failure to follow these instructions may result in personal injury.
2. Relieve the accessory belt drive tension using a half in drive (no socket just the square drive) remove the belt from around the alternator.

3. Raise and support the vehicle using a floor jack (or equivalent) and jack stands; set your emergency brake.
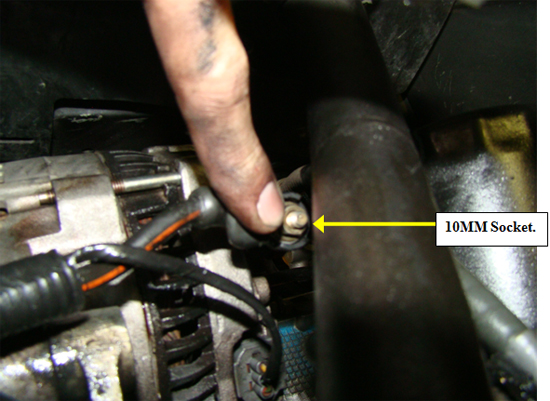
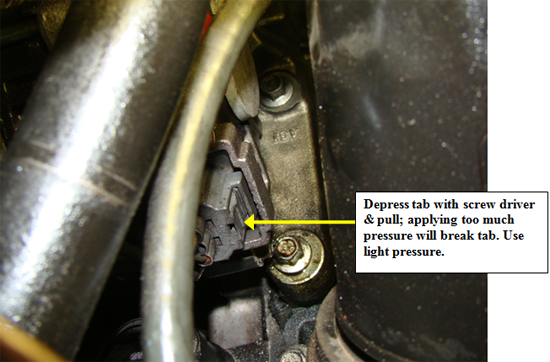
4. Disconnect the alternator connections from underneath the car.
5. Next you have to make a decision on which way you want to remove the alternator. One way is through the top but you have to remove the battery, battery tray, power steering reservoir, radiator reservoir, and the primary pulley assembly. Take it from me this is not a good time; my preference is to remove the lower radiator hose below the alternator.
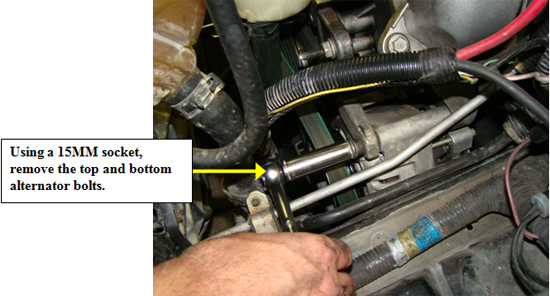
6. Remove the lower radiator hose below the alternator and allow it to drain; once drained continue to remove the upper and lower alternator bolts (15MM socket). Remove the top bolt first and then the lower bolt (from underneath the car). At this point the lower bolt is the only thing holding in the alternator so you will need to support it with a free hand. The Alternator is surprisingly heavy so be alert when it is freed from the bracket. Some gentle prying may be necessary to release it from the bracket due to the tight fit.
7. With the alternator removed from the car you will now need to remove your pulley from the alternator. *If you have purchased your new alternator with the pulley installed you can skip this step*. The best way to remove the pulley is with an air impact gun; if you don’t have one, bring it to your local garage and they can remove it for about $10 or so.
8. When you re-install your pulley on the new alternator DO NOT USE AN AIR TOOL OF ANY KIND! Using an impact driver will pull the internals of the alternator and fracture the front housing as well as damage the internals.
9. Once the pulley is installed you can reverse the order to install the new alternator. Follow the torque specs provided at the beginning of this instruction.
10. Ensure that you have re-connected your radiator hose(s). The following is the procedure for re-filling the fluid. By not following the procedure your car may over heat! Watch your temperature gauge carefully.
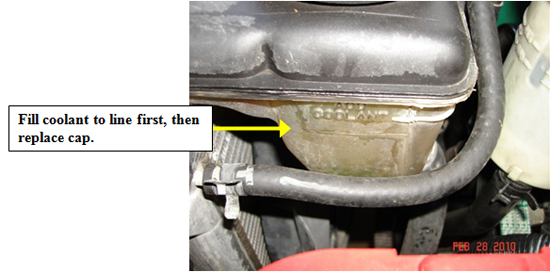
11. Check all hose clamps for correct tightness. Make sure the radiator drain-cock is closed. Remove the coolant bottle cap and fill the reservoir to the add coolant line. Install the cap.
CAUTION:Do not fill the cooling system through the reservoir only (coolant will not enter the engine), only the reservoir and the radiator will be filled and engine overheating will occur.
12. Remove the fill plug in the crossover tube on top of the engine.
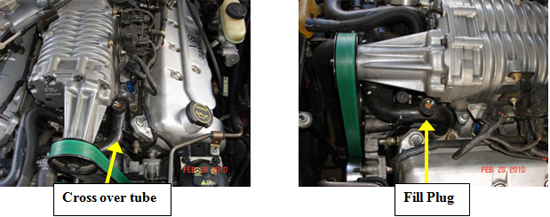
13. Using a funnel, add coolant to the crossover tube, keeping the level of coolant in the funnel at 1/4 full
14. Squeeze the 2 large upper cooling system hoses 5 times. Bubbles may appear in the funnel as air exits the system.
15. Start the engine and run for 5 Mins while monitoring the coolant in the funnel. A sudden drop in the funnel level indicates the elimination of air in the system.
16. Shut off the engine and let it cool for 10 Mins.
17. Crack open the degas bottle cap enough to allow the coolant level in the funnel to drop to within 1 inch of the bottom of the funnel. Tighten the cap.
18. Remove the funnel and install the fill plug in the crossover tube.
19. Add coolant in the degas bottle to the full coolant line.
20. Repeat the fill procedure if necessary.
21. Double check all your connections.
22. Lower the vehicle back down to the ground.
23. Reconnect the battery.
Installation instructions provided by AmericanMuscle customer Brendan Courtney 2.28.10
Related Guides
-
Installation
-
Installation
-
Installation

