FREE 1 to 3-Day Delivery on Orders $149+ Details
How to Install a Prothane Bullet Motor Mounts on your 2005-2009 Mustang
Installation
1. Disconnect the battery by removing the negative cable from the battery post
2. Visually locate the original motor mounts from the top side of the car. Using a ratchet with extension and appropriately sized sockets generously loosen but do not remove the 2 bolts and 1 nut from each motor mount.
3. Elevate the vehicle to gain access to the mounts from underneath. Make sure the vehicle is safely supported with jack stands or on an automotive lift. The removal and installation will be performed from under the vehicle.
4. Support the weight of the engine using a block of wood and a screw or hydraulic jack. Be sure to place the support where it will not damage the engine or any of its components.
Replace one mount at a time.
5. Remove the nut from the top of the mount and raise that side of the engine approximately 1/4"
6. Remove the engine bracket from the block. NOTE: A ground cable is bolted to the passenger side engine bracket, remember to reattach it upon assembly.
7. Remove the 2 bolts holding the original mount to the chassis and remove the mount.
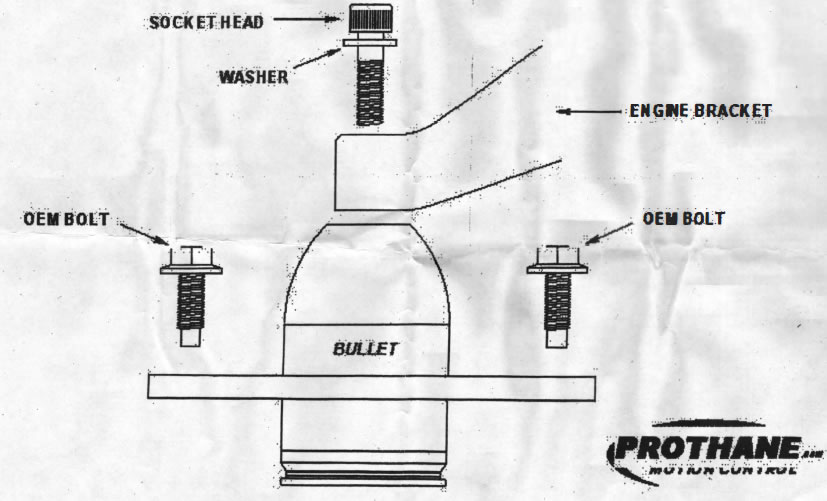
8. Install the new Protane Bullet Mount with the bullet facing up. Install and hand tighten the 2 bolts attaching it to the chassis.
9. Place the engine bracket in position and get the new socket head bolt started by hand in the top of the bullet mount. You may want to use some anti seize on the bolt. Now install the 4 bolts holding the engine bracket to the engine. Tighten bracket bolts to OEM specifications.
10. Lower engine back onto mount
11. Repeat steps 5-10 on the other side
12. Place vehicle back onto the ground
13. Tighten engine mount bolts to OEM specifications. Tighten new socket head bolts to 30 lbs/ft
14. Reconnect negative battery cable
Installation
1. Disconnect the battery by removing the negative cable from the battery post
2. Visually locate the original motor mounts from the top side of the car. Using a ratchet with extension and appropriately sized sockets generously loosen but do not remove the 2 bolts and 1 nut from each motor mount.
3. Elevate the vehicle to gain access to the mounts from underneath. Make sure the vehicle is safely supported with jack stands or on an automotive lift. The removal and installation will be performed from under the vehicle.
4. Support the weight of the engine using a block of wood and a screw or hydraulic jack. Be sure to place the support where it will not damage the engine or any of its components.
Replace one mount at a time.
5. Remove the nut from the top of the mount and raise that side of the engine approximately 1/4"
6. Remove the engine bracket from the block. NOTE: A ground cable is bolted to the passenger side engine bracket, remember to reattach it upon assembly.
7. Remove the 2 bolts holding the original mount to the chassis and remove the mount.
8. Install the new Protane Bullet Mount with the bullet facing up. Install and hand tighten the 2 bolts attaching it to the chassis.
9. Place the engine bracket in position and get the new socket head bolt started by hand in the top of the bullet mount. You may want to use some anti seize on the bolt. Now install the 4 bolts holding the engine bracket to the engine. Tighten bracket bolts to OEM specifications.
10. Lower engine back onto mount
11. Repeat steps 5-10 on the other side
12. Place vehicle back onto the ground
13. Tighten engine mount bolts to OEM specifications. Tighten new socket head bolts to 30 lbs/ft
14. Reconnect negative battery cable