Talk to a Mustang Sales Tech
1-877-887-1105
M-F 8:30A-11P, Sat-Sun 8:30A-9P
$20K Sweeps! 10 Chances to Win! Enter Daily >

PowerStop Z26 Street Warrior Brake Rotor, Pad and Caliper Kit; Rear (94-04 Mustang GT, V6)

Item 413316
Verify parts fit and get product recommendations.
Mustang Sales Techs: Connect Now M-F 8:30A-11P, Sat-Sun 8:30A-9P
$0.00
Our Price

$568.15 (kit)

FREE Shipping Market Price $653.37 You Save 13% ($85.22) Up to 10% off for Military & First Responders! See Details

Will this fit your Vehicle?

Select a different vehicle Help?
Update or Change Vehicle
Ship to: Ashburn - 20149
Sorry, please enter a valid US or CA postal code
We're sorry, zip can't be updated at this time.
Recommended Install Shops
How It Works
Install Shops are available near Ashburn - 20149

Add Local Shop Installation

Total cost of service $299.00
    Create a list
    Add to New List

    Saved - View your saved items

    We're sorry. We couldn't save this product at this time.

    or use

      Product Videos

      Justin: If you're looking to completely overhaul and upgrade the rear brakes in your '99 to '04 Mustang, well then the Z26 Street Warrior rotor, pad, and caliper kit would certainly be an excellent, and I would think, affordable choice. Now the Z26 kit will include high-performance carbon-ceramic pads, drilled and slotted rotors along with the brand new red calipers, all for right around that mid-to-high $300 price point. Now if you didn't know, PowerStop is a very popular option when it comes to affordable braking upgrades here on the site. And I really like the fact that they give Mustang owners a few different flavors when it comes to just how aggressive they want to get with their rides or their braking setups. For instance, they have the extremely bare-bones OE replacement kit which is essentially a stock replacement, all the way down the line to their super-aggressive Track Day stuff and really everything in between. Now the Z26 kit that we have here today does include the company's second, most aggressive pad option, landing right below the Track Day pad in regards to just overall aggressiveness and material. And again, they do pair it up with a brand new set of drilled and slotted rotors, and rear calipers, which I don't have on the table with me here today, but they are included.Now since this pad is unique to the Z26 kit, let's talk a little bit more about it. And again, what you're looking at here, guys, is a ceramic carbon pad or carbon-ceramic, however you like to say it. So it is gonna offer a little bit more initial bite compared to the Z23 kit, also from PowerStop, which does utilize a more traditional or run-of-the-mill ceramic pad. Now PowerStop does claim that the Z26 pad will be both noise and dust-free. But it has been my experience running a carbon-ceramic pad, that you can typically expect just a little bit more of both, right? A little bit more noise. Maybe a little bit more dust compared to a stock pad. Now to be completely honest, guys, I have pretty much the same exact pad on my S197. And while I will say stopping power is rather impressive, I do get a little bit more dust compared to the factory pads. And I do hear a little bit more noise when the pad is cold. It goes away when everything is hot and gets some heat in the pads themselves. But don't take my word for it, guys. It's a great time to remind you to read up on some of the customer reviews back on the product page to hear from fellow SN95 New Edge owners about running this setup on their rides and see what they think. Now the pads themselves are only part of the equation here. With the PowerStop kit, you are also receiving a brand new set of rear rotors with the Street Warrior kit as well. Now you can see they have been given the slotted and drilled treatment to help with heat and fade while also looking pretty awesome behind your favorite set of wheels at the same time.Now, the cast rotors have been mill balanced, and rotor run-out has been tested to be within OE specs. And that just basically means, guys, you shouldn't expect any nasty vibrations or inconsistencies with the rotors themselves. Finally, you are looking at a silver zinc plating here. And that's just in place to help reduce any unsightly surface corrosion on your non-friction areas over the years. Last but not least, we do have the included rear calipers. Again, apologies for not having them on the table. But what you should know is that these are remanufactured units that have been completely gone through with things like new seals, new boots, bleeder screws, and even brand new hardware along with that fresh, red powder coat, which is sure to look great behind your favorite set of wheels.Now finally, guys, PowerStop does pressure test all of their re-manned calipers before being sent out. And they do back them with a 90-day, 3,000-mile warranty in case if you run into any issues. Switching gears, let's get into the install. And so I'm just gonna call this a middle-of-the-road 2 out of 3 wrenches on the difficulty meter. Maybe a couple of hours to knock out from start to finish depending on how fast you like to work. Now obviously, some basic automotive knowledge is required here, including bleeding the braking system and so on. Now as far as tools are concerned, well, lift jack or jack stands will be needed to get the rear of the car in the air, along with the basic socket set, a few open-ended wrenches, a rear caliper tool. And of course, don't forget some fresh DOT 3 fluid if you are bleeding out the entire system. But to give you a better idea of just what to expect on your ride at home, here is an AM customer to walk you through it now.Man: How's it going, folks? Today we're gonna be installing a PowerStop Z26 Street Warrior brake rotor pad and caliper kit for the rear. This is for the '94 to '04 Mustang GT and also the V6s. We're gonna start off with our 10-millimeter and we're gonna crack loose the brake line. And then we're gonna tighten it back up just so it's easier for us to break free when the caliper's off the vehicle. That way, we're not fighting with it. Your next step in your process is gonna be a 14-millimeter wrench or ratchet wrench. And you're gonna start with the caliper bolts themselves. And a little helpful tip as we're going along here guys, is our ratchet wrench is really your best friend when it comes to this. Kind of a tight fit for a lot of things including ratchets. Socket, you'll have a couple of pinches and knuckle burns to try to make some of this work and it's really not worth it. It's just as fast to grab your ratchet wrench or a wrench itself, it will get you so far as to literally finger turn them. Set these bolts off to the side. You will not be reusing them. So now you want to take your caliper, pull it off. Your pads may fall off, they may not fall off, don't worry about it. We're gonna set that to the side and remove the other pad. These here you can dispose of because you will not be reusing these.The next step of your process will be a 15-millimeter ratchet wrench or wrench or even your socket ratchet, because it would work in this situation here. You'll want to remove the caliper bracket. Once you're able to get so far, you'll be able to hand turn. These bolts, you do want to keep to the side, because you will be using them on the PowerStop pads. These bolts, you do want to set to the side because you will be reusing them on the PowerStop kit. Okay folks, once you get the caliper and the caliper bracket removed, take the rotor itself and set it off to the side. You will not be reusing it. This is the time to check and see if there's any issues while you're in here. Make sure your ABS ring is nice and tight. There's no play in your axle, it's not bashing up and down, and your bearings are good. Your seals are good, there's nothing leaking.Let's continue to the next step. On this PowerStop Z26 kit they have, they had it marked rear-passenger side, rear-driver side. We've completed the driver side already. Slides on like so. You're gonna take the PowerStop caliper and caliper bracket on one side and put it all together. This is where you're gonna use the old bolts that came off the caliper bracket. These will be your 15-millimeter bolts. I'm reusing the caliper bolts, the caliper bracket bolts that came off. Those are the 15-millimeter bolts. I will hand-tighten it and then you will go back with the 15-millimeter and come behind yourself and clamp them down. It helps to bring it a little back like that. Do the same thing with the top bolt. Always check to make sure everything is nice and snug before you continue. You don't your brakes coming off while you're driving down the down the road, I'm telling you. See, it kind of takes a little crank there. Now you have to go back to your 14-millimeter and you're gonna take the caliper itself off the bracket. I'm sorry the footage isn't that great, guys, I am one person. I work in a shop. The guy that I do work in the shop with is busy on the other vehicles. This is my personal vehicle that I am working on right now. [Inaudible 00:09:31.224]. So once you do remove these bolts, you're gonna want to set them off to the side. [Inaudible 00:09:35.139] for 20 minutes. Same thing with the caliper, you just want to set it off to the side.So on your brake pads here, you've got the Extreme pad. This piece can go on two ways, but you only want it to go on one way. You want this piece with the grip facing like so, facing the rear of the pad just like so. Let's do the same thing with the other side. You're gonna start from the backside and work it frontward, lock it on. There's a little clip on the back side. You're gonna grab the other pad [Inaudible 00:10:20.980] slide right in. [Inaudible 00:10:26.491] other side, so it's stuck to the front of the rotor.Again, you're gonna repeat the same step on the next pad. You can't put it on this way. You can, but if the pad wears down, it's gonna hit that before your pad even gets halfway through. So it's a wasted pad if you do it incorrectly. Same thing. You start in the back and lock it on. Once again, line it up to your rotor. And it can only go in one way, obviously, curve with the curve. You're gonna simply just slide your pads in here. They may give you a little bit of resistance. And so you can slip a flathead screwdriver. Remember I showed you that flat screwdriver came in earlier, can be kind of handy when it needs to. This goes in the little tab and click it. I can't get it quite in the way it's supposed to. [inaudible 00:11:21.392] So, now we're going to go back to our caliper here. I didn't know this on my previous caliper, on the install on the other side, that we had quite a bit of issues with the emergency brake hole. So what we need to do is take a ½-inch drill bit and a drill and it's a quick, zip through it. You don't need to wallow it out [inaudible 00:11:51.718] more or less you're taking the paint off of it, so that your e-brake cable slides in with no headache.All right folks. Once you've drilled this out, you're gonna have a bracket in your package of clips. You have a long end and a short end. You're gonna want the long end to go towards the piston. The long end goes in first. It will slide in, down and clip on [inaudible 00:12:17.346] to that. Now you're gonna come back, put your caliper on. This will be where those two bolts were that you took off earlier, and you'll need those two bolts now. You have a round part and a flat part. You want the flat part facing up, the round part facing out so your caliper can line up on it. Otherwise, you'll be fighting to get it on there. [Inaudible 00:12:44.067] We're gonna use the same bolts you took off here originally. You push the top in. Once you put bottom in, you can push the top in and it runs on the string. Crank it down. [Inaudible 00:13:00.094] it will fly just because of the angle that it's on. And you're gonna go back to your 14-millimeter and you're gonna tighten it again, guys. Now, we're gonna go back to the brake line itself and I'm gonna take this little rubber lid off. Just stick it off to the side and you could put it back in your other caliper when it's done. That way, you're not having a hot mess when you're moving them around.So in the tool guide, I mentioned the Vise-Grips. There's a rubber hose that comes off this brake line. Now you're not gonna want to cramp it down like that, you'll destroy the brake line. You'll have problems you don't want to have. So you're gonna open it up, put it on the rubber part of the brake line. And once it clamps down, you're gonna tighten it by hand. And once it comes to a tight spot, open it up, a slight turn and grab it. It's still gonna leak. This prevents it from leaking at a fast rate. If you have to get up to a lot of force behind it to close the Vise-Grips, you've got too much pressure on the Vise-Grips and the hose, and you have possibly damaged the hose. So this is where I told you earlier to disable or just break free this bolt, because now you gotta come in here and do this and take it out. Now it's gonna leak and there's absolutely nothing you can do about that. Go ahead and let that brake just hang out there. You're gonna take your bolt off. And you're gonna replace... this is called a banjo bolt, this a banjo washer. It comes with two new ones in your kit. I highly recommend using them because the last thing you want to do is get this far along and it start leaking. So you've got one that goes on the inside, and against the board itself it should go from this way. You will see a flat part and a part where it's indented. The indented part is where the bolt goes into it. And then you'll put another washer on that side, and you'll notice the square where it will line up. Grab your 10-millimeter again and tighten it up. Now you can take the Vise-Grips off that, and that takes care of that.Now this is where the flat-head screwdriver comes into play. You have a C-clip back here that you need to remove in order to get that brake line off. If you don't remove it, you're not gonna get the brake line off. You're gonna be beating yourself up for the next 20 minutes wondering why it won't come out. It will fly off, don't lose it. You still need it, a little clip like so. You're gonna pull your e-brake out and feed it through the back of your brake. The caliper is installed. And this is where it comes into play when I told you about drilling it out. Even when it's drilled out, it's still giving me problems. I recommend grabbing your Vise-Grips and grabbing hold of your cable a little bit there, and pulling some cable through. That way, you can get your brakes back onto your car. Use your Vise-Grips, grab ahold of that cable, and lock them on nice and easy. You're gonna pull out, up...not quite [inaudible 00:17:11.677] sorry about that. Now you'll want to lock them down, just pull out, up...I'm sorry, out, down and over and release it. Cable goes back in. That C-clip you took off is now gonna go back on. Just like so. And there's your PowerStop Z26 Extreme Street Warrior brake package setup.Justin: So, wrapping this one up, guys. If you are looking to complement a big brake kit on the front, or if you're just looking for an awesome way to really pump up the rear braking performance on your ride, well then be sure to check out the PowerStop Z26 kit right here at americanmuscle.com.

      Product Information

      Features, Description, Reviews, Q&A, Specs & Installation

      Features & Specs

      • Brake Rotor, Pad, and Caliper Kit
      • For Rear Placement
      • Built for Muscle Cars and High-Performing Modified Vehicles
      • G3000 Iron Rotors
      • Silver Zinc Plated, Drilled and Slotted Rotors  
      • Cast-Iron Powder Coated Red Calipers
      • Carbon-Fiber Ceramic Pads
      • Bolt-On for Straightforward Installation
      • Limited 3-Year/36,000-Mile Warranty
      • Fits 2005-2010 Ford Mustang GT Models
      • Fits 1994-2004 Ford Mustang GT and V6 Models

      Description

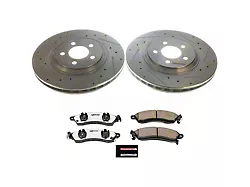
      Budget-Friendly Power Boost. For an excellent braking performance to complement your Mustang’s speed and power, look no further than the PowerStop Z26 Street Warrior Brake Rotor, Pad and Caliper Kit (Rear). This kit upgrades your rear rotors, calipers, and pads for that superior boost in your braking system that is also a great value for your money.

      Complete and Durable. This rear brake upgrade kit is composed of high-quality parts that guaranteed long-lasting durability. The rotors are dilled and slotted and are made of cast-iron materials. It has a silver zinc plating for protection from corrosion while the drilled and slotted design is to lower the rotors’ temperature and for safer and smoother braking. The caliper’s bright red coating is a guaranteed eye-catcher and it’s made of cast iron with powder-coated finish to ensure it will remain and great looking as it is. The shims are made for noiseless braking while the brake pads have carbon-fiber ceramic formula to reduce dust.

      Installation. A direct bolt-on installation method allows a straightforward and hassle-free fitting. It also does not require any modifications on the vehicle.

      Warranty. This kit has a Limited 3-Year/36,000-Mile Warranty covering workmanship and material defects.

      Application. The PowerStop Z26 Street Warrior Brake Rotor, Pad and Caliper Kit (Rear) fit all 1994-2004 Ford Mustang GT and V6 models.

      Information on PowerStop's proper Break-In Procedure can be found here: https://www.powerstop.com/brake-pad-break-in-procedure/

      Fitment:

      Details

      PowerStop KC1303-26

      CA Residents: WARNING: Cancer and Reproductive Harm - www.P65Warnings.ca.gov

      Installation & What's in the Box

      Installation Info

      What's in the Box

      • Rear Brake Rotors
      • Brake Pads
      • Brake Calipers
      • Pad Shims
      • Installation Hardware
      4.7

      Customer Reviews (500+)

        Questions & Answers

        10 More Questions

        Will It Fit My Mustang

        • GT - 94, 95, 96, 97, 98, 99, 00, 01, 02, 03, 04
        • V6 - 94, 95, 96, 97, 98, 99, 00, 01, 02, 03, 04