 FREE 1 to 3-Day Delivery on Orders $149+ Details
How to Install Power Stop OE Replacement Brake Rotor & Pad Kit - Front & Rear (94-98 GT, V6) on your Ford Mustang
Installation Time
2 hours
Tools Required
- 14 and 15mm Wrench and Socket
- Extension
- Hammer
- Jack Stands
- Floor Jack
- Thread Locker(for vibrating parts)
- Brake Cleaner
- Something to hold up the caliper to make the job easier
- C-clamp(for front brake compression)
- Rear Brake Compressor(or Disk Brake piston tool as seen in photo in page 4)
Note: To be safe it is always smart to chock the opposite side of the vehicle when putting it up on jack stands.
Installation Instructions:
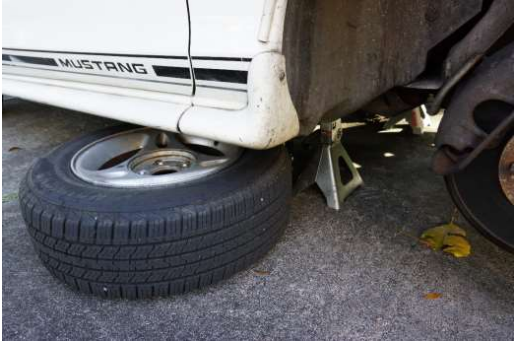
1. Depending on how you plan to do the installation will change the way you will jack up your car, unless you are using a lift. In my case I did the front first and then moved my way to the back. Whichever way you are doing it the first step is to loosen all of the lug nuts before you jack the car up. Now chock the back wheels and jack up the front of the car. Support the car with jack stands and keep the jack in place for an added amount of safety. Now remove the wheels- what I usually do is put the wheels under the car just to be safe again.
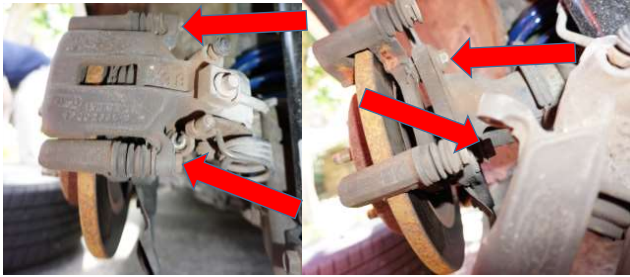
2. Because we are replacing both the rotor and pads we can skip straight to taking the caliper off of the rotor. To do this remove the two caliper mounting bolts behind the caliper, these will be 15mm and they will be located in these positions located in the photo to the left. Once you get the caliper off you hang it (right photo) so that the brake lines do not have any access stress on them. Now you can remove both the brake pads and rotors, you will probably want to spray everything down with brake cleaner to remove all the dust and debris.

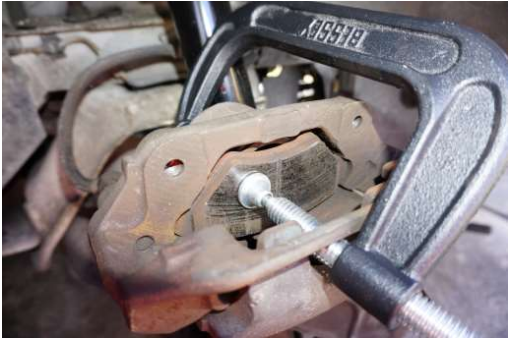
3. The next step is to compress the caliper so that you can fit the new brake pads back on the rotor. To do this you can either use a disk brake tool or just a large C-clamp which is what I have done. Really you can do this while the caliper is still mounted on the rotor but I prefer to do it will the caliper off so that I can see what is happening. Leave one of the old pads in and press the piston back so that it cannot go back anymore, do not over compress them, just tighten the clamp till it feels tight and you should be good.
4. Now before you put the front back together you are going to want to spray down the rotors with brake cleaner as they have oil on them from the factory to protect them and you don’t want this on your brake pads as it will effect performance and lifetime of the product. Once you have done that, make sure you use the rotor that is meant for the front- it will be thicker and will have vents down the center of it. Put the rotor back on the car and support it with a lug nut if needed. It is now time to put on the included hardware. To do this take the metal clips off of the caliper and replace them with the new ones, the easiest way is to do this one after the other so that you know where the clips are located. Now take the new brake pads and with the included brake lubricant
follow the directions of the manufacturer and add a decent amount to the back of the pads where they come into contact with the caliper, and anywhere they could make a noise just don’t get it on the pads or rotors.
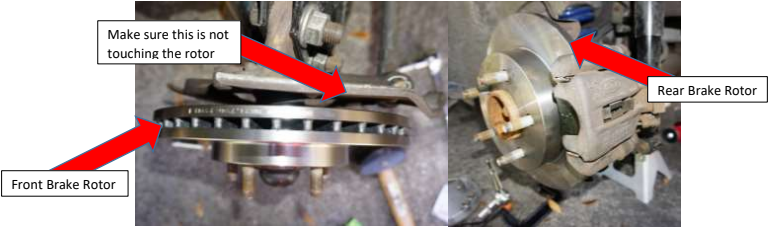
5. Now you are going to reverse the removal process and put the caliper back onto the two mounting bolts over the rotor. You can use a little bit of medium strength thread locker on the mounting bolts so they won’t come loose due to vibrations. Also before you put the wheel back on make sure you clean everything up again with brake cleaner and make sure that the metal guard behind the rotor is not rubbing up against it. Once this is done put the wheels back onto the car and lower the front back down because it is time to move onto the back.
6. Follow the first few steps as we did on the front of the car- loosen lug nuts, jack up and support car, remove rear two tires. The back is a little more finicky in the way you have to remove the caliper and compress the piston. I would highly recommend investing in a Rear Brake Compressor either one of the tools on the photo will work, I
used the little cube on the end of a 3/8-Inch ratchet and extension.
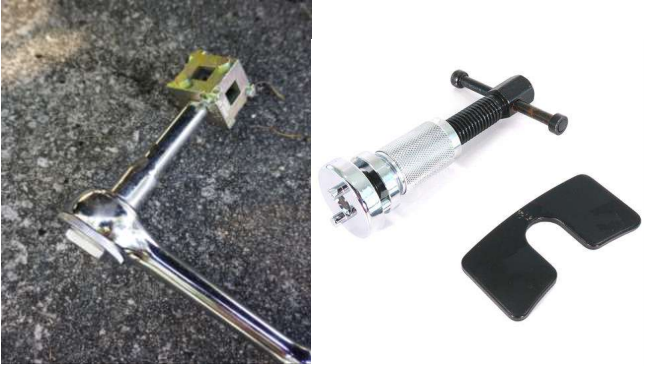
Both of these tools should be locally available or found online, just search for Rear Brake Compressor Tool. I have however seen it done with some big needle nose pliers and a clamp but I would just one of the tools as they are inexpensive and will save your patience and your knuckles.
7. Because we are replacing both the pads and rotors again the back is going to be a little more difficult, but it really isn’t that bad. First you are going to want to remove the two 14mm bolts on the caliper but not the bolts going to the knuckle, (located in the left photo). Also if you are having trouble moving the top of the caliper, make sure your parking brake is off because as you can see the parking brake goes straight into the caliper. After you get the caliper off you can remove the brake pads, make sure you keep track of where the metal clips go on the pads to make installation of the new ones easier. Now you can remove the caliper mounting bracket with two 15mm bolts in the back, (located in the right photo). Once this is off you can now remove the rotor and get to probably the hardest part of the job.
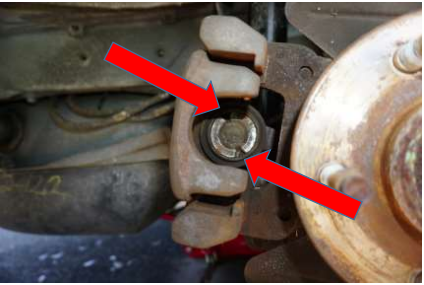
8. This step is to compress the caliper, the difficult part is that you need to rotate the piston clockwise as you apply pressure at the same time. If you are using the little sqaure tool just align it with the two divots(as seen in the photo below) in the piston and press and turn clockwise. You might need an extra pair of hands to hold the caliper up as you rotate and apply pressure. Turn until it doesn’t turn any more and get it inline with the back of the caliper. Again be careful of the brake lines as you do not have that much room to work. If you are having some trouble with this step or you are doing this by yourself, a little tip is to put the caliper on the bracket after you remove the rotor- you will have to remove and put the bolts back in a few times but this makes it so you can rotate and apply pressure to the piston without holding it. This is how I ended up doing it with the little cube.
9. Now that you have the pistons compressed you can now put the rear brakes back together. Again make sure you spray off the rotors with break cleaner to remove the oil. Now before putting the caliper bracket back on make sure you put the rotor on the rotor is more offset than the one in the front and it is solid all the way through (look at photo on page 3), I have made this mistake before and it is annoying when you have to take the bracket off again because the rotor will not go on with the bracket already mounted. Once the bracket and rotor is back on you are going to put the new included clips onto the pads. Now take the new brake pads and with the included brake lubricant follow the directions of the manufacturer and add a decent amount to the back of the pads where they come into contact with the caliper. And then put the caliper over the pads and rotor and put the bolts back. If you want to be a little safer make sure you are using medium strength thread locker on the bolts. Again you might want to clean everything off with some more brake cleaner.
10. Once you have replaced all of the brake pads and rotors you are done with the job! Put the wheels back on the car and lower it back down. Before you go driving you are going to need to pump the brakes because we compressed the pistons. Once this is done, for the best performance out of your brakes follow the manufacturer’s instructions on how to break the brakes in. Enjoy your new stopping power!
Installation Instructions Written by AmericanMuscle Customer Eligh Moses 2/12/2019
