 FREE 1 to 3-Day Delivery on Orders $149+ Details
How to Install Pypes High Flow Metallic Catalytic Converter Kit (86-10 All) on your Ford Mustang
Installation Time
4 hours
Tools Required
- 5/8 Deep Socket
- Ratchet or Impact Drill
- 9/16 Wrench
- Adjustable Wrench
- Angle Grinder with Metal Cutting Blade and/or Reciprocating Saw (Sawzall) with Metal Cutting Blade
- Tape Measure
- Black Permanent Marker
- Floor Jack
- (2) Jack Stands
- (2) Wheel Chocks or Blocks

Shop Parts in this Guide
Note: Cutting of your existing exhaust system will be required for installation.
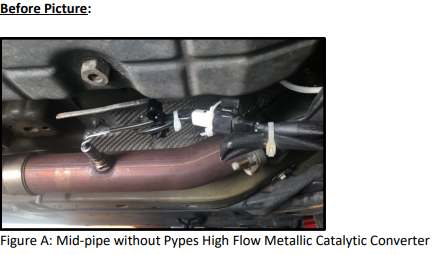
Exhaust Mid-Pipe Removal Procedures:
1. Engage emergency brake and put manual transmission in gear; automatic transmission use Park.
2. Place wheel chock or blocks behind both rear wheels.
3. Carefully raise the front of the car by placing the jack in accordance with your owner’s manual.
4. Place jack stands on either side of the vehicle under the sub frame.
5. Disconnect and remove the O2 sensor from the mid-pipe.
- Depress the tab on the O2 sensor cable and pull apart. (Figure C)
- Utilize the adjustable wrench to remove the O2 sensor from the mid-pipe. (Figure C)

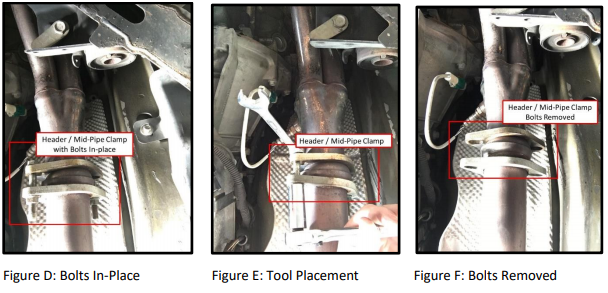
6. Utilizing the 5/8 deep socket w/ Ratchet or Impact Drill and 9/16 wrench, remove the 2 x bolts from the header / mid-pipe clamp. (Figures D, E and F)
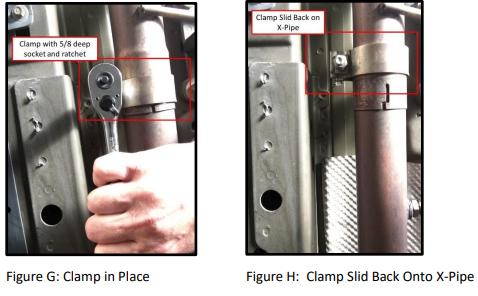
7. Utilizing the 5/8 deep socket w/ Ratchet or Impact Drill, loosen the nut on the mid-pipe / X-pipe clamp and slide the clamp back onto the X-pipe (Do Not Remove the Clamp). (Figures G and H)
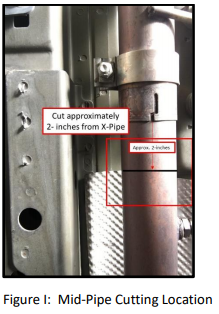
8. Utilizing the Angle Grinder or Reciprocating Saw, cut through the mid-pipe approximately 2-inches from the mid-pipe / X-pipe interface. (Figure I)
- After cutting through the mid-pipe, the portion of the mid-pipe connected to the headers will naturally fall.
9. Remove the portion of the mid-pipe that is remaining inside the X-pipe or H-pipe. Pypes High Flow Metallic Catalytic Converter Installation:
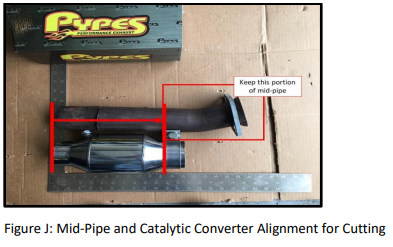
10. Utilizing the Angle Grinder or Reciprocating Saw, cut the remaining portion of the mid-pipe to facilitate installation of the Pypes High Flow Metallic Catalytic Converter with the mid-pipe. (Figure J)
- With both pieces of the mid-pipe put back together, align the end of the mid-pipe with the end of the catalytic converter.
- Measure 9 ½ inches from the end of the mid-pipe.
- This will be the portion of the mid-pipe in which the catalytic converter will replace.
- Keep the remaining portion of mid-pipe (header interface side).
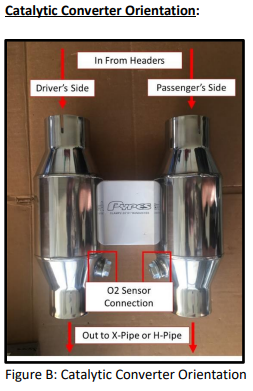
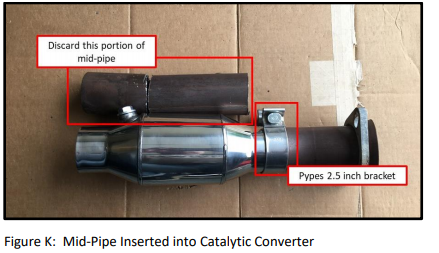
11. Place the Pypes 2.5 inch bracket over the end of the catalytic converter with the slits, opposite the O2 sensor. (Figure K)
- Do Not tighten the bracket.
12. Insert the mid-pipe into the catalytic converter. (Figure K)
- Do Not tighten the bracket.
- The mid-pipe will be required to slide into and out of the catalytic converter when installing the entire system.
13. Install Pypes High Metallic Catalytic Converter into the exhaust system. (Figures L and M)
- Ensure the X-pipe/H-pipe bracket is loose and still on the X-pipe/H-pipe side.
- Ensure the Pypes 2.5 inch bracket is loose and the mid-pipe is able to slide in and out of the Catalytic Converter.
- Insert the catalytic converter into the X-pipe/H-pype. i. Push the catalytic converter into the X-pipe/H-pipe (the side nearest the O2 sensor) until the catalytic converter flares out.
- Align the mid-pipe with header and slide the mid-pipe until it makes contact with the header.
- Ensure the mid-pipe flare is properly seated with the header.
- Insert and tighten the two bracket bolts.
- Tighten the bolts equally by moving back and forth to ensure the mid-pipe flange and header flange remain flush
- Tighten the bolts equally by moving back and forth to ensure the mid-pipe flange and header flange remain flush
- Ensure the Pypes 2.5 inch bracket covers the slits on the catalytic converter, the nut is facing downward and tighten.
- Slide the X-pipe bracket over the slits of the X-pipe, ensure the nut is facing downward and tighten.
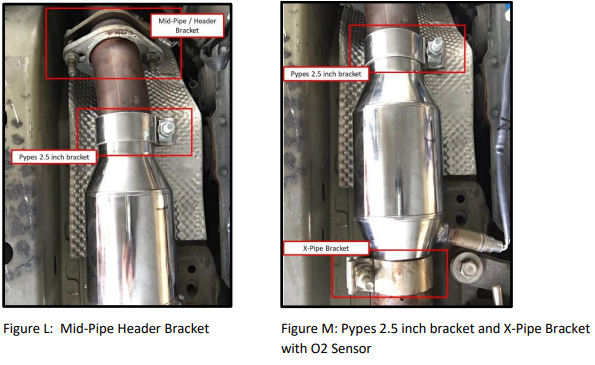
14. Install O2 sensor and connect O2 sensor cable. (Figure M)
15. Repeat the process for the other side.
16. Go back over each nut and bolt to ensure it is correctly tightened.
17. Raise the car off the jack stands and carefully lower it back down.
18. Remove the wheel chocks or blocks.
Installation Instructions Written By AmericanMuscle Customer 5/15/2018.
