 FREE 1 to 3-Day Delivery on Orders $149+ Details
How to install a Roush Cold Air Intake for M90 ROUSHcharger 2005-2009 Mustang
Installation Time
1 hours
Tools Required
- 1/4" and 3/8" Drive Ratchets with Extensions
- Metric and Standard Socket Sets (deep recommended)
- 3/8" Drive Torque Wrench (7-35 ft-lb range)
- Short Phillips-head Screwdriver
- Fender Cover (2)
- Standard Hex Key Set – 5/32 needed

Shop Parts in this Guide
Installation
LIMIT OF LIABILITY STATEMENT
The information contained in this publication was accurate and in effect at the time the publication was approved for printing and is subject to change without notice or liability. ROUSH Performance Products (RPP) reserves the right to revise the information presented herein or to discontinue the production of parts described at any time.
SAFETY REQUIREMENTS
STOP! READ IMPORTANT SAFETY CAUTIONS AND WARNINGS BEFORE PROCEEDING.
IMPORTANT SAFETY NOTICE
Appropriate disassembly, assembly methods and procedures are essential to ensure the personal safety of the individual performing the kit installation. Improper installation due to the failure to correctly follow these instructions could cause personal injury or death. Read each step of the installation manual carefully before starting the actual installation.
1. Always wear safety glasses for eye protection.
2. Place ignition switch in the OFF position.
3. Always apply the parking brake when working on a vehicle.
4. Chock the front and rear tires to prevent unexpected vehicle movement.
5. If working without a lift, always consult vehicle manual for correct lifting specifications.
6. Operate the engine only in well-ventilated areas to avoid exposure to carbon monoxide.
7. Do not smoke or use flammable items near or around the fuel system.
8. Use chemicals and cleaners in well-ventilated areas.
9. Batteries produce explosive gases, which can cause personal injury.
Therefore, do not allow flames, sparks or flammable substances to come near the battery.
10. Keeps hands and any other objects away from the radiator fan blades.
11. Keep yourself and your clothing away from moving parts when the engine is running.
12. Do not wear loose clothing or jewelry that can get caught in rotating parts or scratch surface finishes.
13. Allow the engine, cooling system, brakes and exhaust to cool before working on a vehicle.
WORK SAFELY!
Perform this installation on a good clean level surface for maximum safety and with the engine turned off.
SECTION A - DISASSEMBLY
The following section will guide you through the disassembly of the stock components.
1. Cover both fenders with fender covers to protect the vehicle finish.
2. Using an 8mm wrench, disconnect the (-) negative & ( ) positive connections to the battery.
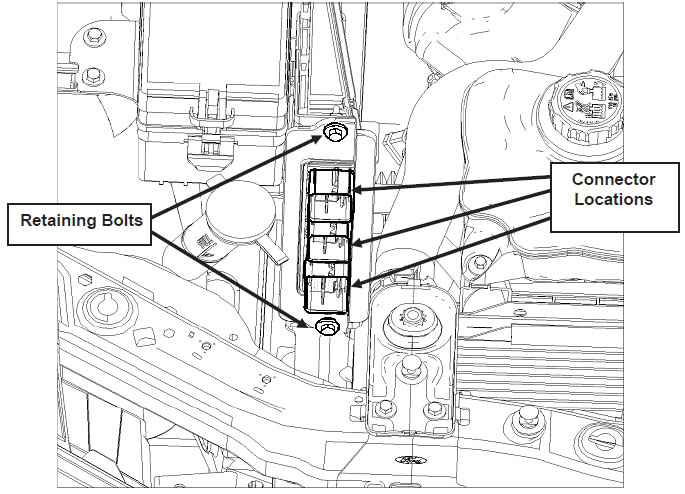
3. Disconnect the 3 PCM (Powertrain Control Module) connectors by lifting the grey levers over the connector back shell and lifting the connectors from their sockets. Remove the PCM by removing two 10mm bolts and pulling the PCM forward and lifting out of the engine compartment. Follow the instructions on the next page as soon as possible to help minimize the amount of time you are without a PCM.
Important: Be sure to write your VIN number and phone number (in case we need to contact you for additional vehicle information) on the PCM using a permanent marker.
Supplemental Instructions
ROUSH Stage 3 Mustang with the ROUSH Stage 3 Mustang Cold Air Kit
Valued Customer,
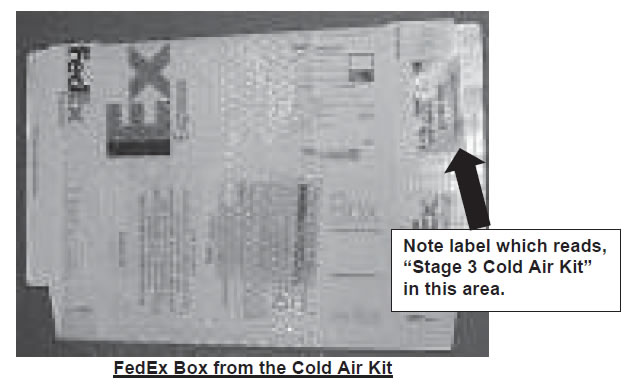
If you purchased both the ROUSH Stage 3 ROUSHCharger Kit and the ROUSH Stage 3 Cold Air Kit, you will find that each kit has a FedEx shipping box for you to send your PCM to ROUSH for recalibration. In order to receive the correct calibration for your Mustang, you MUST send your PCM in the FedEx shipping box included in the ROUSH Stage 3 Cold Air Kit. That box will have a sticker on it saying “ROUSH Performance Stage 3 Cold Air Kit - PCM”.
2005 – 2006 Mustang ROUSHCharger Kit – Black # 403309
Or
2005 – 2006 Mustang ROUSHCharger Kit – Polished # 403310
&
2005 – 2009 ROUSH Mustang Stage 3 Cold Air Kit # 403913
4. Loosen the clamp that connects the stock coupler to the clean air tube.

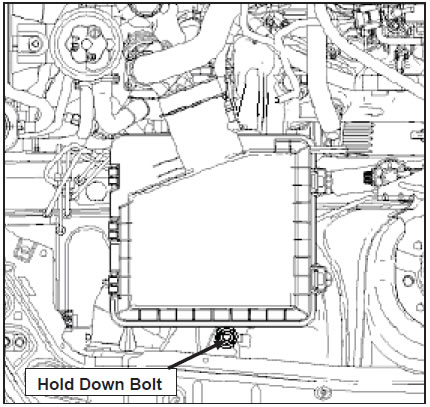
5. With a 10mm socket wrench, remove the airbox hold down bolt and set aside. This bolt will be reused later. Firmly grasp the airbox and pull up to remove it from the vehicle. Remove the two grommets from the bottom of the airbox. These will be re-used.
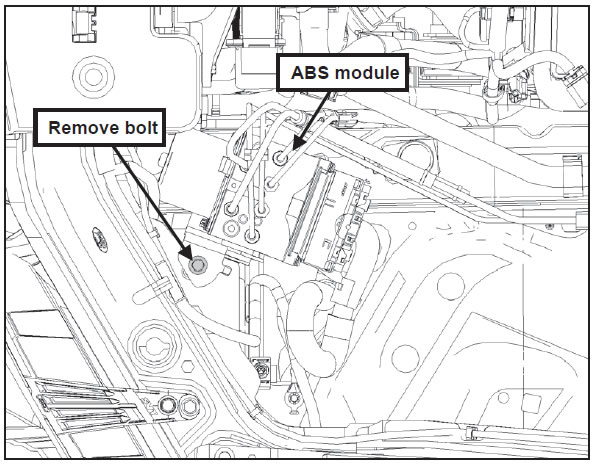
6. Locate the ABS module bracket and remove the bolt shown below. This bolt will be re-used later.
SECTION B - ASSEMBLY
The following section will guide you through the final installation of the kit into the vehicle.
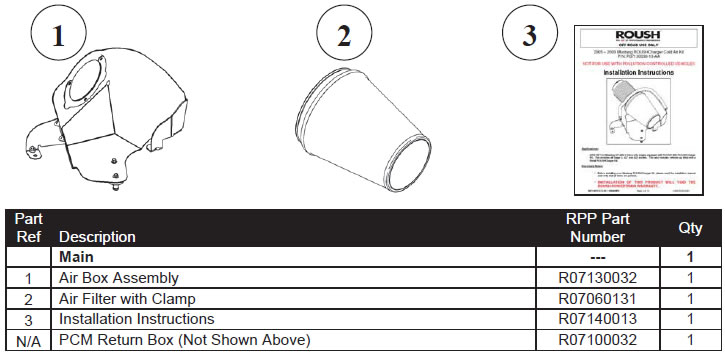
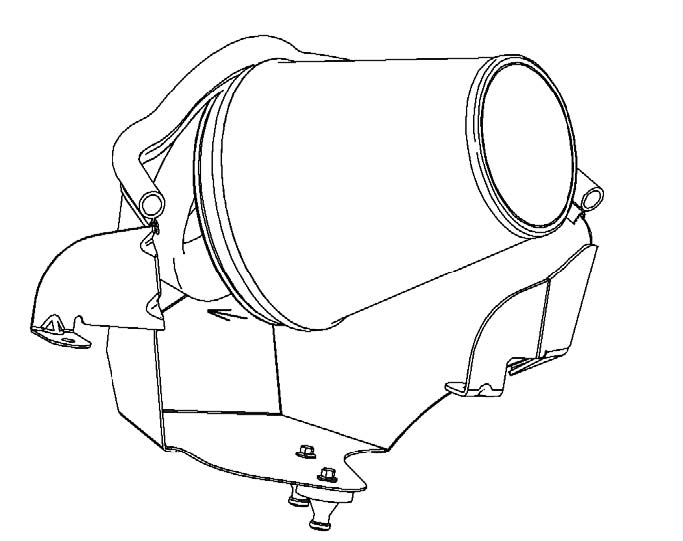
1. Install the Seal (R07130026) onto the Airbox Assembly (R07130032). Make sure the Seal is fully seated.
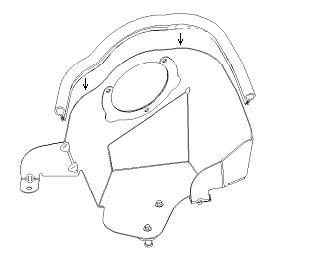
2. Install the Bellmouth (R07130019) onto the Airbox Assembly using the (3) ¼-20 x 1/2" Button Head Screws (R18020056). Torque screws to 8 Nm. The Bellmouth should face the inside of the Airbox Assembly.
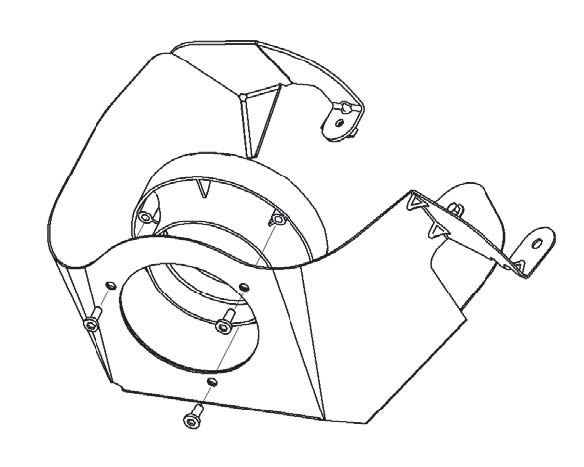
3. Install the Air Filter with Clamp (R07060131) onto the Bellmouth. Hook the Air Filter Flange on the top of the Bellmouth and push down. Torque the Worm Drive Clamp to 3 Nm. Note: The Air Filter is pre-oiled and does not need to be oiled at this time.
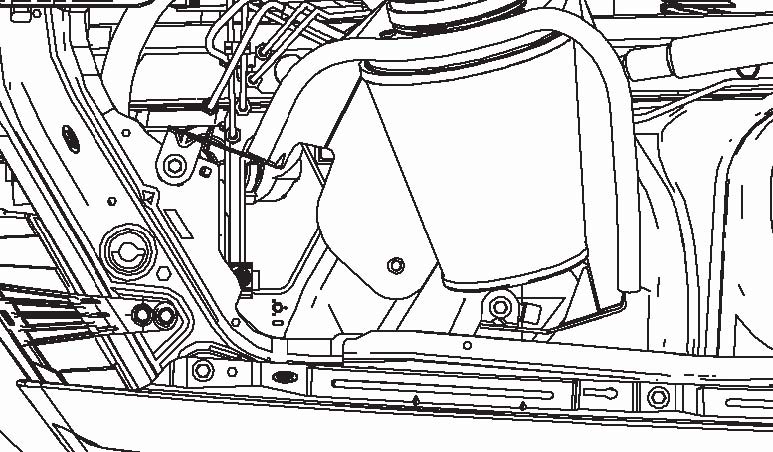
4. Install the Rubber Grommets (previously removed from the factory airbox) into the holes located beneath the Airbox, rearward of the ABS module in the inner fender well.
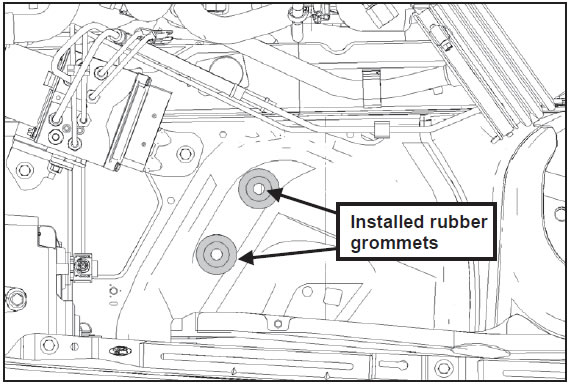
5. Lower the complete Airbox Assembly into the vehicle using the two pegs as guides into the Rubber Grommets. Push down on the Airbox Assembly to seat the bottom pegs into the Rubber Grommets. Use the take-off Airbox bolt and ABS bracket bolt to secure the Airbox in the vehicle. Torque the (Airbox) M6 Bolt to 10 Nm, and the (ABS) M8 Bolt to 25 Nm.
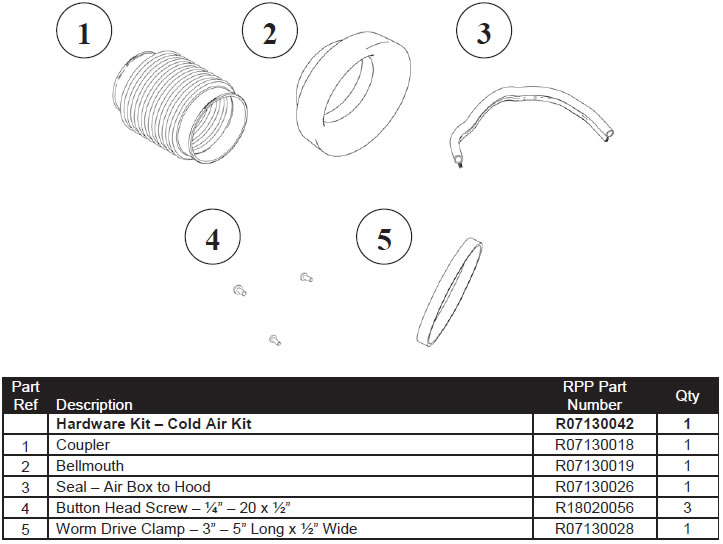
6. Loosely re-install the stock worm drive clamp (previously removed from the take-off coupler) onto the small end (with the flat) of the new Coupler (R07130018). Loosely install the new Worm Drive Clamp (R07130028) onto the large end of new Coupler.
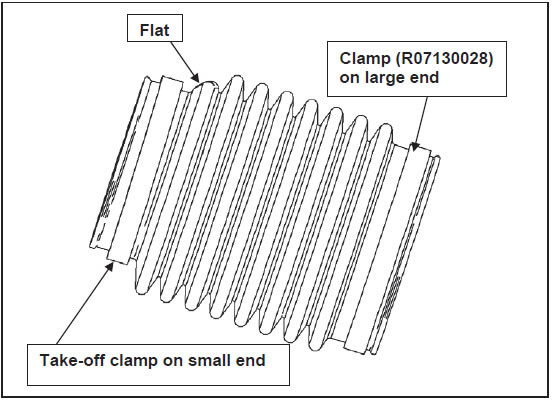
7. Install the small end of the coupler over the clean air tube. Make sure the flat section of the coupler is facing toward the alternator for maximum clearance to alternator pulley.
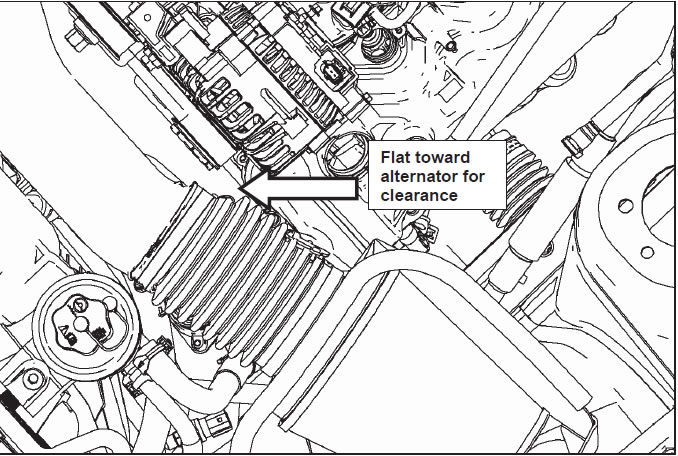
8. Install the large end of the coupler over the bellmouth. Rotate clamps so that they have clearance to the alternator and other components. Torque both Worm Drive Clamps to 3 Nm.
9. Re-install the re-programmed PCM.
10. Reinstall the battery connections by first connecting the positive cable then the negative cable to the battery.
11. Close the hood gently and check for clearance to the Cold Air Kit Seal. If installed properly the Airbox Seal should begin to touch the hood blanket as the hood is closed. If a lot of force is required to close the hood, verify that the Airbox is seated properly in the Grommets and at the fastener locations.
Congratulations!!! You have completed the installation of the ROUSH Performance Products, Stage 3 Cold Air Induction Kit. It is recommended that you save all parts removed from your vehicle during the installation of this kit.

