 FREE 1 to 3-Day Delivery on Orders $149+ Details
How to Install Stainless Works Turbo Chambered Cat-Back Exhaust w/ X-Pipe (05-09 GT w/ Long Tube Headers) on your Ford Mustang
1. Remove the factory exhaust system starting at the rear of car. It may be necessary to have the exhaust system at full droop to aid in removal and reinstallation.
2. If connecting to a stock H-pipe or an aftermarket system that is the same diameter as the stock system, use the supplied 2 ½” to 3” adapters and install into rear of factory H-pipe. If connecting to Stainless Works headers, these adapters are not used.
3. Install X-pipe and 2 clamps over adapters.
4. Install front over axle pipes and 2 clamps.
5. Install over axle to muffler inlet pipes and 2 clamps.
6. Slide muffler inlet pipes into mufflers with 2 clamps on each muffler (4 total)
7. Position muffler in place, and slide muffler inlet pipe onto the over axle pipes. Insert the hangers which are welded to the mufflers in factory hanger mounts. The front muffler hangers will need to be unbolted from the frame to allow them to be first slid onto the hanger pins on the mufflers and then rebolted to the frame.
8. Starting at front of exhaust, adjust pipes to ensure adequate clearance to floor and surrounding areas. Once the system is fitted properly, we recommend breaking the system apart and cutting (4) ¼” to ½” deep notches into the expanded pipes, and de-burring thoroughly. These notches will allow the pipes to compress when the clamps are tightened. Also apply a film of red high temp RTV at each joint to aid in sealing.
9. Reinstall the exhaust system and adjust pipes for adequate clearance. Tighten clamps as you work toward the rear of the car.
10. The following pertains to the overaxle assembly requiring adjustment of the passenger side pipes:
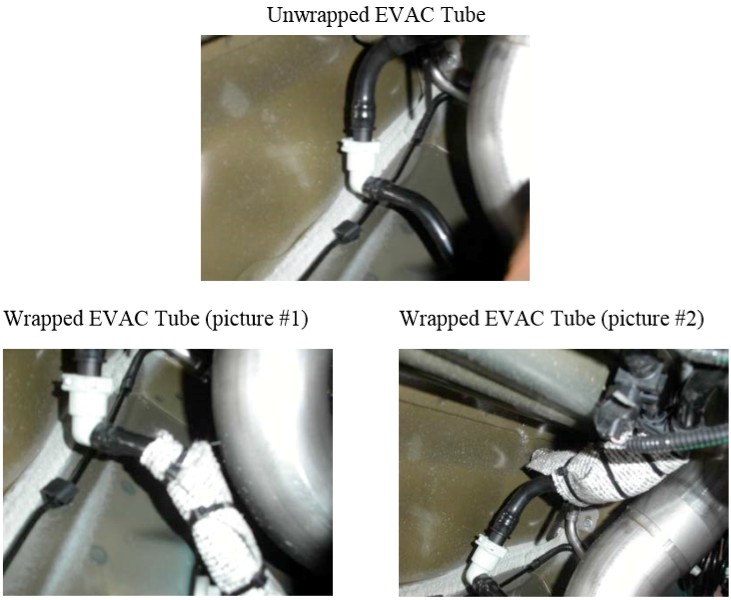
Place the two pieces of supplied Koolmat wrap around the EVAC tube at the top of the passenger side over axle using three supplied zip ties on each. This will provide extra assurance that the EVAC tube will not melt. Adjust tailpipe so there is a min of ½” clearance between the wrapped EVAC tubes and the over axle. See before and after pictures below:
11. Tighten overaxles and mufflers, reinstalled the hanger brackets.
12. Install tips and clamps making sure to have clearance around the tip between the tip and valence.
13. Start car outside and warm up thoroughly. It will be normal for the exhaust system to smoke for approximately 5-10 minutes. The smoke is due to lubrication used in the manufacturing process and the vehicle should be allowed to run outside.
14. Let the vehicle cool thoroughly and re-tighten all clamps.
