 FREE 1 to 3-Day Delivery on Orders $149+ Details
How to Install Steeda Adjustable Rear Toe Links on your Mustang
Installation Time
4 hours
Tools Required
- 7mm socket
- 10mm socket
- Small flathead screwdriver
- T20 torx bit or driver
- Vise grips
- C-clamp
- 3/32” Allen wrench, 2mm also
1. Raise the car. If you are using a jack and jack stands, be sure to
properly chock the front tires.
2. Remove the rear tire for easier access to the toe link assembly.
Note: There are two methods to installing Steeda’s adjustable toe
links. Option 1 sets the toe link at factory length, so an alignment
is not immediately necessary. Option 2 gives the most
adjustability, but an alignment needs to be completed as soon as
possible.
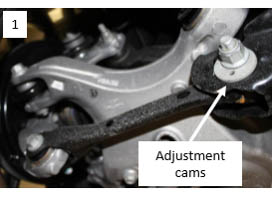
Figure 1
3. Locate the adjustments cams for the toe links, as show in figure 1.
Mark a spot on the cam washers, and a corresponding spot on the
subframe, so the cams can be placed back into the same position
when re-installing, not necessary if using option 2.
4. Remove the 2 bolts, securing the toe link to the knuckle and sub
frame.
5. Option 1: Measure center to center of the factory toe link and
record. Note: There could be a slight variation from one side to the
other, so be sure to work with one side at a time, or record which
side you are working on. It is also helpful to lay the original toe link
down next to the Steeda toe link to get their lengths close. The jam
nuts can be tightened easier once the toe links are installed.
6. Install the Steeda adjustable toe link, in the same orientation as the
stock link. Install so the gusset is facing downward at the knuckle
end. Start both bolts by hand. Place the provided 14mm lock nut
onto the factory bolt installed in the knuckle end of the toe link.
7. Place the stock cam washers and bolt into the subframe mount, and
position the cam in the same position that was marked in step 3.
8. Option 2: (Suggested) Using Steeda’s lockout plates, install them so
the hole is located towards the center of the car. Using the supplied
14mm bolts and locking nuts, install lockout plates on both sides (2
per side) mounted all the way to the inside of the sub frame. See
figure 3. If this option is used, approximately ¼” of length will need
to be added to the toe links.
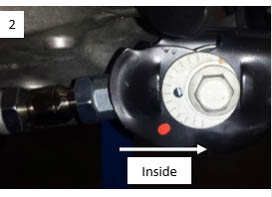
Figure 2
9. Torque both toe link bolts to 129 ft-lbs.
10. Repeat steps 2-8 for opposite side.
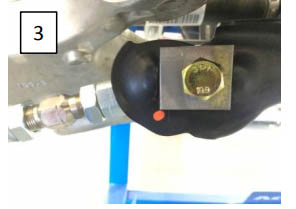
Figure 3
11. Once complete, check all fasteners and apply blue lock tight to the
jam nuts and lower the car safely. It is recommended to have the
car aligned at a certified alignment facility, and a must if the cams
have been positioned or replaced for maximum adjustment. It’s
also important to check adjustable suspension components
frequently.
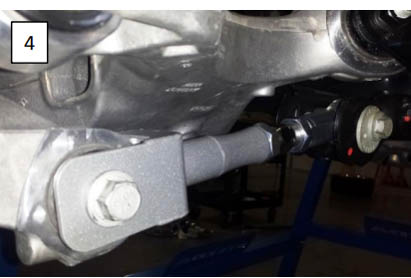
Figure 4
Patent Pending
Copyright: Steeda Autosports Inc. 555- 4120 6/15/2015
