 FREE 1 to 3-Day Delivery on Orders $149+ Details
How to Install Steeda Adjustable Rear Ride Height Kit (15-17 GT, EcoBoost, V6) on your Ford Mustang
Tools Required
- Jack
- Jack stands
- TorqueWrench
- 12mm drill bit and drill
- 15mm wrench
- 18mm socket
- 15mm socket
- 19mm wrench
- 22mm socket

Shop Parts in this Guide

REMOVING THE REAR SHOCK
1. Secure the vehicle on a lift or support it on jack stands.
2. Remove the rear wheels; a 22mm socket fits the factory lug nuts.
3. Disconnect the brake line bracket from the body.
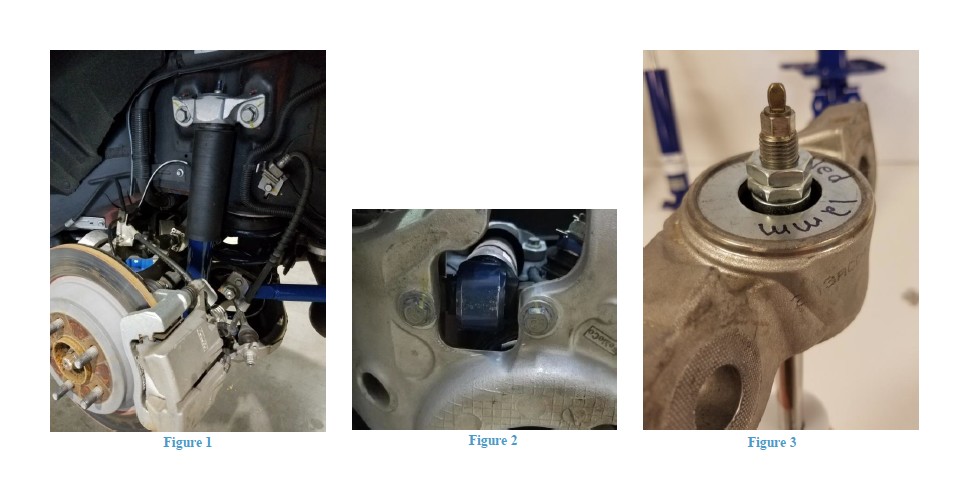
4. Using an 18mm socket for the upper damper mount, remove the two bolts which hold the damper to the chassis. Next remove the two bolts located at the base of the damper using a 15mm socket; access to these bolts is gained underneath the factory control arm.
5. Once both the upper and lower bolts are removed, pull the stock damper assembly from the car.
6. Using a 15mm wrench and a 6mm wrench, remove the factory damper shaft nut and pull the factory damper mount, dust boot and bump stop off the assembly.
7. In order to fit the Steeda damper shafts you will need to drill the factory damper mount shaft hole from 10 mm to 12 mm. 8. Assemble the Steeda Pro Action shock by first placing the nylon washer over the shaft. Then slide the Steeda bump stop(s) and factory dust boot over top of this shaft. NOTE: Make sure the dust boot is seated into the groove on the taller bump stop. Steeda recommends using only the taller bump stop. If the only the taller bump stop is used, use the provided o-ring below it to keep it in place.
8. Re-install the now drilled stock damper mount and then install the provided spacer, and both jam nuts onto the damper shaft in that order. Before tightening the second jam nut down take a 19mm wrench and tighten the first jam nut down snugly. NOTE: Steeda recommends our Billet Rear Shock Mount (555-8152) to work with this kit.
9. Using a 19mm and 9mm wrench toque the first jam nut to 22ft-lbs. DO NOT use an impact gun to tighten this nut!
10. Tighten the second jam nut down snugly on top of the first jam nut.
***Proceed to removing and installing the rear spring***
REMOVING/INSTALLING THE REAR SPRING
11. Be sure the rear sub frame is supported by a jack, so that you can lower it independently of the car.
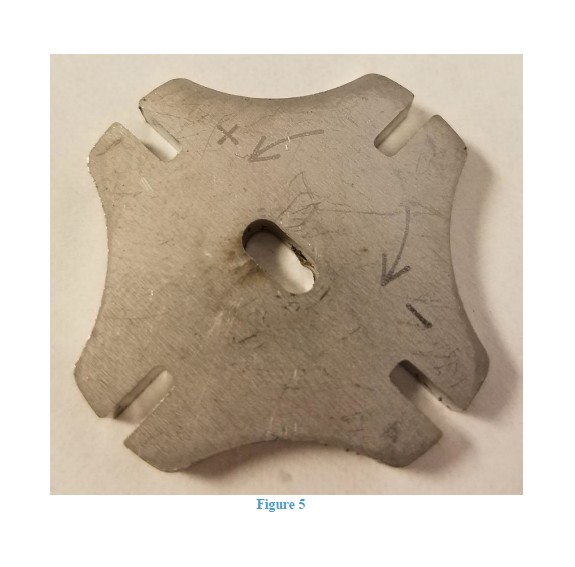
12. Remove the 2 main bolts securing the sub frame to the car. There is a bracket on the front of the sub frame, that has 2 more bolts that will also have to be removed.
13. Once the sub frame bolts are removed, lower the sub frame until the spring is able to be removed. NOTE: The sway bar end link may need to be disconnected to gain the necessary drop.
11. Remove the stock spring.
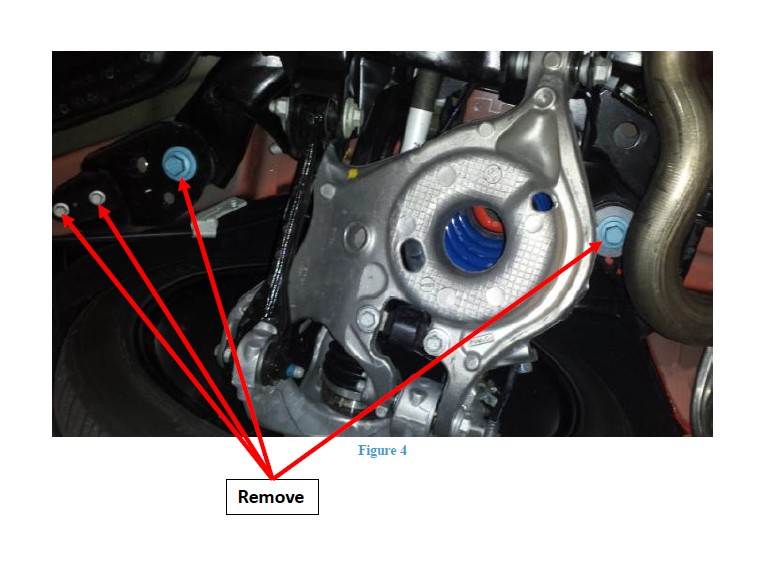
12. Install the Steeda spring adjuster on the chassis side where the factory rubber spring seat was.
13. Install the Steeda spring with the ground coils to the top, making sure the pigtails of the spring are correctly oriented into the lower control arm.
NOTE: Turning the adjuster all the way down will lower your vehicle 3/4” and turning the adjuster all the way up will lower 1-1/2”. After setting the ride height, tighten the set screw.
17. Raise the sub frame back up, and install and tighten the sub frame bolts.
INSTALLING THE REAR SHOCK
18. Install the Steeda Pro Action shock.
NOTE: Blue loctite is recommended for the bolts holding the shock in place.
19. Reconnect the brake line bracket to the body and reinstall any other part that was removed during this process.
20. Torque all bolts to factory torque specs.
SETTINGS AND ADJUSTMENTS:
In order to adjust the rebound damping in the vehicle, either in the front or the rear of the car, you will notice an adjustable valve is located at the top of the strut shaft. Simply place the adjustment knob inside the slot of the provided adjustment tool. Turning the tool counter clockwise will stiffen the rebound force provided by the damper and turning the tool clockwise will soften the rebound force provided by the damper. Steeda recommends setting the dampers all the way clockwise (full soft position), then back one full turn counter clockwise as a starting position.
When it comes to on track tuning of these dampers to improve the handling characteristics remember that dampers do not affect steady state cornering performance.
Vehicle turn in: If the car is understeering during turn in slowly remove rebound dampening to the rear of the car until you get to your desired level. If the car is oversteering during vehicle turn in, slowly add rebound dampening to the rear of the car until you reach your desired level.
Corner exit: If the car is understeering at corner exit, slowly add rebound damping to the front of the vehicle until you reach your desired level. If the car is oversteering during corner exit, slowly remove damping in the front of the vehicle until you reach your desired level.
