FREE 1 to 3-Day Delivery on Orders $149+ Details
How to Install Steeda IRS Subframe Bushing Support System on your Mustang
Installation Time
1 hours
Tools Required
- 13mm socket and ratchet
- 21mm socket
- 5/32 Allen wrench
Installation
1.Lift and support the car, by the chassis on a vehicle lift, or on jack stands. Do not place the jack stands underneath the rear sub frame.
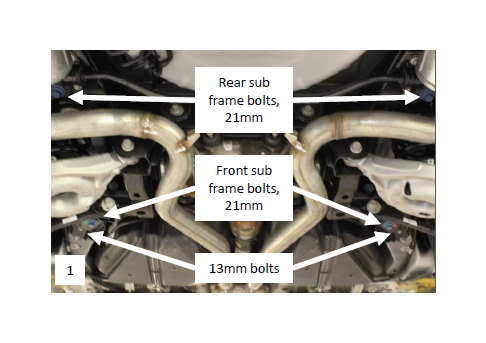
2.Locate the main sub frame bolts. They are blue, hex head 21mm head bolts. Note: In some cases, it might be beneficial to work on one side of the sub frame at a time, so that an alignment is not completely necessary. Loosen, but do not remove both rear sub frame bolts. The bolts need to be loosened enough, to give the sub frame about one inch of drop in the rear. See figure 1.
3.Loosen, but do not remove, the 4-13mm head bolts (2 on each side), securing the front sub frame mount to the chassis.
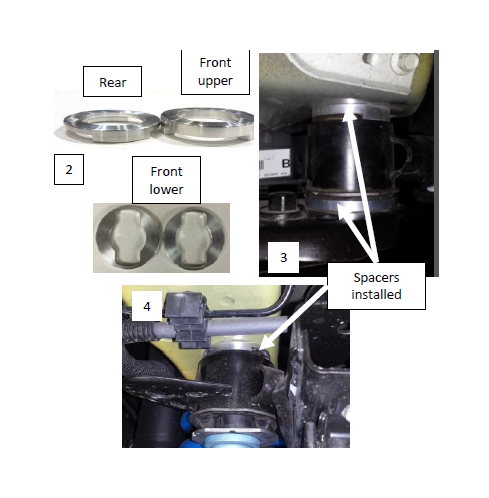
4.Remove the 2 front main sub frame bolts. Install the thicker spacers above the front sub frame bushings. See figure 2. The flat side of the spacers will go up, so that when tightened, they contact the body. The steps on the spacers, will sit on top of the oem sub frame bushing. Install both front spacers at the same time. See figure 3 for correct orientation.
5.Install the front lower spacers below the front sub frame bushings, above the front sub frame mount support bracket. See figure 2 & 3.
6.Once the spacers are installed and oriented correctly, torque the front 21mm sub frame bolts to 129ft-lbs. Torque the 4-13mm bolts to 41ft-lbs.
7.Remove the 2 rear sub frame bolts. Install the thinner spacers above the rear sub frame bushings. See figure 2. The flat side of the spacers will go up, so that when tightened, they contact the body. The steps on the spacers, will sit on top of the oem sub frame bushing. Install both rear spacers at the same time. See figure 3 & 4 for correct orientation.
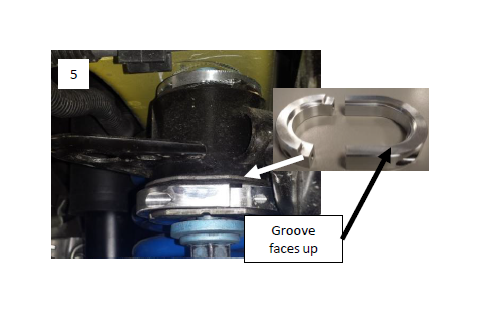
8.Bushing reinforcement collar installation: While the rear main bolts are still loose, install the bushing reinforcement collars on both rear sub frame mounts. The short side of the collar, goes in towards the center of the car. Install that side first, then install the longer side of the collar. Note: Lubrication may be needed to slide the collar into place. The groove in the collar faces up, towards the body of the car. Once the collar is placed into position, install the provided bolts, and tighten until the collars are flush with each other. Make sure the two halves are lined up correctly before threading the bolts in, to keep from cross threading. See figure 5.
9.Once all of the spacers are installed and oriented correctly, torque the rear sub frame bolts to 129ft-lbs.
10.Verify all hardware has been tightened, and lower the car. Enjoy!
Note: An alignment may not be necessary, but is recommended.