 FREE 1 to 3-Day Delivery on Orders $149+ Details
How to Install Steeda Tri-Ax Short Throw Shifter Lever - MT-82 on your Mustang
Installation Time
1 hours
Tools Required
- 7mm socket
- 10mm socket
- Small flathead screwdriver
- T20 torx bit or driver
- Vise grips
- C-clamp
- 3/32” Allen wrench, 2mm also
Disassembly: Cockpit
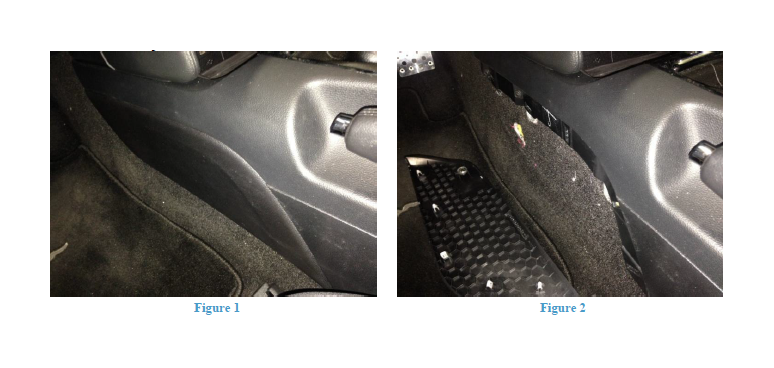
1. Remove the panel covers in the front of the center console by hand. These are held in by clips and magnets. Figures 1 & 2.
2. Using a 7mm socket remove the 4 bolts (2 on each side) which hold the center console to the transmission tunnel. These are located in the front of the center console under the access panels which were just removed.
3. Unscrew and remove the shift knob.
4. Lift the parking brake to its highest position.
5. To remove the center console, open the center console storage area and use a flathead screwdriver to detach the plastic center console cover as shown. This is held in by 4 clips in the storage area, 2 clips on the side of the console and 2 clips on the front of the console. Once the 4 clips in the center console storage area are released simply lift up to detach the 2 clips located on the side of the center console. Figures 3 & 4
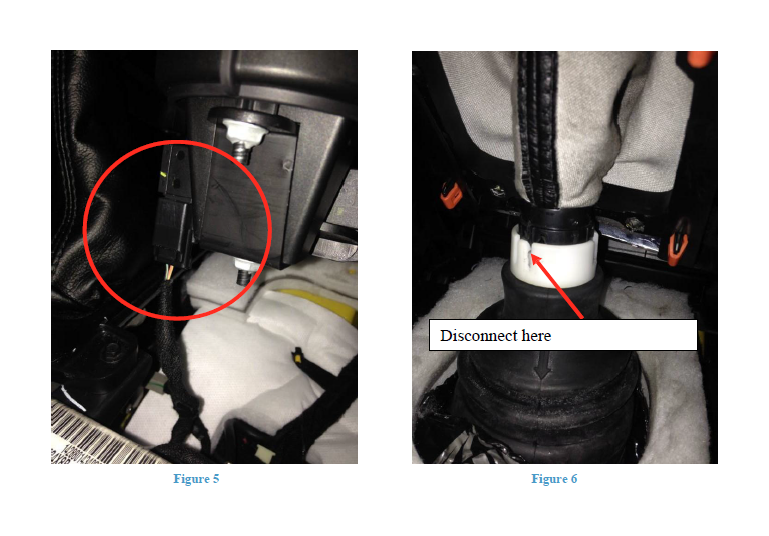
6. Detach the electrical connector or connectors underneath the cup holder and continue lifting up on the console, to disconnect it completely. Figure 5

7. Use a flathead screwdriver to release the three prongs holding the shift boot to the reverse lockout collar and then remove the center console completely. Figures 6
8. Remove the stock sound deadening material.
9. Remove the factory rubber boot.
10. Next you must press the factory roll pin out of the stock shifter. Put the shift lever into 1st or 2nd gear, then put a socket on one side of the roll pin and use a C-clamp to press out the pin into the socket. The pin will not press all the way out, use vice grips to pull the roll pin out the remaining distance.
11. Once the pin is removed, remove the spring from the shifter and place the shifter in neutral.
12. Use the T20 Torx bit to remove the factory reverse lockout collar.
Disassembly: Underbody
1. Jack up your car and place it on jack stands, if possible use of a lift is suggested.
2. Located on the front of the shifter base, slide the rubber boot for the shift linkage off of the shifter base.
3. Remove the 2-10mm nuts, securing the shifter base bushing bracket to the chassis.
4. Remove the 4-10mm head bolts, securing the shifter base lower cap to the shifter base. Be careful not to damage the gasket, located between the lower cap and the shifter base. It will be reused.
Note: When this lower cap is removed, the shift linkage will be able to fall out of the shifter base. Be sure not to lose the bushing that is installed on the end of the shift linkage. Set the linkage aside while continuing with the removal.
5. Remove the 2-10mm head bolts, securing the shift lever bushing support plate into the shifter base.
6. Remove the shift lever, by pulling down on the lever from underneath the car.
Installation of the Steeda short throw shifter
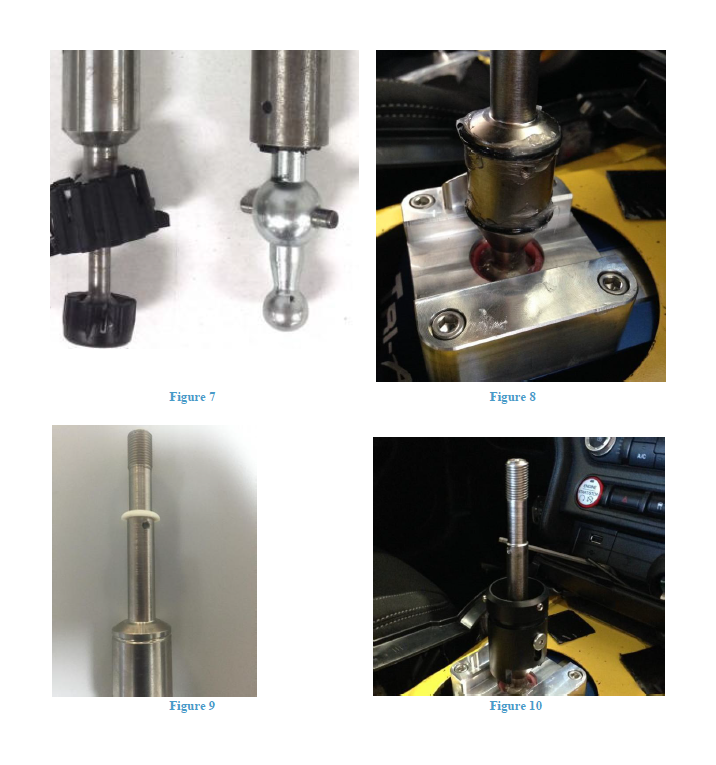
7. Remove both bushing cups from the factory shift lever. Transfer both of the bushing cups over to the Steeda shift lever. Be sure to transfer the large bushing cup first, and then the small one. Make sure the bushing is greased. Figure 7
8. Install the Steeda short throw shifter in reverse order of removal of the factory shift lever.
Note: When installing the Steeda lever make sure that the threaded hole which will hold the reverse lockout collar in place is facing the passenger side of the vehicle as shown in figures 8 and 10.
9. Install and tighten the shift lever bushing support plate to 84 in-lbs. Be sure when re-installing the shift linkage, to place both linkage bushings in their correct spots, and that the lower shift lever bushing is firmly seated into the shift linkage cup. Re-install the shifter base gasket, making sure to place it back over the dowel on the rear of the shifter base. Re-install the shifter base lower cap to the shifter base, and tighten the 4-10mm head bolts to 84 in-lbs.
10. Re-install the shifter base bushing and mount, and tighten the nuts to 97 in-lbs.
11. From inside the car now, install the two supplied O-rings into the grooves on the shift lever. Figure 8
12. Lubricate around the entire perimeter of both O-rings making sure to get grease on both the top and bottom faces of the O-rings as shown. Figure 8
13. Install the Steeda reverse lockout collar orienting it so that the vertical slot aligns with the Torx bolt hole. Do not apply Loctite to this bolt as it could prevent smooth operation of the reverse lockout collar. Try moving the reverse lockout up and down several times to make sure the o-rings are fully seated properly. Figure 10
14. Slide the spring over the shaft of the shift lever and install the two supplied 4mm x 0.8 set screws into the shift lever. Make sure both are spaced equally in the threaded holes and tighten them down firmly. Then install the factory white plastic anti rattle washer on top of the set screws. Figure 9
15. Install the white factory sound deadening material around the shifter.
16. Re-install the rubber shift boot, by sliding it over the reverse collar, and placing it around the edges of the shifter base.
16. Re-install the center console cover and make sure you plug back in the electrical connector or connectors under the cup holders (the car will not start if you don’t). This will simply snap back into place.
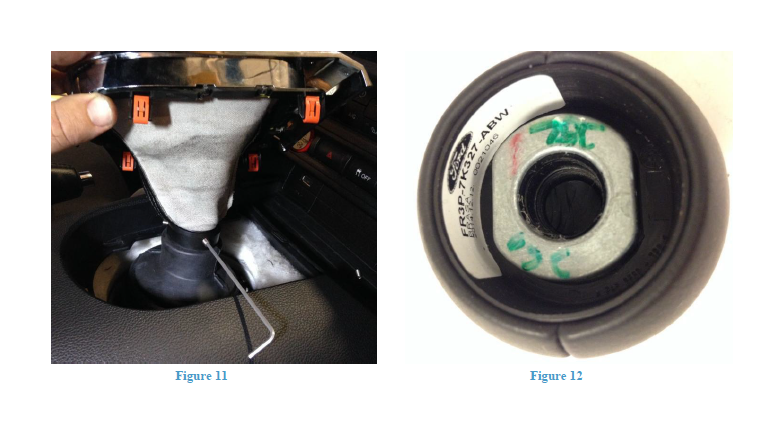
17. Install factory shifter boot and pull up reverse collar into the top of the Steeda reverse lockout. Then tighten the 3 set screws evenly to hold the factory collar in place. Make sure they are evenly and snug, this piece is Delrin and can strip easily. Figure 11.
18. Install the supplied rubber chord into the threaded hole in the factory shift knob. Figure 12.
19. Screw the factory shift knob down onto the Steeda lever. Tighten down firmly until your shift knob aligns with the reverse lockout collar properly. Make sure not to over tighten this piece as the plastic shift pattern emblem in the stock knob can pop out.
20. Re-install the four bolts which hold the front of the center console to the transmission tunnel using the 7mm socket.
21. Snap the front center console access panels back into place.
TIPS:
If there is an issue with the function of the reverse lockout, please check to make sure the o-rings are installed correctly and seated properly into the groves. Also make sure the shift knob is not on too tight and allows for the complete movement of the reverse lockout up and down. Lastly check that the 3 setscrew are tightened evenly on the reverse lockout.
