 FREE 1 to 3-Day Delivery on Orders $149+ Details
How to Install an ST Suspension Anti Sway Bar - Front your 1979-1993 5.0L, Excludes 93 Cobra Mustang
Installation Time
1 hours
Tools Required
- Properly rated floor jack, support stands, and wheel chocks
- Combination wrench:
- Ratcheting socket wrench and sockets:
- Safety Glasses
Congratulations! You were selective enough to choose a SUSPENSION TECHNIQUES PRODUCT. We have spent many hours developing our line of products so that you will receive maximum performance with minimum difficulty during installation.
Note: Confirm that all of the hardware listed in the parts list is in the kit. Do not begin installation if any part is missing. Read the instructions thoroughly before beginning this installation.
Warning: DO NOT work under a vehicle supported by only a jack. Place support stands securely under the vehicle in the manufacturer’s specified locations unless otherwise instructed.
Warning: DO NOT drive vehicle until all work has been completed and checked. Torque all hardware to values specified.
Reminder: Proper use of safety equipment and eye/face/hand protection is absolutely necessary when using these tools to perform procedures!
Note: It is very helpful to have an assistant available during installation.
KIT INSTALLATION
1. Open the hardware kit and remove all of the contents. Refer to the part list (Page 2) to verify that all parts are present.
2. Park the vehicle on a smooth, level concrete or seasoned asphalt surface and activate the parking brake. Block the REAR wheels of the vehicle with appropriate wheel chocks; making sure the vehicle’s transmission is in 1st gear (manual) or “Park” (automatic).
3. Using a properly rated floor jack, lift the front wheels of the vehicle off the ground. Place support stands, rated for the vehicle’s weight, and in the factory specified locations. Refer to the vehicle Owner’s Manual. Prior to lowering the vehicle onto the stands, make sure the supports will securely contact the chassis.
4. It is very important that the vehicle is properly supported during this installation to prevent personal injury and chassis damage! Make sure that the supports stands are properly placed prior to performing the following procedures. We DO NOT RECOMMEND using wheel ramps while performing this installation.
5. Remove the end links from the ends of the original equipment Anti-Sway Bar (ASB) and lower the control arm.
6. Note the position of the original equipment Anti-Sway Bar (ASB) to ease in the installation of your new Suspension Techniques Anti-Sway Bar (ASB). Locate and remove the bushing brackets from the center portion of the Anti-Sway Bar. Remove the original equipment Anti-Sway Bar (ASB).
7. Thoroughly lubricate the inside of your new polyurethane bushing using high-grade lithium or silicone based grease with molybdenum disulfide (Moly). Place the lubricated bushing on your new Suspension Techniques Anti-Sway Bar. Refer to the original equipment Anti-Sway Bar (ASB) for the proper location of the bushing.
8. Position your new Anti-Sway Bar in the factory location and fasten the center portion using the factory brackets and bolts.
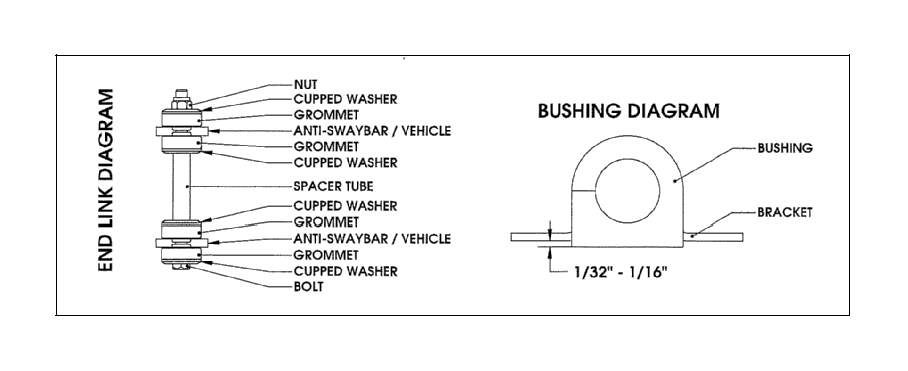
9. With the center portion properly fastened, connect the ends of the Anti-Sway Bar (ASB) to the control arms as shown in the diagram. The longer bolts and spacers are for the vehicles that are remaining at stock height. Lowered vehicles use the shorter bolts and spacers. Tighten the end links until the grommets bulge slightly, but do not crush them.
10. Check that all components and fasteners have been properly installed, tightened and torqued.
11. Check brake hoses, steering and other components for any possible interference.
12. Lift the vehicle and remove the support stands. Carefully lower the vehicle to the ground.
13. Immediately test-drive the vehicle in a remote location so that you can become accustomed to the revised driving characteristics and handling. Be aware that the vehicle will handle substantially different now that it has been modified.
14. Installation is complete. Check all of the hardware and re-torque at intervals for the first 10, 100, 1000 miles.

! SUSPENSION TECHNIQUE INSTALLATION TIPS
LUBRICATION
Pre-lubricating the inside of the bushing before it’s installed is important because the lubrication will greatly reduce noise and it will increase bushing life. Suspension Techniques recommends you use Molybdenum disulfide. This will help protect the inside surface of the bushing and will last longer than most types of grease. Thoroughly lubricate the inside of the bushing with this grease.
BUSHING INSTALLATION
Make sure an amount of 1/32” to1/16” of the bushing is showing when you install it onto the bracket. See the diagram above. If the bushing is showing more than 1/16” than use a sander or a sheet of coarse grit sand paper to shave it down to the proper height. In most applications when installing the new bushings on your Suspension Techniques Anti-Sway Bar (ASB) you may refer to your original equipment Anti-Sway Bar (ASB) to locate the proper location.
END LINK INSTALLATION
It is not required that you use lubricant on the end links since there is no rotational movement. The Suspension Techniques end links are comprise of grommets, cupped washers, a spacer tube, bolt, and lock nut, these assembled components create the end link. See END LINK DIAGRAM above.
