 FREE 1 to 3-Day Delivery on Orders $149+ Details
How to Install a TCI StreetFighter Ratchet Shifter on your Automatic 2005-2009 Mustang V6 or GT
Installation
Step 1:Apply parking brake and put shifter inDposition. Disconnect Battery. Raise vehicle andsecurewith jack stands.
Step 2:Remove shifter bezel by gently prying up on both sides and ends. Do NOT pry up in one area!
Step 3:After removing bezel, remove top of center
console by removing the screws at the rear, under arm rest. (Figure 1) Gently work top section of console up and over the parking brake arm.
Step 4:Remove the center console side panels located under dash at the front of console by pulling straight back and up.
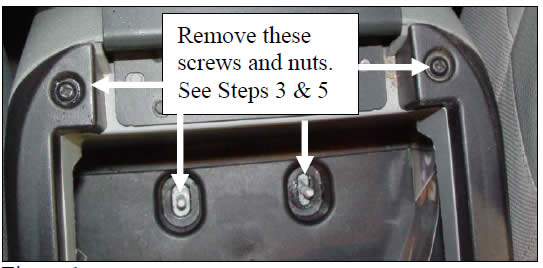
Step 5:Remove the (2) screws at front of console and the (2) nuts inside the storage area under armrest and remove center console. (Figure 1)NOTE:If there is a power outlet in the rear of the console, be sure to unplug it before removing it!
Step 6:Unplug the plug from the rear passenger side of the factory shifter and pull to the side.
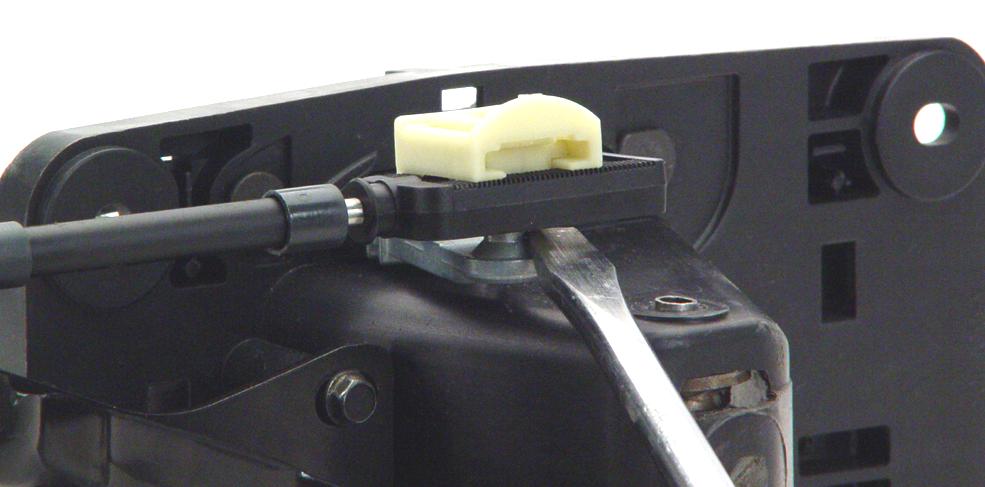
Step 7:Use a flat screwdriver to pry the connector off of the shift arm. (Figure 2)
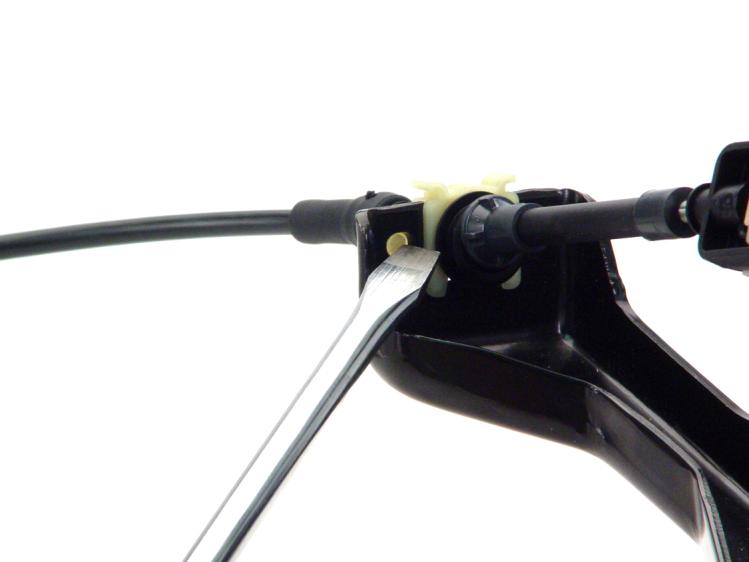
Step 8:Using a small screwdriver press the locking ear on the shifter cable locking clip where it protrudes thru the cable support arm and at the same time push up on the small tab shown in figure 3. Do the same to the tab on the upper ear while pulling the cable outward toward the drivers’ side. If top tab does not release, then use
the screwdriver to gently pry out of arm.
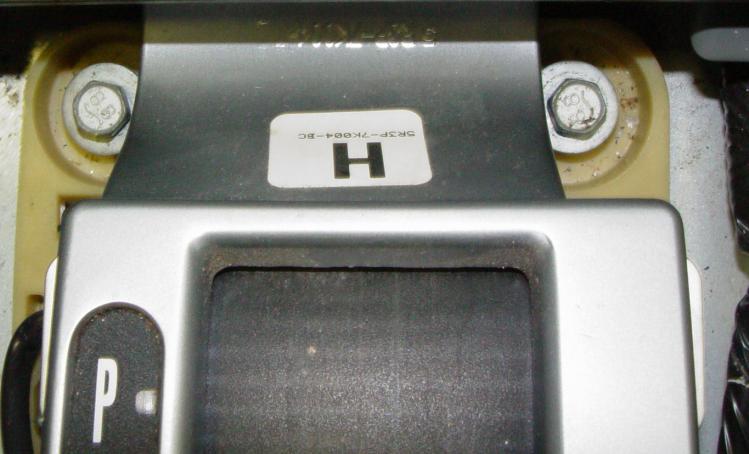
Step 9:From inside remove the (2) bolts and (2) screws that are holding the shifter down and remove shifter. (Figure 4).
Step 10:Install new TCI shifter and carefully snug the (2) bolts and (2) nuts down in a criss-cross manner.THIS IS VERY IMPORTANT!!Using a torque wrench, torque them down evenly in a criss-cross pattern to80 inch pounds. If this is not done correctly, damagewilloccur to shifter! Plug the harness into the shifter.
Step 11:Re-connect battery and turn ignition on and make sure the shift indicator on shifter lights up and cycle thru the gears and put in theD position. From under vehicle, reattach cable to cable support arm.
Step 12:Align shifter cable end with the shift arm and attach.Be careful and do not cycle cable thru the gears when attaching to shifter!If this happens, you must put transmission back into the D (4thgear) position! You can verify this by pulling the shift lever to the rear position. This isPARK. Then push arm forward 3 clicks. You should feel the detents in the transmission when you do this.
Step 13:Put shifter inPARKposition and re-connect battery cables. Turn ignition key on and make sure the shift indicator illuminates an amber color in Park only. Now you can lower vehicle.
Step 14:Re-install center console pieces and shifter bezel in reverse order of removal in Steps 2-5.
Shifter Operation:
To move shifter fromPARKposition, you must have
the ignition on and depress the brake pedal. Then pull back on Park Release Arm and while holding arm, pull back on shifter handle and put in desired position. To ratchet the shifter, put it inDposition and pull handle back. You should feel it ratchet. You must ratchet back for each gear. You do not need to hold the Park
Release Arm while ratcheting the shifter. To put shifter back into Neutral, Reverse or Park, you must pull back on the Park Release Arm. To turn the Overdrive off, you must depress theO/Dbutton located above the
Park position. To ensure this is working properly, the
O/D light in the dash should illuminate O/D OFF.
Related Guides
-
Installation
-
Installation
-
Installation
