 FREE 1 to 3-Day Delivery on Orders $149+ Details
How to Install a Zex Nitrous Dual Outlet Purge Kit on Your 1979-2012 Mustang

Shop Parts in this Guide
Installation
Read this installation manual completely before attempting to install your Dual Outlet Purge Kit. Failure to do so may result in damage to your engine or vehicle and/or physical harm to yourself. ZEX™ is not responsible for damage or injuries caused by improper use of this purge kit.
Installation Instructions
1. For safety, disconnect the positive ( ) and negative (-) cables from the battery while installing the ZEX™ Dual Outlet Purge Kit.
2. Disconnect the -4AN main nitrous delivery line at the Nitrous Management Unit or solenoid inlet, depending on what type of nitrous system you have (Fig. A).
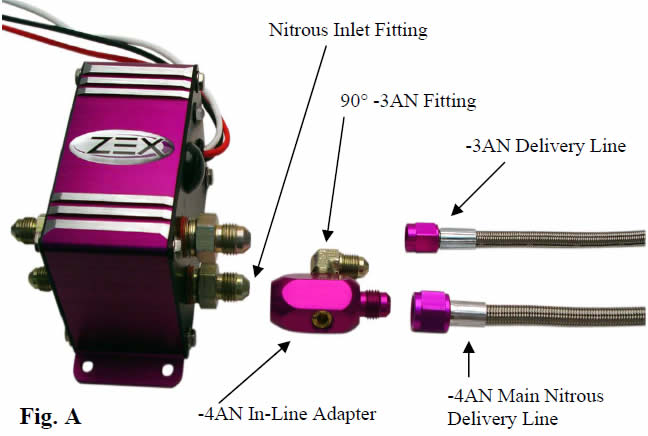
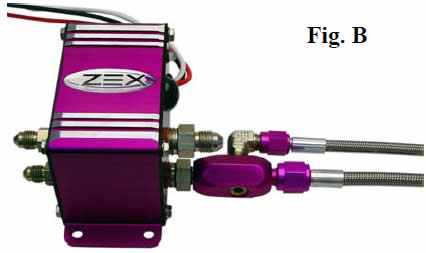
3. Attach and tighten the -4AN in-line adaptor to the NMU/nitrous solenoid inlet fitting. At this point, you may turn the inlet fitting with the in-line adapter tightened to it, clockwise, to achieve the desired inline adaptor position. The inlet fitting uses a pipe thread, so the additional turning in the clockwise direction should be kept to a minimum. Do not over tighten the inlet fitting (Fig. B).
4. Reconnect the main nitrous delivery line to the inlet of the -4AN in-line adaptor.
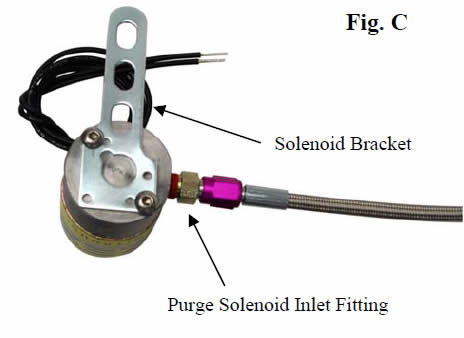
5. Attach one end of the 2 foot long –3AN delivery line to the adapter’s 90 deg. –3AN fitting and attach the other end to the purge solenoid’s inlet fitting (Fig. C).
6. Find an appropriate place for the solenoid bracket, keeping in mind that you will need to place it in an area that will allow you to route the two q3w in. hard-lines to your desired nitrous discharge areas. Attach the bracket using the two large sheet metal screws included with the kit. Fasten the purge solenoid to the bracket with the two enclosed Allen head screws (Fig. C).
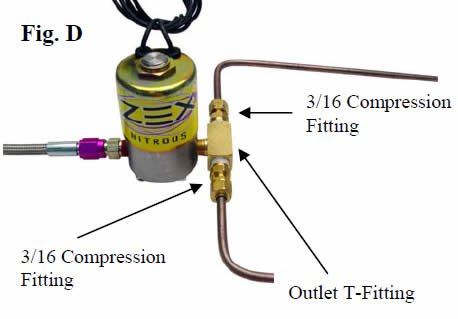
7. Install the two 3/16 compression fittings into the 1/8NPT outlets of the Outlet T-Fitting. Install the T-Fitting into the purge solenoid’s outlet (Fig. D).
8. Bend the hard-line to your specifications and then attach and tighten them to the two outlet compression fittings (Fig. D).
9. Use the enclosed tube clamps and small sheet metal screws to secure the discharge tubes in place.
10. Find an appropriate place inside the vehicle’s interior for the activation button and drill a 25/64-inch diameter hole.
11. Locate a 12 volt source wire and splice into it with the red t-tap electrical connector. Attach the.250 in. wide male electrical connector to a length of the supplied wire and connect it to the t-tap. Install the in-line fuse holder and fuse on this wire lead and run the remaining length of wire through the hole you have just drilled for the activation switch. On this end of the wire, crimp on one of the.187 wide female connectors.
12. Cut another length of wire and feed it through the same hole. Attach the end of this wire lead to one of the solenoid wires using a pair of male/female,.187 wide blade connectors. Attach a.187 wide female connector to the wire end sticking out from the hole. Pull back both wires out of the hole.
13. Attach.187 wide male electrical connectors to the ends of the push-button switch wires and insert the push-button switch through the mounting hole. Slide the push-button lock washer and lock nut over the wires and thread the nut onto the switch and tighten in place.
14. Connect the switch leads to the wire leads.
15. Locate the other solenoid wire and connect it to an appropriate ground.
16. Reconnect your battery’s positive and negative cables.
17. At this point, you should hear the purge solenoid click when the push-button is depressed. If you do not hear a click, re-inspect your wiring and re-test until proper operation is observed.
18. Open your nitrous bottle to pressurize the system’s delivery lines and inspect the purge lines for any signs of leakage. If no leakage is found, press the push-button switch a few times and observe the purge spray to verify correct operation.
19. Your installation is complete! Enjoy your ZEX™ Dual Outlet Purge Kit.
Related Guides
-
Installation
-
Installation
-
Installation

