 FREE 1 to 3-Day Delivery on Orders $149+ Details
How to Install a Zex Wet Injected Nitrous System on Your 1986-2004 Mustang GT
Installation
| Description | Qty. | Description | Qty. |
|---|---|---|---|
| Nitrous Management Unit | 1 | Red 18 Ga. Wire | 10 ft. |
| 10 lb. Nitrous Supply Bottle (unfilled) | 1 | Switch Cover | 1 |
| Bottle Clamp (Short) | 1 | 5/16-18x1” Bolt | 4 |
| Bottle Clamp (Long) | 1 | 5/16-18 Nut | 4 |
| Wet Nitrous Nozzle | 1 | 5/16 Flat Washer | 4 |
| 24” -3AN Braid Hose Assembly | 2 | 8x1/2” Drill Tip/Phil Head | 6 |
| 36” -4AN Hose Assembly | 1 | 1/8-28 NPT RH Tap | 1 |
| 16’ -4AN Braid Hose Assembly | 1 | 90 Degree -4AN Swivel Adapter | 1 |
| .026 N20 Fuel Jet | 1 | 1/8 NPT Bulkhead Fitting | 1 |
| .030 N20 Fuel Jet | 1 | Bulkhead Fitting Nut | 1 |
| .034 N20 Fuel Jet | 1 | Fuel Tee Fitting | 1 |
| .040 N20 Fuel Jet | 1 | -4AN to 1/8 NPT 90 Degree Fitting | 1 |
| .046 N20 Fuel Jet | 1 | -4AN to 1/16 NPT Fitting | 1 |
| .054 N20 Fuel Jet | 1 | Schrader Valve Core Tool | 1 |
| Arming Switch Wire Harness | 1 | Hose Clamp | 2 |
What is nitrous oxide?Nitrous oxide is a gas composed of two nitrogen atoms bonded to one oxygen atom. The scientific abbreviation for one nitrous oxide molecule is N2Owhere N is nitrogen, and O is oxygen. This is where the familiar phrase 'N-2-O' comes from when people talk about nitrous oxide.
How nitrous oxide makes power:Nitrous oxide kits make large amounts of horsepower by allowing an engine to burn more fuel. Burning more fuel creates higher cylinder pressures that will push down on the pistons with greater force. When the nitrous is injected into an engine and the initial combustion takes place, it creates enough heat to separate the nitrous oxide into its two components, nitrogen and oxygen. Once separated, the additional oxygen is then free to react with additional fuel.
To run nitrous successfully and safely, you have to introduce precise amounts of additional fuel with precise amounts of nitrous oxide.All of the extra oxygen provided by the nitrous oxide must have fuel with which to react or you may damage your engine severely. When the amount of nitrous and the amount of supplemental fuel are controlledprecisely, your engine can safely and reliably generate exceptional power increases.
Wet & dry nitrous systems:The ZEX™ Part #82023 nitrous system is a "wet" nitrous system. A "wet" nitrous system gets it¹s fuel from a connection to the engine’s fuel system. This fuel supply is then directly fed to the nitrous nozzle. This differs from a "dry" nitrous system in that a "dry" nitrous system injects the enrichment fuel through the engine’s own fuel injectors, not the nitrous nozzle.
Why our nitrous system is better:The ZEX™ nitrous system is easy to install, with all the major components, such as the solenoids, electronic throttle switch, etc. contained in an attractive enclosure. It’s a "plug and play" installation. Most current nitrous systems use a throttle arm actuated micro-switch. That means you have to fabricate a mounting bracket for the switch and adjust the placement of the switch to make it work right. Our nitrous kit utilizes a wire that you simply clip on the throttle position sensor (TPS) output voltage wire. The TPS voltage signal is sent to a programmable electronic switch that engages and disengages the system at a predetermined voltage threshold. Above the threshold determined for wide open throttle, the system activates. Below the voltage threshold, it remains dormant. The ZEX™ nitrous system’s injector nozzle is the most advanced nozzle design in the industry. The primary features are the fuel transfer tube and the self-adjusting properties of the design. The fuel transfer tube injects the enrichment fuel directly into the outer edge of the nitrous plume. This high-speed nitrous gas shears the fuel away from the tube, atomizing it to a much finer degree than other nozzle designs. This ensures perfect fuel distribution from cylinder to cylinder, especially with the higher horsepower settings. The fuel transfer tube also allows for a self-adjusting characteristic. Because a vacuum is created as the nitrous gas is being sprayed across the tube opening, as bottle pressure goes up, so does the gas speed and vacuum level. This increase in vacuum "pulls" more fuel out of the nozzle and ensures your tune-up will not go lean. This feature ensures much safer tune-ups.
How the ZEX™ Nitrous Oxide System works:The ZEX™ Part #82023 nitrous oxide injection system begins with a connection to a supply cylinder containing pressurized liquid nitrous oxide and a connection to the engine’s fuel system. These connections go to the Nitrous Management Unit, which houses the nitrous and fuel solenoids. These solenoids are normally closed, but are opened when the TPS switch senses that the nitrous system is armed and the engine is at wide-open throttle. Once these solenoids open, the nitrous and fuel are delivered to the nitrous nozzle via flexible delivery lines. The amount of nitrous and fuel that is injected through the nozzle is adjustable by means of metering jets installed in the nozzle itself. These metering jets allow for easy changes in horsepower settings.
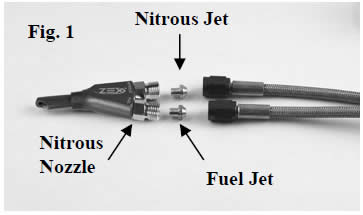
How to adjust power levels:The ZEX™ Nitrous kit is designed for multiple power levels. These levels are controlled by metering jets installed in the nozzle’s fuel and nitrous jet fittings. To change the power output, all you need to do is install the appropriate set of jets as shown inFig.1. The correct combination of jets is listed on the tune-up sheet on the back of this instruction manual.
Work safely.Always wear eye protection and gloves when working with lines or hoses that contain pressurized nitrous oxide or fuel. Never transport nitrous cylinders loose in a trunk or the back of a pick-up truck and especially NOT within a vehicle's interior whether the cylinder is full OR empty. Always disconnect the GROUND side of the battery when working on any electrical components.
Nitrous oxide won't fix problems you already have.Before you install your nitrous system, be sure your engine is in good mechanical condition. Intermittent wiring problems, etc., can lead to erratic system performance and possible engine damage.
Never defeat the operation of the safety relief disc in the nitrous cylinder's valve stem.It's required by law and is there for your safety. Never drill, machine, weld, deform, scratch, drop, or modify a nitrous oxide tank in ANY way whatsoever!
Never overfill nitrous cylinders.That little bit extra will put you and others at risk of injury. More often than not, when the cylinder warms up, the pressure goes above the limit of the safety relief disc and you lose all the nitrous you just paid for.
All the power comes from the fuel, not the nitrous.Nitrous oxide is simply a tool that allows you to adjust how much and how quickly the engine burns the fuel. If the fuel isn’t there, the power won't be either.
Avoid detonation at all times.Nitrous enhanced detonation is much more damaging than detonation that occurs when naturally-aspirated due to the increased amount of fuel available for releasing energy and the fact that more oxygen is present.
If, when your system is activated, something doesn't feel or sound right, BACKOFF.If you hear any detonation or feel anything unusual, get off the throttle. It's a lot easier to check everything over than it is to just try to drive through it and damage expensive parts. Don't activate or have the system activated when you hit the stock rev limiter. The stock rev limiter is a fuel cut-off. If you cut fuel while you're injecting nitrous, you’re instantly very lean. This momentary lean condition has the potential of causing engine damage.
Engine modifications:The ZEX™ Nitrous System, out of the box, is designed to work as a bolt-on kit for stock or mildly modified vehicles. Mildly modified vehicles would include header upgrades, exhaust upgrades, air filter kits, etc. If major engine modifications have been performed, a fuel pump upgrade will be required for safe nitrous system operation. Major engine modifications would include turbochargers, superchargers, aftermarket cylinder heads, head porting, camshafts, intake manifolds, etc. Failure to upgrade the fuel system when using nitrous in these highly modified applications may cause serious lean conditions that can result in severe engine damage.
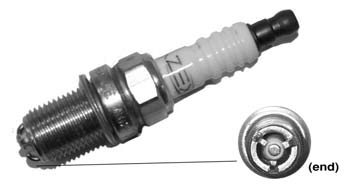
Spark plugs & nitrous performance:Quite often, a factory type wide-gap projected nose plug will produce a detonation condition after a few seconds of nitrous use. The detonation is not due to the heat range, it occurs because the ground strap of the spark plug becomes a glow plug instead of a spark plug. The ground strap is too long to dissipate the extra heat produced by a nitrous accelerated burn. The correct solution is to replace the plugs with units that have shorter ground straps. By doing this, you will shorten the heat path from the ground strap to the plug base. ZEX™ Hyperformance™ spark plugs are recommended for many applications.
Reading plugs & tuning the ZEX™ Nitrous Kit:If you've installed larger injectors or have otherwise increased the capacity of your fuel system, you need to read the following. Because the real limit of how much power you make with the ZEX™ Nitrous Kit is your car's fuel system, you need to tune up to that limit. Start with the lowest power level nitrous jet and corresponding fuel metering jet. Make a full throttle pass at the drag strip and read the plugs. Not enough nitrous/too much fuel results in a sooty, black plug coloration. This coloration means that the fuel mixture is too rich. Too much nitrous will exhibit high heat in the form of a bluish or rainbow-like coloring on the plug's metal surfaces. This means your engine is about to, or is, detonating. If this is observed, ensure the proper spark plugs are installed, reduce nitrous/increase fuel delivery, and ensure the proper grade of fuel is being used. When you check the spark plugs, check EVERY plug.
Don't just spot check the easiest plug you can access.Due to the wide possibility of air/fuel mixture variations, you need to check every single plug for signs of detonation or other problems. If your plugs indicate too much fuel, trim the fuel delivery down by installing a larger metering jet. If you are too lean/not enough fuel, you need to install a larger metering jet to increase fuel delivery.
Engine computer modifications:Unless provisions for retarding the ignition timing have been made, ensure that an aftermarket "chip" or a modified engine computer are NOT installed when using the ZEX™ Nitrous System. Most modified "chips" use advanced ignition curves. These advanced ignition curves can lead to detonation and severe engine damage when used with nitrous. If nitrous will be used with an aftermarket” chip", it will be necessary to install an ignition system that allows the timing to be retarded when the nitrous system is in use. In these instances, it is recommended that you retard the ignition timing 2 degrees for every 50 hp worth of nitrous used.
Clear nitrous lines after use.Close bottle valve. Use purge kit to relieve line pressure or open line fitting to let nitrous bleed off.
Installation Instructions:
1. Decide where to put everything.Before you start to install the various components of this kit, you¹ll have to discover the best positions for each component by trial fitment and careful measurement. First, the nitrous lines that attach the nitrous nozzle to the nitrous management unit are about 2-feet long. That means where you choose to install the nitrous nozzle in the intake tube decides, within a 2-foot radius, where you have to mount the Nitrous Management Unit.
You’ll also have to decide where to install the arming switch and nitrous bottle. The arming switch should be installed in a position convenient to the driver, but not in an area that increases the chance of unintentionally arming the system. You’ll have to run a wire through the firewall to the Nitrous Management Unit. Do it just like you would run a lead for your stereo system. In fact, if you have one installed, you can probably run the arming lead through the same grommet. If not, try to use a wire loom hole that is grommeted. To help decide where you’ll mount the nitrous supply bottle, check the following section for technical restrictions on bottle mounting locations and positions.
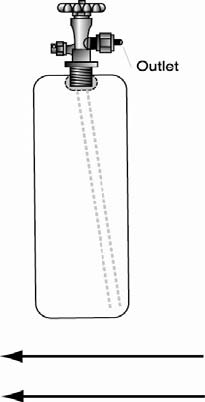
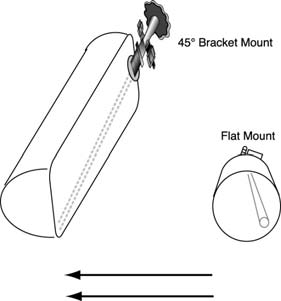
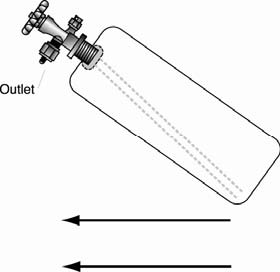
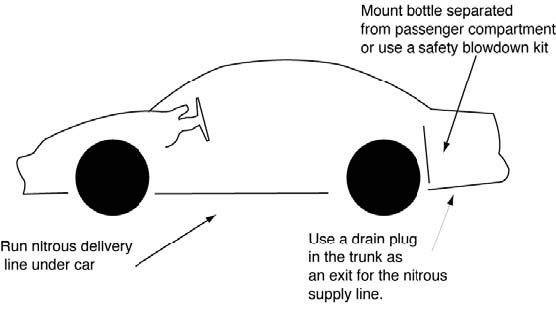
2. Mount nitrous supply bottle.Mount the nitrous supply bottle so that it is separated from the passenger cabin. Fastback style cars that do not have separate trunk compartments have to be equipped with a safety blow down tube. Route the tube from the safety pressure relief cap to the exterior of the car, preferably under the car. Doing so will prevent your car from filling with a cloud of nitrous oxide should the safety pressure relief cap rupture. Index the pickup tube with bottle position. (Refer to Fig. 2, 3, and 4).ZEX™ nitrous bottles are designed with the bottom of the siphon tube at the bottom of the bottle towards the outlet. Always mount the bottle so that as your car accelerates, the liquid flows toward the pickup tube.
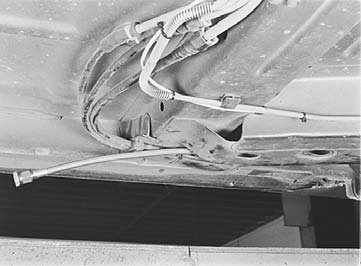
3. Mount nitrous delivery line under the car. When routing the nitrous delivery line under the car, try to use the subframe as a conduit (Fig. 5). This protects the line and eliminates the need to use clamps. The supplied cable ties work if you can run the line higher in the underbody so that it's safe from road level obstacles such as speed bumps. For the pro-race look, you can use steel loom clamps with rubber sheathing to fasten the line to the body.
4. Mount nitrous management unit.Keeping in mind the length restrictions of the nitrous nozzle feed line, mount the Nitrous Management Unit in a suitable location. It's a pretty rugged piece of equipment that is built to withstand under hood temperatures as well as exposure to weather. Connect the Nitrous Delivery line tithe Nitrous Management Unit.
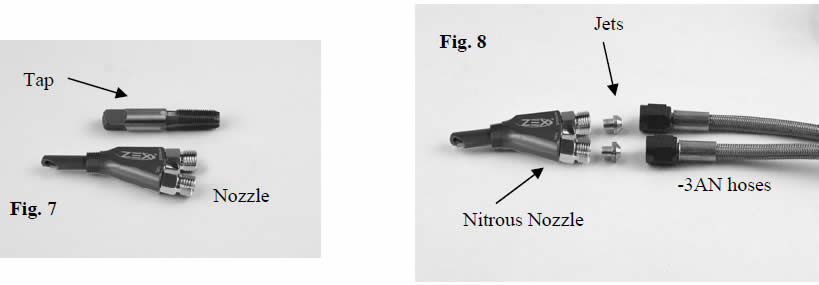
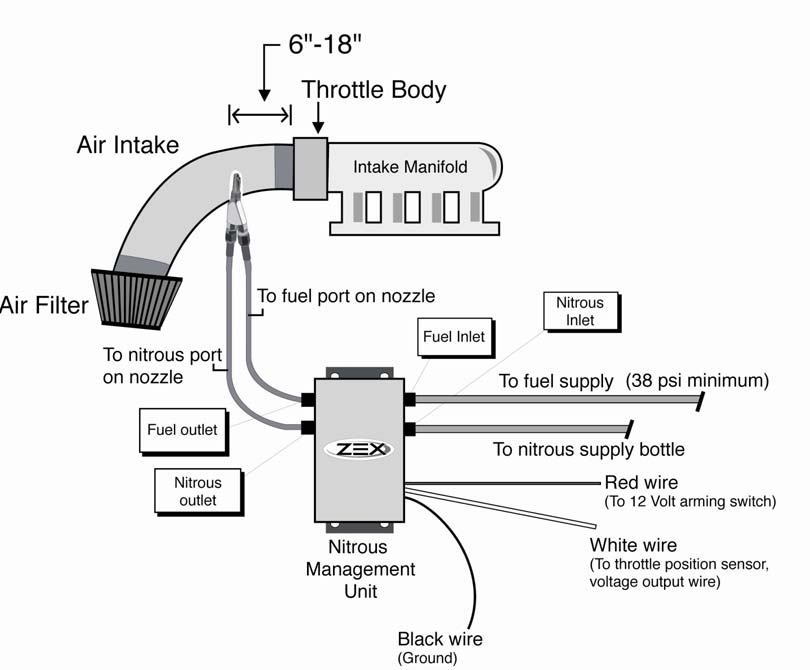
5. Install nitrous nozzle.Optimum nozzle placement is 6" to 18" from the throttle body. After you have determined where to mount the nitrous nozzle (Fig. 6) in the intake, make sure this location won't interfere with other components. If your engine uses a mass airflow sensor, mount the nozzle after the sensor, but before the throttle body. After you’ve found the spot, mark it and remove the air inlet duct from your engine. Drill a 9/16-inchmounting hole and install the bulk head fitting. Be sure to remove any drill shavings since they can severely damage your engine. Install the nitrous nozzle so that the spray is in the direction of airflow.
We've enclosed a tap (Fig. 7) should you need to mount the nozzle in a metal duct. Just drill a 11/32 inch hole where you want to mount the nozzle, tap the hole and install the nozzle. Once the nozzle is installed, place the appropriate tuning jets in the nozzle and tighten the 2-foot long, -3AN hoses to the nozzle jet fittings and the Nitrous Management Unit. (Fig. 8)
*Note: Ensure that the fuel connection on the Nitrous Management Unit is connected to the fuel jet fitting on the nitrous nozzle. Ensure the same for the nitrous connections.
6. Wire it.Once you have mounted the components, you are ready to wire the nitrous system. From the Nitrous Management Unit, find a suitable ground for the black wire and connect to it with the included crimp-on ground ring. Run the red wire through the firewall of the vehicle into the interior, behind the dashboard. Ensure that the red wire passes through a grommeted hole and not a bare metal hole. The wires insulation may be rubbed off if put through a non-grommeted hole. Run the white wire from the Nitrous Management Unit to the output voltage lead from the throttle position sensor. After those connections are completed, you need to install the arming switch wire harness assembly. Find a suitable place in the interior of the vehicle for the arming switch and drill a 1/2inch (.500) hole. Mount the switch and switch cover through this hole. Take the lead that the fuse assembly is attached to and find a suitable 12 volt accessory source of power under the dash. Use the T-tap electrical connector to splice into the 12 volt accessory wire and plug in the wire harness lead. The ZEX™ wet nitrous system draws 10 amps, ensure that the electrical circuit you are tapping into can handle the increased current load! Take the other lead from the arming switch and connect it to the red wire from the Nitrous Management Unit. As a reference for wire locations, use Fig. 9.
7. Program activation switch.Now that you have completed the wiring of your nitrous kit, the next step is to program the Activation Switch. To program the Activation Switch, turn the vehicle’s ignition on, but do not start the engine. Turn the nitrous arming switch to the “ON" position. Go to the Nitrous Management Unit (NMU) and locate the push-button switch. Depress, then release, the push- button switch. Observe the NMU’s Operation Light. At this point, it should be RED. This RED light informs you that the NMU’s Activation Switch is in learn mode. Return to the driver’s seat and depress the accelerator pedal to the floor, holding it there for ten seconds. Release the accelerator pedal and go back to the NMU and observe the Operation Light. At this point, the light should be flashing continuously from RED to GREEN to OFF. This is the NMU’s way of telling you that it has successfully learned the voltage curve of your engine’s throttle position sensor. Go back to the driver’s compartment and turn off the system’s arming switch, then turn it back on. Go back to the NMU and observe the Operation Light. It should be solid GREEN at this point. This informs you that the system is armed and ready to activate at wide-open throttle. Return to the driver’s seat and depress and release the accelerator pedal several times. You should hear the solenoids click each time you reach wide-open throttle. At this point, your Activation Switch is fully programmed and ready for use. If you ever transfer your nitrous system to another vehicle, perform this same procedure on the new vehicle to "relearn" the NMU’s Activation Switch.
8. Install fuel delivery line.The first step in installing the fuel delivery line is to determine where you would like to draw the fuel from. The ZEX™ nitrous kit comes with several fittings that will allow you to decide what the best solution is for your vehicle. If you would like to use the fuel tee fitting, ensure that the fuel line pressure has been relieved and then cut the rubber fuel line. Insert the barbed ends of the fuel tee into the rubber hose ends and secure with the provided hose clamps. Using an appropriate thread sealant, install the 90 deg. -4 AN fitting into the threaded hole. Another option is to remove the fuel rail and drill and tap it for the 90 deg. -4 AN fitting. Pick the spot you would like to drill and mark it. Using a 11/32 drill bit, drill the hole and then tap it with the supplied1/8 NPT tap. Using an appropriate thread sealant, install the 90 deg. -4 AN fitting into the threaded hole. Before installing the fuel rail back on the engine, ensure that all metal shavings have been cleaned out. There are also certain vehicles that have a -4ANSchrader valve fitting, factory attached to the fuel rail. Once the valve core is unscrewed and removed, with the tool provided in the ZEX kit, this factory fuel rail fitting makes for a very clean and easy hook-up for the nitrous system’s fuel supply hose. Finally, a 1/16NPT to -4AN fitting is also included for easy connection on vehicles that contain fuel rails with a 1/16 NPT access port. Once the fuel fitting has been sorted out and installed, connect the -4AN, 36” hose assembly to the fuel fitting and the fuel inlet on the Nitrous Management Unit. This completes the fuel connections for the ZEX™ #82021 Nitrous System.
9. Check fuel and nitrous pressure lines.To ensure that the system is ready to be used, a final check of the system’s fuel and nitrous pressure lines must be done. With the engine running, check your fuel lines for any signs of leakage. Correct any fuel leaks before proceding! Assuming the fuel lines check out, turn off your engine. Open the nitrous bottle valve. Listen carefully as your valve is opened. Inspect the nitrous pressure lines and fittings for leaks. Leaks in the nitrous supply line will be obvious because they will be covered in frost.
10. Check fuel quality & ignition timing.The last two things to check before enjoying your new ZEX™ Nitrous System are the fuel quality and ignition timing. First, ensure that premium fuel (92 R/M Octane or better) is in the fuel tank. Premium fuel will ensure maximum safety and detonation resistance for your engine. Second, make sure that your ignition timing is set correctly. All recommended ignition timing retard amounts, on the Tune-Up Sheet, are calculated off of the base, stock ignition setting. It is important to set this with a timing gun before you use your nitrous system for the first time. Do not assume that it is set properly. If the ignition timing is not set correctly, severe engine damage may occur. ZEX™ does not recommend the use of aftermarket “tuning” chips with our nitrous systems. These chips tend to advance ignition timing and can cause engine damaging detonation when used in conjunction with nitrous injection systems.
ZEX™ #82023 Nitrous System Tune-Up Sheet
| 75 hp | 100 hp | 125 hp | |
|---|---|---|---|
| Nitrous Jet | 40 | 46 | 54 |
| Fuel Jet | 26 | 30 | 34 |
| Ignition Retard (deg.) | 0 | 2 | 4 |
Note: Premium quality fuel, 92 R/M octane or better, is required at all times for safe operation of your ZEX™ Nitrous System.
Related Guides
-
Installation
-
Installation
-
Installation

