Talk to a Mustang Sales Tech
1-877-887-1105
M-F 8:30A-11P, Sat-Sun 8:30A-9P
$20K Sweeps! 10 Chances to Win! Enter Daily >

Airaid MXP Series Cold Air Intake with Red SynthaMax Dry Filter (18-23 Mustang GT)

Item 406799
AmericanMuscle no longer carries the Airaid MXP Series Cold Air Intake with Red SynthaMax Dry Filter (18-23 Mustang GT). Please check out 1986-1993 Foxbody Mustang Cold Air Intakes for an updated selection.
Verify parts fit and get product recommendations.
Mustang Sales Techs: Connect Now M-F 8:30A-11P, Sat-Sun 8:30A-9P
$0.00

    Product Videos

    Hey guys, Adam here with americanmuscle.com. And today we're taking a closer look at and installing the Airaid MXP Cold Air Intake with the SynthaMax Dry Filter for the 2018 and newer Mustang GT. Now if you're the owner of a newer 5.0 S550, you might be in the market for a new intake from the aftermarket world that's not only gonna boast a big horsepower and torque bump, but also give you a better breathing engine, overall better throttle response and acceleration, and a better sounding engine. Now this particular option from Airaid is gonna be one of the more premium options in the category. Airaid's got all the bells and whistles built into this kit and it does not require a tune. Big ups there. You don't have to worry about picking up a handheld tuner to go along with a custom tune just to get this thing to work right, but not gonna be the case here. I will say a custom tune would maximize its potential, but right out of the box, without the tune, Airaid's letting us know that this can bring upwards of about 17 horsepower and 12-foot-pounds of torque increases under the curve when using this on your 5.0. Pretty good gains if I do say so myself. This intake filter's a SynthaMax dry filter conical. I'll show you guys a little bit more detail on that later on but know that this is washable, reusable, doesn't require oiling so it's low maintenance, and it's definitely gonna increase your filtration as well as your cold air coming in.The tubing here is a cross-linked high-intensity molding. This heat shield is gonna be a rotomolded plastic with a built-in air duct, so it's pulling in the most cold air. And what you see up top is a see-through polycarbonate lens so you can check the condition of your filter while also getting this brushed aluminum trim which I just think looks really good under the hood. Matched up with the factory strut tower brace, not exactly the same thing, but I think those things complement each other pretty well, making this very attractive under the hood. Now, everything here you see comes in right around 400 bucks which, again, premium quality stuff warrants a premium quality price tag, but it's all well worth it, especially given it doesn't require a tune.Moving forward, guys, with the installation, expect one out of three wrenches on our difficulty meter. Anybody can tackle it in the driveway at home. You'll need very, very simple hand tools to get this done. No drilling. No modifications. None of that nonsense. Cold air intakes are one of the easiest things you can possibly do to not only your engine bay, but just your vehicle in general. I'm gonna show you guys every step of the process. Took me about an hour, maybe an hour and a half from start to finish. What do you say we get started?Tools used in this install include an impact gun, an extension, 1/4-inch and 3/8-inch ratchets, 7, 8, 10 and 15-millimeter deep sockets, 5/32 hex socket, T20 Torx bit, small Allen key and a flathead screwdriver.Now, guys, in order to uninstall our factory intake, we are gonna have to get our strut tower brace out of the way as well as our engine cover to get to our clamps at the throttle body. Now, if you don't have the strut tower brace, you can skip that step, go straight to the engine cover. We have ours, though, so we're gonna grab a 15 deep socket, remove the two nuts holding on the studs here and on the other side. Now, for this one, we are gonna have to pop our battery cover off. We're just gonna slide that out of the way. You also may have to take this plastic retainer clip off of your positive harness on the battery off of that stud. From here, you're gonna lift up, get that over the stud on both sides, feed it underneath that harness, and set this aside. Now, for your engine cover, you do have two nuts. A 10-millimeter in here and a 10 in here. We've got this one out of the way, so let me show you how to get that one. Grab an extension and a 10-millimeter socket, go in the engine bay here. You're gonna loosen that up. Now, it's hard to get the nut out itself, so once that's loose, you can really just pull up on the cover and the nut will stay in that hole. Perfect. Set it aside.All right. So at this point we're gonna do our MAF sensor and our hoses. MAF sensor, you're gonna pull back on the red locking tab, pinch and disconnect. For the hoses, you're just gonna push down on the tab on the side here and release. And then for your black hose, push in, pull up on your gray tab and disconnect. It's a little tough to get to depending on its orientation. Once you get that off. This is your gray tab there. To remove that, you're really just pushing in here and pulling back. Now, for your sound tube, we're gonna disconnect it with pliers, pinching this retaining clamp. Grab pliers, pinch that all the way closed and you're gonna pull back on your tubing and then release. Now, on the right side by your filter, you're gonna see a 10-millimeter bolt that's holding on your factory airbox. Let's get that out of the way. Next, grab a 7-millimeter socket. You're gonna loosen up the clamp holding your tubing to the throttle body. If you don't have a 7, you can also use a flathead screwdriver. Now, what I like to do is once it's loose, there's a little retaining tab there. Just twist that and this should disconnect. Now you should be able to pick your entire filter, intake tubing, and the air duct on the bottom all up in one piece.So we finally got our factory intake off of our 2018 GT behind me on the table next to our Airaid SynthaMax dry filter. I wanna take you through some of the similarities but mainly the differences between the two kits. Let's start with that star player, the filter. Now, I took apart the factory airbox to show you guys that factory filter. Now, this is a flat paper element drive filter which isn't washable, it isn't reusable, and really, it's pretty standard among factory vehicles coming off the line, but it's really not anything special in terms of increasing horsepower, increasing filtration capabilities. Upgrading to your aftermarket filter here like this Airaid one is gonna be a night and day difference. This is a conical dry filter, a SynthaMax dry filter, a patented technology by Airaid which is meant to help filter out down to two microns of particles coming through this cotton gauze filter. Now, it's a multi-layer cotton gauze that gets thicker as it goes in. It also has a diamond mesh outer layer, the wiring layer, to help filter things out and keep things sturdy. Now, this being a dry filter doesn't require as much maintenance as an oiled filter, but it is washable and it is reusable. So when it comes time for routine maintenance, you don't have to break the wallet out and pick up a new filter. All you gotta do is pop this guy out, use some pressurize air, you can clean the filter and throw it right back in. Now, if you were to pick up an oiled filter, oiled filters do capture particles the same way, except when you clean it, you'd have to re-oil it. So not gonna be the headache here.Moving on from there, you're also getting a cross-linked, high-intensity, polyethylene tubing which is gonna help streamline your air. It doesn't have any of the kinks that you see in your factory tubing and you're also getting a one-piece rotomolded heat shield. Now, this has a built-in air duct similar to the one that you see on your factory intake. The only difference is you don't have to pop this guy off to install it on your new one. Also, because it's a one-piece, it doesn't have any room for air leaks, pushing cold air out and letting heat in. So, not the worry when it comes to this heat shield. What it does have that's a little bit different than most of the other one-piece heat designs is it does have this removable lid. Now, the lid here is more of a window and it does come with this plexiglass cover. This will do a good job dissipating heat but it's more for appearance I'd say. So you're gonna install this right on the top of the window there to give you a brushed aluminum look under the hood which, of course, affects appearance but it also allows you to see right into your filter to check its condition. So you don't have to take everything apart to check it out, to see how dirty it is and when it's time for cleaning. So that gives you a little bit more ease of use. It also comes with silicone couplers that are gonna have an airtight seal and finally, a velocity stack to help speed up that airflow coming in, translating to a better breathing engine along with some horsepower and torque numbers. Finally, what we have to do to start assembling things here on the table is first off, we're gonna remove our factory MAF sensor from the side of our filter housing and toss that over to our tubing.What you're gonna do is grab a T20 Torx bit and remove the two factory screws holding on your MAF sensor. Once you get the screws out, slide the MAF sensor out, set it on the table and you can put your stock components aside. Next up, what you're gonna do is take the foam gasket, the MAF plate and your MAF sensor along with the hardware and install them together before putting them in your tubing. So step number one is you're gonna take your MAF sensor, take the plate and insert that into position, lining up the holes. From there, on the back, you're going to install your foam gasket. Now, what you wanna do is line up the cutouts so that the open holes are accessible. You're gonna take the 3M sticky back off and you're gonna push that through and stick it to the back of the plate. Again, you just wanna make sure that the holes are not being blocked by the foam. Put pressure on that. Make sure it sticks. Take the two screws included in the kit, they're small Allen screws, and you're gonna thread that into position, holding the MAF sensor on to the plate. Grab a small Allen key and tighten those down. Find the additional screws included in the kit. They're a longer 5/32 hex screws. And you're gonna use those to bolt this down to the tubing. We're gonna slide this into place, lining those screws up. Grab those screws along with the appropriate size washer and you're gonna install that through the hole, threading it on by hand on both sides and then grab your socket and tighten them down.Next up, you're gonna take your hose fittings. The larger one is gonna go on the front next to your MAF sensor. The smaller one's gonna go on the rear for your other vacuum line. Now, there are two different size grommets. The larger one's obviously gonna go with your larger fitting. The smaller one with your smaller fitting. We're gonna start by inserting that into the pre-drilled hole, the pre-cut hole in the tubing. It's a really tight squeeze but if you work your fingers all the way around it, you can definitely get it to fit in there. If you grab a small flathead, you can try to work it in there in the tight corner back here. Once you have that in place, you're just gonna take your hose fitting and insert that all the way down to the end. Do the same thing for the front.Next up, take your smaller silicone coupler. That's gonna go over the end that's gonna attach to your throttle body. Insert one of the smaller clamps over the end and get that inserted over the position on the tubing. Once that seats all the way down, grab a socket and tighten down this clamp. Now, if you don't have the appropriate size socket, looks like an 8-millimeter, you can use a flathead screwdriver as well. All right. Now, what I like to do is just take the exact same size clamp for the other end and just insert it over so we know we have that there for when we install it on car.Next up, take your ribbed coupler, the one that looks like this, and we're gonna insert that over the other end using one of the larger clamps. You wanna insert that until the tubing is in the middle where this lump is. That's where the two are gonna meet. Grab your socket and tighten it down. All right. Again, I'm just gonna insert this clamp over that end.Next up, you're gonna take your velocity stack along with the additional hex screws. You're gonna install that on the side of your heat shield with the large open hole. Now, there's pre-drilled holes all around, so you wanna line that up with the threaded holes on the back of the velocity stack. This is going to install from the inside. You don't want the open mouth on the outside. So you're gonna insert this in here, line up those holes, and insert the screws by hand, and then we'll tighten them down. Now that you have this loosely installed, grab your 5/32 hex socket and tighten them down. Perfect.Next up, we're gonna install our filter. Now, this you wanna insert a certain way. Find that chrome line in the filter itself and you're gonna face that downward so that it's legible. You're gonna insert your larger clamp. Keep that bolt head on the top though. You don't want that to fall down on the inside. You're gonna insert this in and attach it to the velocity stack and then tighten it down with your socket. All right. Once that's on there, grab your 8-millimeter and tighten it down. Now we can install our heat shield and filter assembly. You wanna make sure your factory grommet is still in the vehicle. If this is not, you can check your factory intake. It might be stuck on there. You can remove it and pop it right back into place. From here, make sure your sound tube is out of the way. We'll tackle that in just a little bit. Drop that air duct toward your front grille and line up the side with this open hole where you're gonna reinstall your factory 10-millimeter. Once that seats, grab that 10-millimeter, insert that back down here and tighten it down.Next up, grab your MAF harness extension included in the kit. We're relocating the MAF sensor for what was original here to now back here. So we need that extra room. What you're gonna do is just connect it to your factory harness, snap it in, drop the locking tab. The other end is gonna feed down here and connect to your MAF. Now you have the option to run it under the tubing but I find that to be a little bit tight, so I'm going to just do it right here across the top of the air duct. We're gonna leave that about here for now so it doesn't fall down deep, grab our tubing and install that. It's gonna go onto your velocity stack and then connect to your throttle body. Grab your 8-millimeter socket and tighten it down. And then tackle your throttle body. Now, we do have to delete our sound tube. In order to do that, you have a couple of options. You can take the plug included in the kit, follow this all the way back to the firewall and remove it from down there behind the engine bay which is going to be the more permanent solution. That way you can take it off, use the plug, plug that hole and you're good to go. Now if you don't wanna go all the way back there, you have a couple of different options but it may require you to pick up a separate plug. Instead of taking off one of these one-time-use clips to use the plug also included, you can remove this here band which is an 8-millimeter. That's what we're gonna do here because we are returning back the stock just for video purposes. So we're gonna remove from here, pop that out and plug this hole. Now, guys, the plug included in the kit will not work for this so you will have to pick up a separate one or you can go back to the firewall. Now you can connect your hose fittings. They'll snap right into place on those rubber grommets. All right. Top it off at your MAF sensor. Bring that extended harness around. Plug that in. You"ll hear a click. Drop the red locking tab.Next up, you wanna drop that polycarbonate sheet over the top here. You wanna make sure you're cleaning it, freeing it of all fingerprints and dirt and dust. Make sure it has a nice finish to it. Now you can drop off your brushed aluminum sheet. Line up the holes and bolt it down. Now we're just gonna install this by hand for right now and then we'll come back with our socket. Make sure you have a washer over each of the screws. All right. Now you can finish it off by wiping this down so it's free of fingerprints. Engine cover back on and then your strut tower brace. All right. Now you're good to go.Guys, that's gonna wrap up my review and install for the Airaid MXP Series Cold Air Intake with the SynthaMax Dry Filter for the '18 and newer 5.0. Now, if you're the owner of one of these S550s, you can get for yourself right here at americanmuscle.com.

    Product Information

    Features, Description, Reviews, Q&A, Specs & Installation

    Features

    • MXP-Series Cold Air Intake System
    • Improves Horsepower and Torque
    • Includes SynthaMax Dry Filter
    • Includes One-Piece Roto-Molded Air Box
    • High-Density Cross-Linked Polyethylene Construction
    • Medium-Level Installation
    • No Computer Re-Tune Required
    • Not CARB Certified, Thus Not Legal For Sale or Use in California
    • Lifetime Manufacturer’s Warranty
    • Fits the 2018-2023 Ford Mustang GT Models

    Description

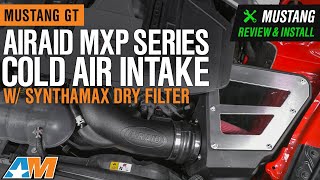
    Increase Power and Performance. As powerful as your 2018-2023 Ford Mustang GT, you will gain even more from it with the installation of the Airaid MXP-Series Cold Air Intake with SynthaMax Dry Filter. Your daily driver will become more like a dedicated track star due to air directed through a cross-linked, high-density polyethylene design using extensive computer modeling to maintain proper mass air flow readings and calibration. With increased air flow, your Mustang engine will gain 16.5 more horsepower and 11.9 more lb-ft of torque.

    Includes SynthaMax Dry Filter. The included SynthaMax dry filter is made to effectively filter out minuscule power robbing particulates while maintaining excellent air flow. Made from non-woven synthetic material, this air filter is reusable simply by washing and reoiling it.

    Includes One-Piece Roto-Molded Air Box. This AIRAID cold air intake features a custom CAD designed one-piece roto-molded air intake housing to increase airflow. It does so by addressing the shortcomings of the restrictive factory design.

    Not CARB Certified. This AIRAID MXP-Series cold air intake system is not CARB-certified at this time. Therefore, it is not legal for use in California or other states adopting California emission standards.

    Medium-Level Installation. With basic hand tools such as a wrench, socket, and Phillips screwdriver, you can install this cold air intake system within 2 hours.

    Lifetime Manufacturer’s Warranty. AIRAID guarantees that this cold air intake will not have any defects in materials and workmanship for the lifetime of your cold air intake. Some exclusions may apply; please see manufacturer’s warranty for details.

    Application. The AIRAID MXP-Series Cold Air Intake with SynthaMax Dry Filter is designed to fit the 2018-2023 Ford Mustang GT models. The included SynthaMax Dry Filter is red in color.

    CA Residents: WARNING: Cancer and Reproductive Harm - www.P65Warnings.ca.gov

    Installation & What's in the Box

    Installation Info

    What's in the Box

    • (2) #56 Hose Clamp
    • (1) 3.5 Inch x 2 Inch Coupler
    • (1) 3.8 Inch Vent Fitting
    • (1) 15/16 Inch X 3/8 Inch Grommet
    • (1) Intake Tube
    • (1) 3/16 Inch Gasket
    • (1) MAF Sensor Adapter
    • (2) 6 mm SS Flat Washer
    • (2) M6 x 1 x 16 mm SS Blot
    • (2) M4 x 0.7 x 8 mm SS Blot
    • (1) 1 Inch x 0.5 Inch Grommet
    • (1) 1/2 Inch Barb Vent Fitting
    • (2) #72 Hose Clamp
    • (1) 4.25 Inch x 3 Inch Hump Hose
    • (9) 1/4 20 Inch x 0.5 Inch Button Bolt
    • (9) 1/4 Inch x 5/8 Inch Washer
    • (1) MAF Plastic Adapter
    • (1) #104 9/16-Inch SS Clamp
    • (1) Filter
    • (1) LID 328 Blank Insert
    • (1) 45%-328 1 Kit Lid
    • (1) Airbox
    • (1) MAF Extension Harness
    • (1) 15/16 Inch x 3/4 Inch Carplug
    4.7

    Customer Reviews (500+)

      Questions & Answers

      10 More Questions

          Related Mustang Categories