FREE 1 to 3-Day Delivery on Orders $149+ Details
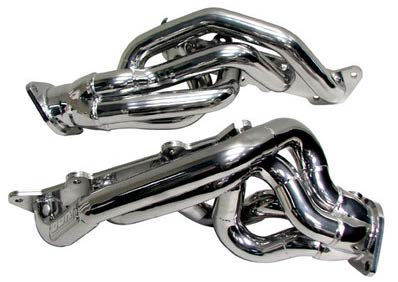
How to Install BBK Ceramic Tuned Length Shorty Headers on your Mustang

Shop Parts in this Guide
Follow these instructions carefully to ensure correct fitment and operation.
STEP 1.
- Disconnect the negative battery terminal. Lift the vehicle as high as possible.
STEP 2.
- From underneath the vehicle, unplug the rear oxygen sensors. Loosen the clamps at the front of the H-Pipe. Remove the catalytic converter nuts at the exhaust manifolds. Remove the converters.
STEP 3.
- Remove 4 nuts and bolts on the lower strut bar and remove the bar.
STEP 4.
- Remove the starter and unplug the front oxygen sensors at the back of the engine. Unbolt the steering shaft at the rack and pinion connection and place shaft up out of the way.
STEP 5 (Driver's Side)
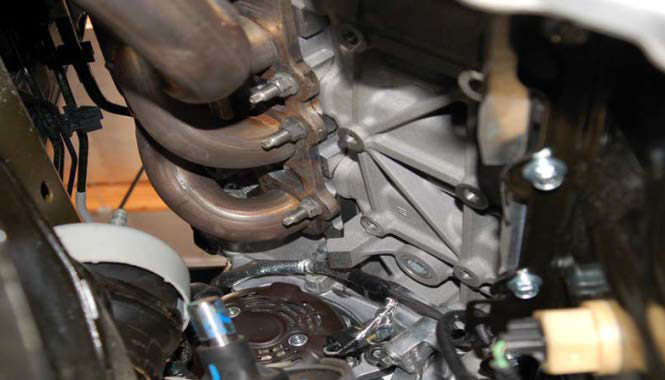
- Place a jacking device under the bell housing and remove the driver side motor mount from the engine. This will give you access to the bottom row of header nuts.
STEP 6.
- Remove the exhaust manifold nuts. Jack up the engine slightly to remove the stock exhaust manifold and gasket.
STEP 7.
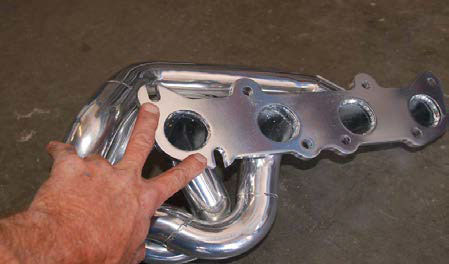
- Looking at the BBK Header Flange, remove the studs that correspond with the notches in the flange. On the driver side it’s the two most rear studs. Those will be replaced with supplied bolts. NOTE!!! There are 2 thread pitches supplied because the manufacturer changed the thread pitch used after 2011. You will have to compare the supplied bolt to the factory stud to confirm which thread pitch to use.
STEP 8.
- Make sure the cylinder head surface is clean and install the supplied gasket over the studs.
STEP 9.
- Remove the oxygen sensor from stock exhaust manifold and install into the BBK Header. NOTE!!! Be sure to add a small amount of anti-seize to the top thread of each oxygen sensor using the supplied anti-seize packet. As you thread the oxygen sensor back into the part the anti-seize will spread evenly throughout the threads.
STEP 10.
- Position the BBK Header in place over the studs and install the nuts and required bolts. This might require lifting the engine up a bit higher to get the header into place. Install nuts and two supplied bolts and tighten.
STEP 11.
- Re-install the motor mount and steering shaft. Lower the engine back down.
STEP 12. (Passenger Side)
- Remove the passenger side motor mount from engine and jack up the motor. Remove the exhaust manifold nuts and remove both the manifold and gasket.
STEP 13.
- Remove the studs in the head that correspond to the notches on the header flange. There are 3 on the passenger side.
STEP 14.
- Remove the oxygen sensor from stock exhaust manifold and install into the BBK Header. NOTE!!! Be sure to add a small amount of anti-seize to the top thread of each oxygen sensor using the supplied anti-seize packet. As you thread the oxygen sensor back into the part the anti-seize will spread evenly throughout the threads.
STEP 15.
- Make sure the cylinder head surface is clean and install the supplied gasket over the studs. Install the header onto the studs, install stock nuts and supplied header bolts and tighten all of them.
STEP 16.
- Re-install the motor mount and lower the engine back down. Re-install the starter and make sure the motor mounts are tight on both sides of the engine.
STEP 17.
- Re-install the catalytic converters and clamps at the H-Pipe connections. Reconnect all of the oxygen sensors.
STEP 18.
- Re-install the lower strut brace.
STEP 19.
- Reconnect the negative battery terminal and start the engine and listen for any leaks. NOTE!!! The nuts and bolts should be rechecked for tightness after about 500 miles of driving.
ATTENTION! Please follow the ECU relearn procedure before driving on the road.