 FREE 1 to 3-Day Delivery on Orders $149+ Details
How to install a DiabloSport Predator Tuner on your Mustang

Shop Parts in this Guide
Installation
Please read through the manual before installing any tune into your vehicle - failure to follow proper instructions can result in a damaged or disabled ECU (Engine Control Unit).
User must ensure that the original Ford Factory Tune is in the vehicle’s ECU before installing the DiabloSport tune.
(Ford dealer reflashes are the same as Factory Tune).
Serious engine damage can occur if the Predator tune is installed over a non-factory/aftermarket performance tune.
Very important!
Do not perform any operations on Predator (except live data diagnostics) while vehicle is running. The vehicle must be parked and engine OFF.
- Always have all the doors closed while installing the DiabloSport Performance Tune, and keep them closed until the process is complete.
- Do not activate any electrical accessories while installing the DiabloSport Performance Tune. Ensure that there are no electronic Aftermarket accessories* wired or plugged into the vehicle that can cause a substantial voltage drop. Please contact DiabloSport if you are uncertain about the effect of devices that are on your vehicle.
- Certain cellular phones or radio equipment might also cause interference. Please remove or turn such devices off.
- Do not try to install any tune on a vehicle with a low battery voltage - charge your battery if necessary.
- Unless instructed, never turn the ignition key OFF while the Predator is plugged into diagnostic port.
- Do not unplug the Predator while it is installing the DiabloSport Performance Tune or the Original Backup.
Preparing the Vehicle for Tune Installation
*Important Note:
All electronic aftermarket add-on parts can create a potential power draw.
- tachometer
- electrical fans
- shift light
- audio/video equiptment.
- gauges
- trailer/ tow accessories.
Any change in voltage during flash programming procedures WILL interrupt the writing process.
Please disconnect or disable any such add on part.
In the event of such an occurrence, unplug the tool, wait 5 seconds and then plug it back in. The tool will recognize that a interrupted writing error has occurred and will automatically install the original back up. The vehicle is now in its original state. Please attempt to locate the voltage draw before Predator is used again.
Predator contains several predefined DiabloSport Tunes. These are thoroughly tested and approved by DiabloSport. You have a choice of either installing the DiabloSport Tune “as-is” into your vehicle, or customizing it to your personal taste.
If you are satisfied with your factory tuned vehicle and only have a desire to modify a parameter or two (example: change gear ratio), you might want to read the chapter ‘Customizing the Factory Tune’. Before you install any tune into your vehicle, when you use the Predator for the first time, it will read the Original Factory Tune out of your vehicle and permanently store it in its memory. This process takes a minute or two. For safety reasons, there is no way to overwrite this backup and therefore the Predator becomes ‘married’ to, and only to, your vehicle until original backup is restored. If there is ever a need to send the Predator back to DiabloSport, for any reason, the Orginal Backup must be put back into your vehicle, as described in the section Reinstalling the Original Factory Backup’, otherwise your Predator will not be accepted back by the reseller. To find out, which tune was last written to your vehicle, go to ‘Predator Options / Show Last Tune Written’ in the Predator.
DiabloSport Performance is designed to add power and torque for a stock to mildly modified vehicle.
87 Octane Performance is designed to add power and torque for a stock to mildly modified vehicle using 87 octane.
Factory Hp Tune is a adjustable factory tune with NO performance tuning.
Note: Performance tunes may vary from predator to predator. NOTE: WHEN CHANGING HP TUNES, THERE IS NO NEED TO RESTORE FACTORY TUNE BEFORE INSTALLING A NEW(DIFFERENT) HP TUNE. YOU WILL BE PROMPTED TO RESET PARAMETERS PRESS YES OR NO AS YOU DESIRE.
*Premium grade unleaded fuel must be used for all predator applications; AMOCO, MOBIL, SUNOCO fuels are recommended.
The very first time the Predator is used on a vehicle it will automatically create a backup of the original factory tune. (Installing the DiabloSport Performance Tune)
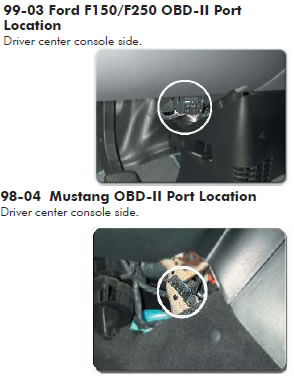
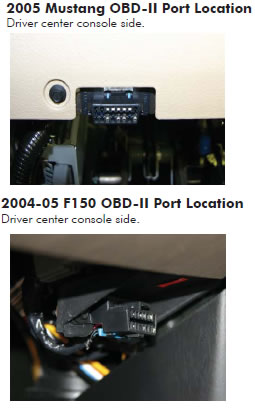
1. Plug the Predator into the Diagnostic Port of the vehicle, located under the driver’s side dash.
2. The first screen you will see is the startup screen with the name of the vehicle the predator supports (i.e.: lightning )
3. Performance tune should be three choices:
- Performance Tune
- Diagnostics
- Options
4. Select “Performance Tune” by pressing the “Continue” key
5. Disclaimer will appear, - read & press “Continue”
6. Turn engine ON. DO NOT START Vehicle- press “continue” (If selecting “modify Tune” see the section on changing parameters)
7. Highlight the tune you would like to install by using arrow keys. Press “enter” to continue
8. Verification of the tune will appear. If this is correct, Highlight “Choose” & press “Enter”.
9. The original Backup will now be saved. “press enter to continue”.
10. Follow the prompts to turn on & off the ignition (do not start the car at any time) press “enter” if prompted.
11. A status bar will show progress on the backup process. This might take several minutes.
12. When completed, a message saying “Original Backup has been saved” will be displayed. Press “Continue”.
13. At this point you have the option of installing the Diablo tune or modifying a tune. Highlight the appropriate choice by using the arrow keys & press Enter.
14. Follow the prompts to turn on & off the ignition (do not start the car at any time) press “enter” if prompted.
15. The tune should now be writing. Do not interrupt this process or ECM damage can occur.
16. When the Process is complete, the Message “ {xxxxxx} tune is now in vehicle. You may drive it now. Please unplug the tool”
Unplug the predator from the Diagnostic port. Cycle the key, and start the vehicle. You are now able to enjoy the force of the Predator!!
Modify Tune Procedures
1. When selecting the “Modify tune” function, a disclaimer will appear. Read and press “Enter” to continue.
2. The “modify Performance Tune menu will appear. You will have 2 choices:
- Modify Parameters
- Reset all Parameters
3. Highlight the appropriate choice by using the arrow keys & press “Enter”
4. In the “Modify Parameters” Menu the following choices will appear:
- Axle
- Spark Advance
- Fuel Base
- Tire Size
- Idle Speed
- OBD II
- Rev Limit
- RPM Shift Point
- Shift Firmness
5. Highlight the appropriate choice by using the arrow keys & press “Enter”
6. Modify the appropriate parameter by using the arrow keys & press “Enter” to continue. [ These parameters should only be changed is you have a understanding of tuning. Engine or ECM damage can occur without proper knowledge.]
7. Verification will display “Are you sure?” press “Enter” to continue
8. The display “this change will take effect next time you install the tune” will appear – Press “Continue”
9. Use the “ESC” key to go back through the menus and either continue to change parameters or go to the “install tune now?” menu. Press “Enter “ to continue.
10. The tune should now be building. Do not interrupt this process or PCM damage can occur.
11. Follow the prompts to turn on & off the ignition (do not start the car at any time) press “enter” if prompted
12. The tune should now be writing. Do not interrupt this process or ECM damage can occur.
During programming do not touch any buttons or open and close doors, the theft light will blink rapidly and on some vehicles the electric fans will come on during programming.
13. Follow the prompts to turn ON & OFF the ignition (do not start the car at any time) press “Enter” if prompted
14. When the process is complete, the Message “ {xxxxxx} tune is now in vehicle. You may drive it now. Please unplug the tool” Unplug the predator from the Diagnostic port. Cycle the key, and start the vehicle. You are now able to enjoy the force of the Predator!!
Modify Parameter Section
To adjust parameters, select parameter group, then select specific parameter, adjust parameter as desired then press enter button and follow prompts. Once desired parameters have been modified, press “ESC” to exit out of main modify parameters menu, you will automatically be prompted to install tune.
NOTE If tune is not installed at the prompt the adjusted parameters will not be lost, they will be saved, just not installed in the vehicle.
To reset parameters, simply press “Reset Parameters” button.
When switching from Performance Tune, Factory HP tune or Custom tune you will be prompted to keep or discard adjusted parameters.
Parameter Adjustments
Fan
Fan high speed ECT 1 ON Fan low speed ECT ON
Fan high speed ECT 2 ON Fan low speed ECT OFF
Fan high speed ECT OFF
NOTE: When adjusting fan settings, keep the factory spread of the on and off values. We recommend that you lower / raise all on / off settings by the same value.
Fuel Base
Fuel Table = WOT fuel table, adjusts fuel at wide-open throttle only, Predator allows for a / - 15% adjustment which equates to a 1 point plus or minus on a air/fuel scale.
NOTE: This adjustment should only be done with proper monitoring devices, such as air/fuel meter.
NOTE: OBD-II adjustments are to be done on off-road vehicles only! Not for street use, off-road vehicles only.
Rev Limit
Rev Limit drive = Rev limit when in gear.
Rev Limit neutral = Rev limit when in neutral, use this for manual transmission equipped vehicles.
Spark Advance
Spark Advance = WOT timing adjustment; adjust timing at wideopen throttle only. Predator allows for a / - 10% adjustment in WOT timing.
RPM Shift Point = Adjust the WOT shift point by RPM for each shift.
Shift Firmness = Adjust the WOT shift pressure for each shift, this allows for a firmer shift under wide open throttle, all tunes have stock settings as default.
Tire Size
Tire revs per mile = Adjust for larger/smaller tire diameter to correct speedometer to get revs per mile use overall tire diameter in inches 20168 divided by tire diameter=revs per mile.
Traction
Traction = Turn traction control on/off
NOTE: Traction control ON/OFF can be reversed in some vehicles, if turning traction OFF does not work, turn it ON in tool and it should turn traction OFF in vehicle.
OBD II
EGR = Turn EGR on/off, (ONLY USE WHEN REMOVING THE EGR).
Heater bank 1 downstream = Turn bank 1 rear oxygen sensor on/off. Heater bank 2 downstream = Turn bank 2 rear oxygen sensor on/off. Hego Config = Turn all 02’s off
Axle
Axle Ratio = Adjust for different axle ratio to correct speedometer, note, numbers are in one decimal, ex. 3.5 this is the same as 3.55 and for 3.73, select 3.7, 4.10 select 4.1 etc.
Idle Speed
Drive = Idle speed when in gear
Neutral = Idle speed when in neutral, use this for manual transmission equipped vehicles.
The following are parameters that are exclusive to the 2005 Mustang.
Main Menu in tool appears as such :
Performance Tune
Diagnostics
Options
Once you select “Performance” tune you will see the usual disclaimer and then the “turn key on……,” etc the following menu will then appear.
Diablo Tunes (below).
Custom Tunes – this only appears if there is a custom tune in the tool.
If you select “Diablo Tunes” The following menu appears:
Performance Tune
87 Octane Performance
Original Backup
All the Diablo Tunes and Custom Tunes can be modified using the custom parameters shown below
Axle Ratio Menu – There are two choices in this menu Axle Ratio and Tire Revs per Mile.
Tire Revs per Mile – To calculate your revolutions per mile, measure your tire diameter in inches and use it in the following formula.
Example: 20168 divided by tire diameter = revs per mile Ex 20168/26 = 775 rev/mile
The stock gear ratios on the 2005 mustang are 3.31:1 for the automatic transmission cars and 3.55:1 for the manual transmission cars. If you have changed your rear differential crown and pinion gears, (select the appropriate ratio using this parameter to correct your speedometer and shift points). Use this parameter to select the appropiate ratio to correct the gear ratio.
Cooling Fan - these temperatures are listed as fan off and fan on. To improve performance, lower all of them by 30 degrees. Remember that once the car is moving approximately 30 mph or more, that the fans will shut off. That is because once the car has a natural flow of air, the fans are no longer needed. This prevents the fan motor from “wearing out” prematurely.
Idle RPM – you can set your engines idle rpm as high as 1200 RPM and as low as 400 RPM. The automatic transmission equipped vehicles have two idle settings, Drive and Neutral. Manual transmission cars only have neutral idle RPM. The engine RPM will fluctuate with temperature. Adjusting the idle will adjust the base target idle speeds. Final commanded idle RPM is affected by RPM adders for temperature and closed loop fuel strategies.
This parameter is more effective for tuning your vehicles idle speed than simply turning the idle stop screw on your throttle body. Rev & Speed Limits – You can not adjust the speed limit, only disable or enable it.
Raise all rev limiters by the same amount to make sure your changes take affect. You can lower the rev limit to 3000 or raise it to 7000 rpm. There is a Rev Limit and a Rev limit Default, both should be changed by the same amount.
Spark Advance Menu
Global Spark Adjuster – this parameter will allow you to add spark advance much like you would adjust a distributor on the cars of yesteryear. You can globally add (advance) up to 4 degrees of spark timing or globally subtract (or retard) 10 degrees of spark timing.
Spark advance 2-4k – applied to 2000 to 4000 RPM ranges
Spark advance 4-7k – applied to 4000 to 7000 RPM ranges
- This is a percent adjustment to the spark table at peak loads. Peak loads occur at WOT (wide open throttle) the maximum advance is 10% and the maximum retard is -40%.
WOT Fuel
Fuel Table 2-4k RPM
Fuel Table 4-7k RPM
These parameters allow you to adjust wide open throttle air fuel delivery by a percentage. This is accomplished by changing the Stabilized Open Loop table at loads of 75% or more.
You can lean fuel as much as 15% or richen as much as 40%. It is recommended to use a wide band air fuel ratio meter on a chassis dynamometer while adjusting air fuel ratio’s at wide open throttle. Remember that in order for your WOT fuel changes to take affect, the computer has to go to the stabilized open loop table at WOT. If you have a cold thermostat, not enough load, cold air kit, aftermarket mass air meter, or the computer is in catalyst protection mode, your changes will not take affect
Features in the 2005 Predator
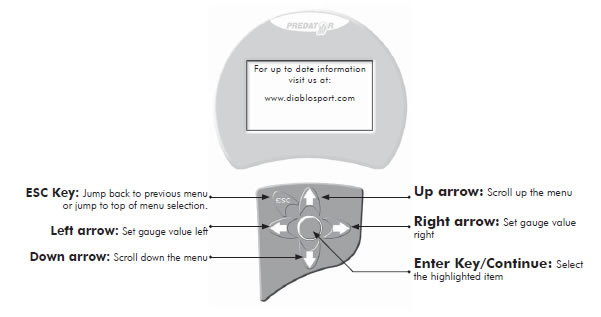
1. If you want to back up one menu you can simply click the left arrow.
2. The Predator can now hold 5 custom tunes. These tunes can be created by Chipmaster Revolution Dealer.
3. New software that allows you easy loading and unloading of tunes to your Predator or to your PC.
4. Displays Diagnostic Trouble Codes and erases them to turn the check engine light off.
5. Live Data Display – allows you to look at the sensors and computer real time to diagnose and tune your engine’s performance.
Custom Tunes
The custom tune menu is for heavily modified vehicles that require additional adjustments beyond the capability of the programmer.
This option should be handled by dealers only, as they must transfer the original tune from Predator to PC and send it to Diablosport for modifications.
Export Tune
Before exporting Extra tune, user must first go to “Troubleshooting” then “Read Extra Tune”, follow prompts and complete this process. This process will read the current tune in vehicle and save it so it can be transferred to PC.
NOTE: Traction control ON/OFF can be reversed in some vehicles, if turning traction OFF does not work, turn it ON in tool and it should turn traction off in vehicle.
Custom Tune
The Custom tune menu is for heavily modified vehicles that require additional adjustments beyond the capability of the programmer.
This option should be handled by dealers only, as they must transfer the orginal tune from the Predator to PC and send it to Diablosport for modifications.
To export the extra tune or original backup, just connect the predator via serial cable to PC and then power Predator on. Predator go to “options” then “custom tune” then select “export custom tune”.
Select either “Original Backup” or “Extra Tune”, click “continue” on the following screen.
Then in software, click “Get File”, enter a file name and select proper folder to save the file in and click “OK” A status bar should appear in the bottom left corner. NOTE: Name the file appropriately with .frg as file type.
Make sure you note where you save the file on your PC so you will be able to find it after operation is completed.
Import Tune
1. On the Predator, go to “ Options ” then to “ Custom Tune “ Click “ Yes ” on the following screen, you want to overwrite extra tune.
2. Then, in software, click “Send File” , select the file and click “OK”
3. Once transfered, the predator will process the tune and ensure that it is correct.
4. Plug the predator into vehicle and instead of the normal tunes you will now have “Custom Tune” there instead. Select Custom Tune and install or modify/ install the tune as usual.
Erase Custom Tune
Use this command to erase the custom tune in the predator and go back to default Diablosport tune. Options/Custom Tune then you will see a message saying “This option is for dealers and expert users only”. Hit (Continue)
Go to “Erase Custom Tune”
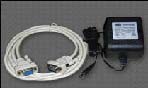
Important Hardware For Custom Tunes/Updates Hardware required: 12V DC 1.0A Power Supply DB-9 9- Pin Serial Cable Extension (Radio Shack part # 26-117B) or on Windows XP computers you can use a Serial to USB cable (Radio Shack part # 26-183)
Re-installing the Original Backup
There are three occasions when one needs to re-install the Original Factory Tune back into the vehicle:
- Going to the dealer for vehicle maintenance or repair.
- Returning the Predator to an Authorized Diablosport Dealer.
- Using the Predator on another vehicle. To restore Original Backup go to Performance Tune and then select Original Backup.
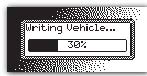
When the Predator starts to write the Original Backup into your vehicle, a progress bar will indicate the status of writing. Follow all instructions on the Predator screen. The complete process will take about 1 minute.
Vehicle Diagnostics
Select the “Diagnostics“ item from the main menu of the Predator, then press the Enter key.

Diagnostics
Show Trouble Codes = Display any stored trouble codes in memory.
Clear Trouble Codes = Delete any stored trouble codes in memory.
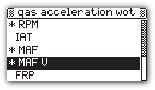
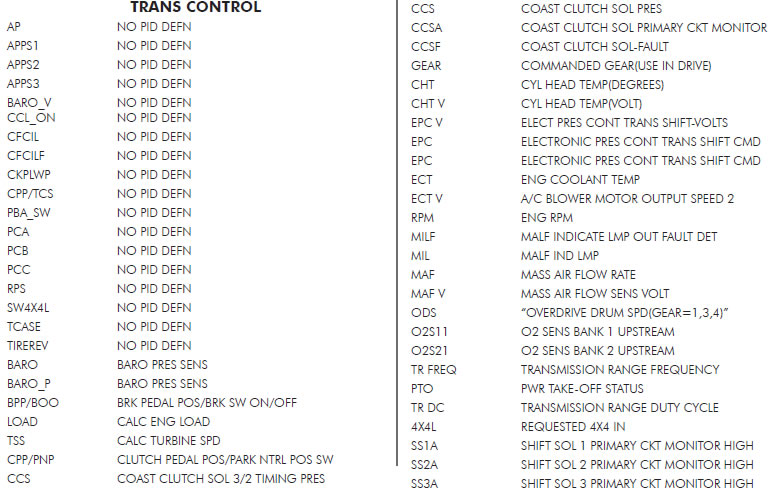
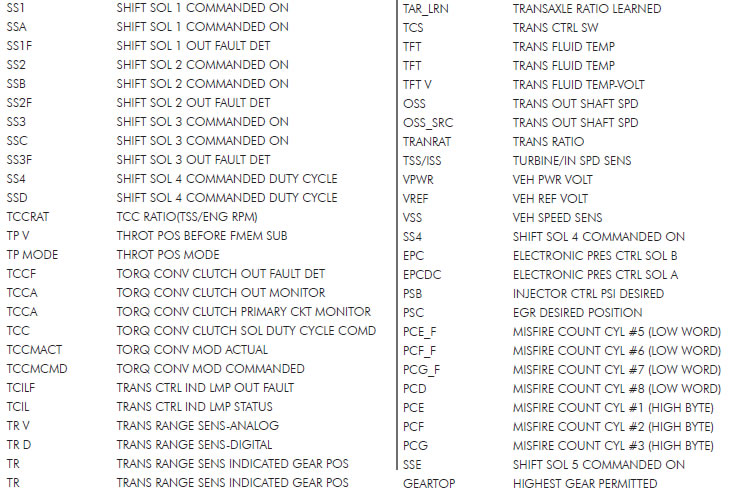
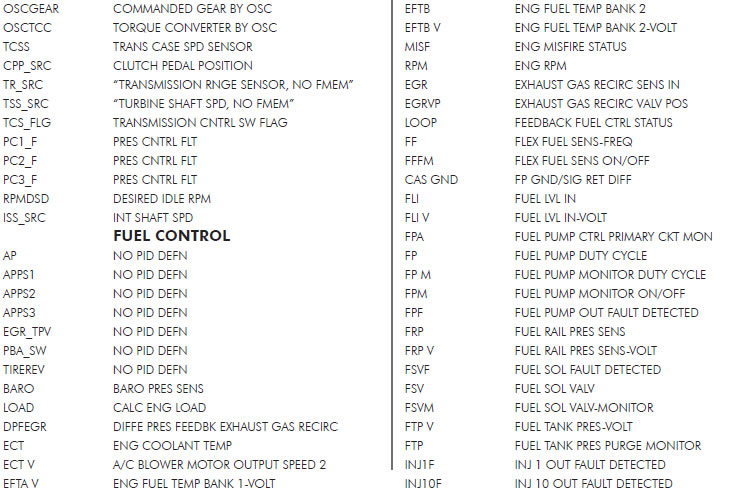
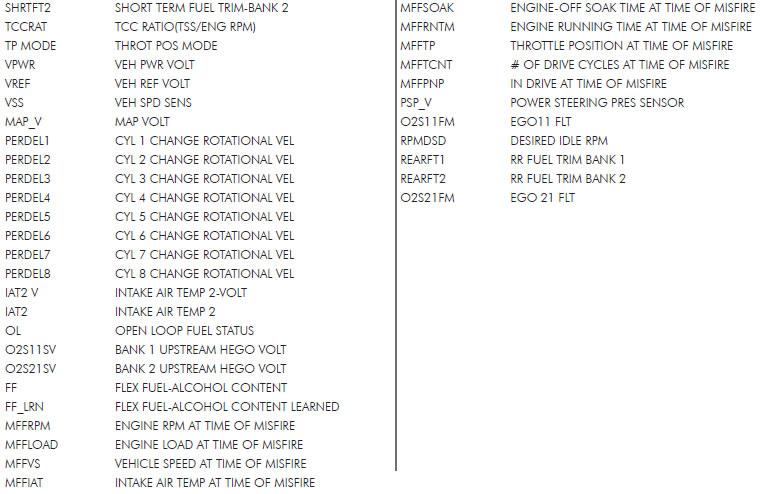
Real Time Data = View real time data, this section is set up in groups of parameters to view.
NOTE: If switching tool from one vehicle to another vehicle you must go into the options menu and press live table reset Each group (when selected) allows user to show specific values or all values in the group. To see specific values choose “Show Select” then based on what sample rate you would like choose “Slow” or “Fast”. The next screen will show all parameters available. Highlight and press the ENTER (circle) button next to value you would like to display, once completed press “ESC” button.
DATA LOGGING
All live data groups can be data logged.
When specifying parameters to view you will be asked to choose “Slow” or “Fast” rate.
Fast rate will sample the values at a higher rate and will be able to log data for about 45min, the more parameters you select the lower the granularity for values will be, we recommend no more than 8 for best sample rate.
Slow rate will sample at a slower rate and will be able to log data for about 1hr 30min, when choosing to view all values the default rate is slow.
Once the proper sample rate is selected, the next screen will ask “DATALOG” yes or no, select “YES” and the data logging will start.
To stop data logging, press the “ESC” button.
Log Playback
To view the logged values, go back to main diagnostic menu and select “Log Play Back”.
Top right hand corner will display the total time data logged.
Top left hand will display elapsed time.
Top Center will display progress bar and mode of view.
Show Trouble Codes = Display any currenttrouble codes
Clear Trouble Codes = Delete any current trouble codes
Real Time Data = View real time data, this section is set up in groups of parameters to view.
NOTE: When switching tool from one vehicle to another vehicle you must go into the options menu and press live table reset
Each group (when selected) allows user to show specific values or all values in the group, to see specific values choose “Show Select” then based on what sample rate you would like choose “Slow” or “Fast” the next screen will show all parameters available, highlight and press the enter button next to value you would like to display, once completed press “ESC” button.
You will now be asked if you wish to data log (record data) or just view the parameters without data log.
Data Logging
All live data groups can be data logged.
When specifying parameters to view you will be asked to choose “Slow” or “Fast” rate.
Fast rate will sample the values at a higher rate and will be able to log data for about 45min, the more parameters you select the lower the granularity for values will be, we recommend no more than 8 for best sample rate.
Slow rate will sample at a slower rate and will be able to log data for about 1hr 30min, when choosing to view all values the default rate is slow.
Once the proper sample rate is selected, the next screen will ask “DATALOG” yes or no, select “YES” and the data logging will start.
To stop data logging, press the “ESC” button.
Log Playback
To view the logged values, go back to main diagnostic menu and select “Log Play Back”.
Top right hand corner will display the total time data logged
Top left hand will display elapsed time.
Top Center will display progress bar and mode of view.
To start viewing data press the enter button, to pause press enter button.
While paused you can use the left and right arrow keys to move forward or backward in the log file, once desired point is reach press enter key to start displaying values from that specific point.
To exit out of the data log press the “ESC” button. 23 Log Upload to PC.
You can also upload the log file into PC and view it with our live streaming data viewer.
To upload the log file to pc you must have the data view software to upload and to view the data.
Real Time Streaming
This option allows you to stream live data directly to your PC into the data view software.
Set up the software on your PC and ensure that you have the right COM port enabled then press “Real Time Streaming” button to view the values.
To obtain a copy of our data viewer, please visit our web site www.Diablosport.com
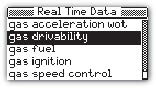
Live Data Groups
Gas Acceleration WOT = Contains parameters that are commonly viewed during dyno tuning and wide open throttle runs.
Gas Drivability = Contains parameters that are commonly viewed during drivability testing and monitoring.
Gas Fuel = Fuel related parameters
Gas Ignition = Ignition related parameters
Gas Speed Control = Vehicle speed related parameters
Gas Trans = Transmission related parameters
Real Time Streaming = View real time data on PC
Log Play Back = View logged data
Troubleshooting
1. My Predator will not power up when I plug it into the OBDII port. Why?
A: Make sure that the cigarette lighter fuse in your vehicle is functional. You may also want to try plugging the Predator into any other vehicle with an OBDII port to see if it powers up. If it does not, please return to point of purchase for a warranty exchange.
2. My Predator lights up, but nothing happens.
A :Please return you Predator to point of purchase for warranty exchange.
3. My Predator says “Invalid license, tune in the vehicle does not match the last tune written,” and it will not install a tune.
A: Please call technical support at (561)908-0040.
4. My Predator is flashing a CAL_ID, and saying call technical support what should I do.
A: Check your Predator for the latest revision update. Look on the top of the main menu of the Predator after it boots up to see your revision information. Check the number after the word “Predator” and verify that it matches the latest revision on our website www.diablosport.com
5. How do I update my Predator to the latest revision?
A: Please go to our website www.diablosport.com and take a look at the “downloads section” where you will find all the necessary information on getting the latest revision update.
6. My vehicle is shifting really hard, why?
A: Make sure you give your vehicle at least 4-5 cold starts with the tune installed before you begin driving it with heavy gas. This is because your transmission needs to learn how to shift with the new tune in the vehicle.
7. My Predator says “FEATURE NOT SUPPORTED ON THIS VEHICLE,” What do I need to do?
A: Check your Predator for the latest revision update. Look on the top of the main menu of the Predator after it boots up to see your revision information. Check the number after the word “Predator” and verify that it matches the latest revision on our website www.diablosport.com
8. The Predator says “VEHICLE NOT IN DATABASE” what should I do?
A: Check your Predator for the latest revision update. Look on the top of the main menu of the Predator after it boots up to see your revision information. Check the number after the word “Predator” and verify that it matches the latest revision on our website www.diablosport.com. If you update your Predator and you are still displaying this message, please call technical support at (561)908-0040.
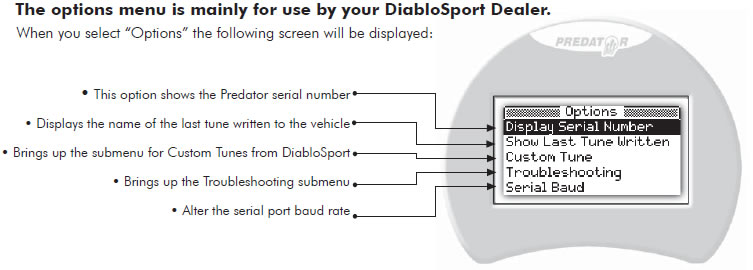
Options Menu
Display Serial Number = Show the Predators serial number
Show Last tune Written = Display the last tune written to vehicle
Custom Tune = Custom tune menu, see Custom Tunes section
Troubleshooting = See Troubleshooting section
Serial Baud = Set the serial baud rate of communications for Predator.
NOTE: When switching tool from one vehicle to another vehicle you must go into the options menu and press live table reset.
Troubleshooting Menu
Show Calibration ID = Display the hex code on the vehicle
Show VIN = Show vehicles VIN number
Read Extra Tune = Reads the tune in the vehicle for export to PC
Restore Original Backup = Restores the original tune and resets the tool for use on another vehicle.
Log Upload = Upload data log file to PC, see Diagnostics section.
Live Table Reset = Reset this when Predator is used on a different vehicle.
Verification = This is a troubleshooting feature and should only be used with the supervision of Diablosport tech support.

