FREE 1 to 3-Day Delivery on Orders $149+ Details
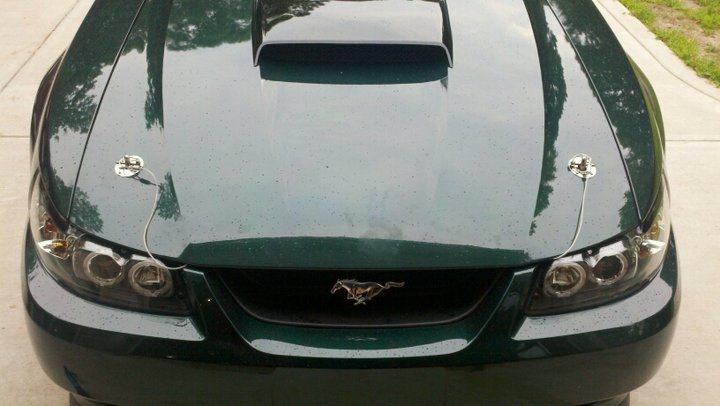
How to Install a Ford Racing Hood Latch and Pin Kit on your 1979-2004 Mustang
Installation Time
2 hours
Tools Required
- Corded or Cordless Drill
- 7/8" Step Bit (These can be found at your local Hardware Store)
- 1/8" Drill Bit
- Painters Tape
- Marker
- Grease (Or something capable of marking the underside of the hood on the pins)
- Dremmel with sander and grinder bits
- 2x 1 1/2" 3/8" thread bolt and washer
- 2x coupler nuts
- Loctite
- Tap
- Phillips Head Screw Driver

Shop Parts in this Guide
Installation
Frame Preparation:
Step 1:Locate the area in which you would like to place your hood pins. I have chosen to
replace the bump stops as that means there is no additional frame drilling or measuring involved.
Step 2:Remove bump stops from frame under hood. There may be some resistance as they are help in at the base my plastic clips. You may need to pry with a screwdriver to pop them out.
Step 3:Now that you have your bump stops out take your 1 1/2” bolt and washer and pop it up
from the underside of the frame. There is already a whole in this area large enough.
Step 4:Put another washer on the top side of the frame where the bolt comes through the hole and thread on the coupler nut. (If this hole was not large enough you may use the grinder bit on the Dremmel to widen the area slightly.)
Step 5:Thread the pins into the top of the coupler nuts making sure to use the openings in the pins to count the turns so you can be sure you are level.(Figure 2)
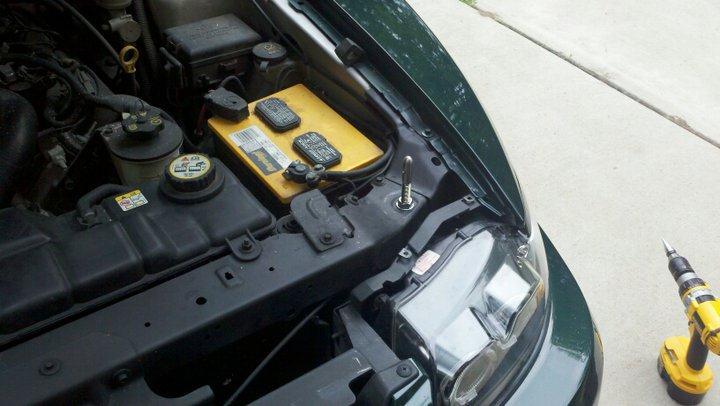
(Repeat Steps 3-5 for the other side) Hood Preparation:
Step 1:Apply a small amount of grease to the top of the hood pins and slowly sit the hood onto
the pins allowing the grease to mark your hole on the bottom side of the hood. This mark should be easily visible as the rubber bump stops have usually rubbed the area.
Step 2:Prop your hood open again and remove the pins from the coupler nuts
Step 3:Lower the hood back down but do not try to close or latch is, let it sit gently on the coupler nuts, or at the top of the latch, whichever stops it first.
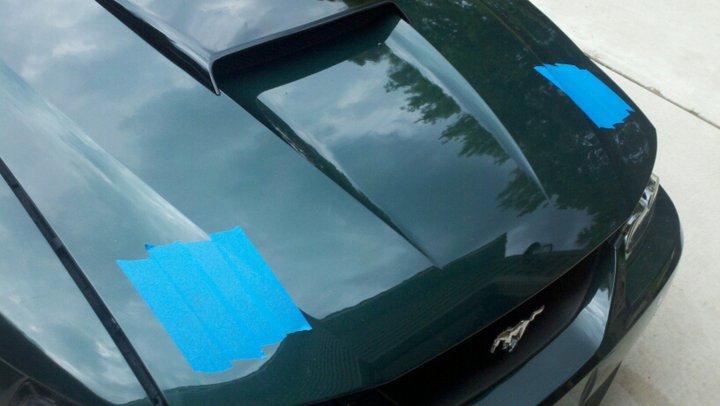
Step 4:Begin placing large piece of painters tape on the top of the hood directly above, and on the surrounding area where you will be drilling through from the bottom side to mark your hole.(Figure 3)
Step 5:Open your hood back up and prepare to drill.
Drilling the Hood:
Note: The hood has 2 layers, you are only drilling through 1 in this stage.
Step 1:Attach the 1/8” bit to your drill and begin slowly drilling perpendicular to the surface.
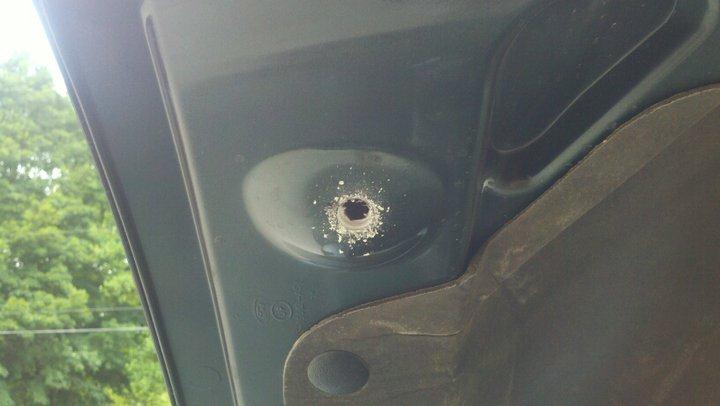
Step 2:Once you have made a good starting hole remove the bit and attach the 7/8” Step Bit, and continue drilling until you reach that point. Remember to drill slowly.(Figure 4) (Repeat Step 1-2 for the other side)
Step 3:Replace the pins back in the couplers and apply another amount of grease to the tops.
Step 4:Slowly lower the hood onto the pins again ensuring you drilled the holes properly and that the pins go through them without issue to the top layer. Allow the grease to mark your second hole.
Step 5:Raise the hood back up and prop it up again.
Step 6:Using your 1/8” bit begin drilling slowly into the hole you just marked on the second layer using your hand to feel for the bit to pop through to the tape. Once you feel it immediately stop.
(Repeat Step 6 for the other side)
Step 7:Remove the hood pins again and lower the hood back down.
Step 8:Use your permanent marker to mark the hole from the top of the tape where you will be drilling back down into the hood.
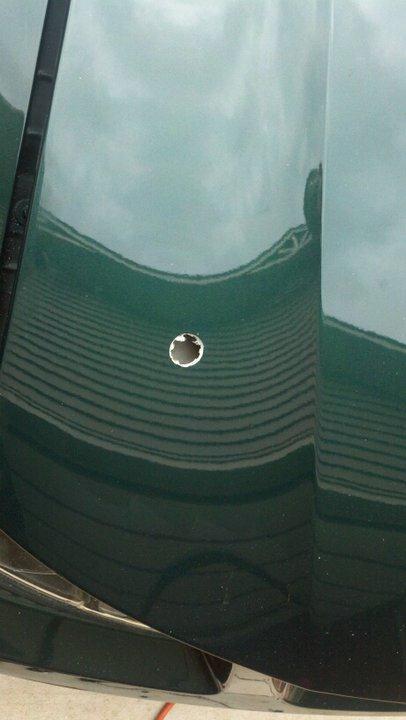
Step 9:Using your 7/8” step bit begin to slowly drill back down perpendicular to the hood until you have exceeded the size of the top plates. The plates in the FRPP kit are 3/4", so the 7/8” maximum should be sufficient.(Figure 5)
Mock Up:
Step 1:Open the hood back up and prop it open again.
Step2:Thread the hood pins back into the coupler nuts
Step3:Lower the hood slowly so that the pins can come through the holes in the hood. Note any areas where they may rub or do not pass and use the Dremmel with sander bit to widen the hole in the particular area.(Figure6)

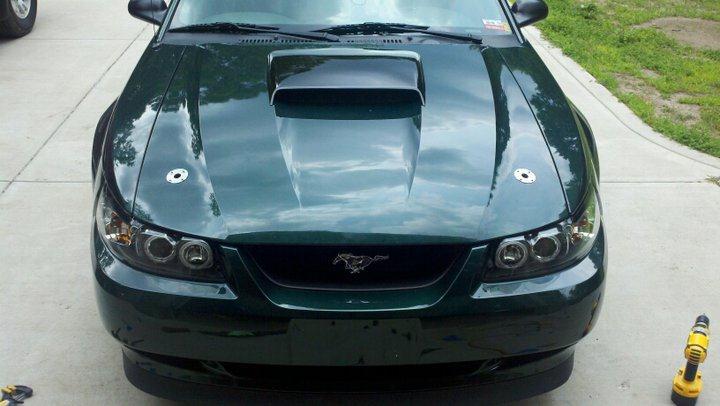
Step4:Take the top plates and put them on the hood around the hole where the pins are protruding.
Step5:When you have the aligned how you like, take your marker and mark the4 screw holes in each plate so you can use your tap to start the guide holes.
Step6:Begin screwing the plates down with the supplied screws and washers. Preferably use a Phillips head screwdriver as you do not want to over tighten and damage the hood. (Figure7)
Adding the Braided Cables and Finishing Up:
Step1:Attach the steel braided cable to the pin clips.
Step2:Put the clips through the pins and determine how much slack you have to the end of the hood.
Step3:Take the clips back out remembering the amount of slack or mark is on the cable cover. Open and prop the hood again.
Step4:Remove the hood pins from the coupler again and place a small amount of Loctite on the threads.
Step5:Rethread the pins ensuring they are still even.
Step6:With the remaining slack in the cable determine where you would like to attach your cable. Try using an existing screw in the radiator support or a similar symmetrical location.
Step7:Close the hood, place the clips in the pins and allow the Loctite dry for about 2 hours before driving.(Figure8)