 FREE 1 to 3-Day Delivery on Orders $149+ Details
How to Install Hawk Performance HPS Brake Pads - Rear Pair (94-04 Cobra, Bullitt, Mach 1) on your Ford Mustang
Installation Time
60 minutes
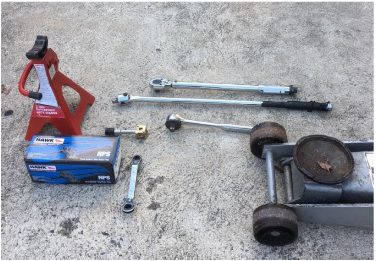
Tools Required
- Jack
- Jack-Stand(s)
- Lug Nut Wrench/Breaker Bar
- 12mm Crescent/Ratcheting Wrench
- Flathead Screwdriver
- Rear Piston compression Tool (Can be purchased at any parts store for cheap)
- 3/8” Ratchet
- 3/8” Extension

Shop Parts in this Guide
Step 1: Begin by loosening the lug nuts of your rear wheel, jacking the car up, and safely resting it on a reliable jack stand. Remove the wheel.
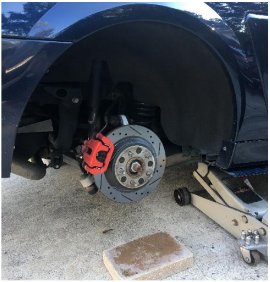
Step 2: Once the car is in the air, pop the hood and take the cap off of the brake fluid reservoir (this will allow the caliper piston to compress much easier later on)

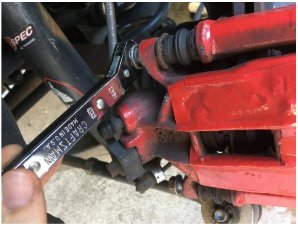
Step 3: With the wheel off, use your 12mm ratcheting wrench or crescent wrench to loosen the two bolts holding the caliper to the bracket. There is limited room, so a regular ratchet/socket combo is unlikely to fit.
Step 4: Lift the caliper off of the pads, you may need a flathead to assist if the caliper is too tightly fitting. Secure the caliper somewhere so that there is limited stress on the brake line.
Step 5: Remove the old brake pads from the bracket. You will have to remove the shims on the sides and transfer them to your new Hawk pads.
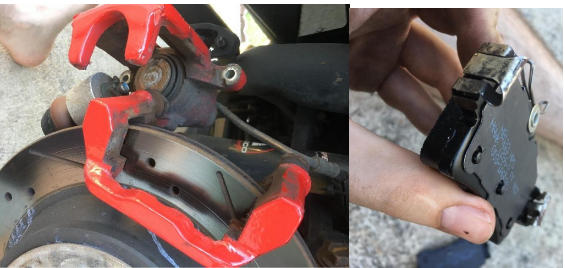
Step 6: Pull the slide pins out of the back on the caliper bracket. These pins should be moving freely. If not, clean them off and apply some of the provided grease to the pins and re-insert them.
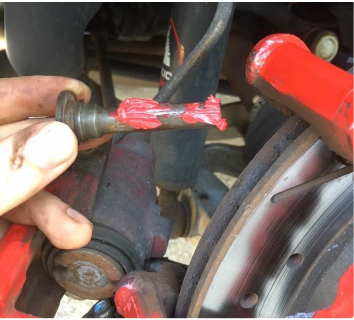
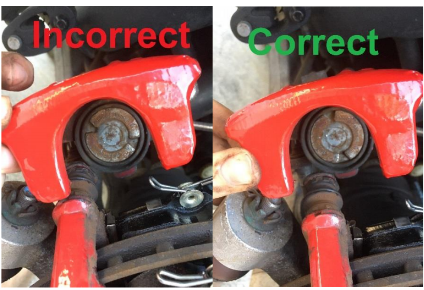
Step 7: Using your Rear-Caliper Piston Compression Tool, find the appropriate side that fits the slots of your caliper piston. Using the 3/8 ratchet and extension, along with the compression tool, turn the piston clockwise until it is fully compressed back into the caliper. (Rear calipers must be spun and pushed in at the same time, unlike the fronts that only need to be pushed straight in). Make sure that the slots on the piston are at the top and bottom when you are finished rotating.
Step 8: {Optional} Apply some of the provided grease to the backs of your new Hawk HPS pads, and on the shims to reduce vibration noises.
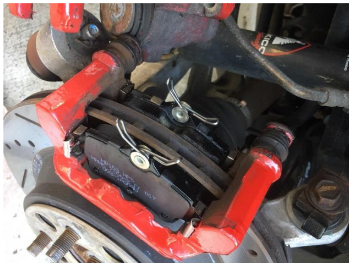
Step 9: Insert the new pads into the bracket, make sure they fit snuggly. You can now fit the caliper back over your new pads.
Step 10: Using your 12mm ratcheting wrench, tighten down the caliper bolts.
Step 11: Re-install your wheel, and repeat the entire process on the other side of the car.
Step 12: With the car lowered, and the brake fluid reservoir cap placed back on, start your car and push the brake pedal down 10 times. The first few times you press the brakes, they will sink to the floor, you should feel the pedal start to tighten after that.
Step 13: Go on a short drive, and refrain from extremely heavy braking for a few miles to allow the pads to “break in” and form to the rotors.
Enjoy your new stopping power!
Installation Instruction written by AmericanMuscle Customer 10/5/28

