 FREE 1 to 3-Day Delivery on Orders $149+ Details
How to Install Raxiom LED Footwell Lighting Kit - Red on your Mustang

Shop Parts in this Guide
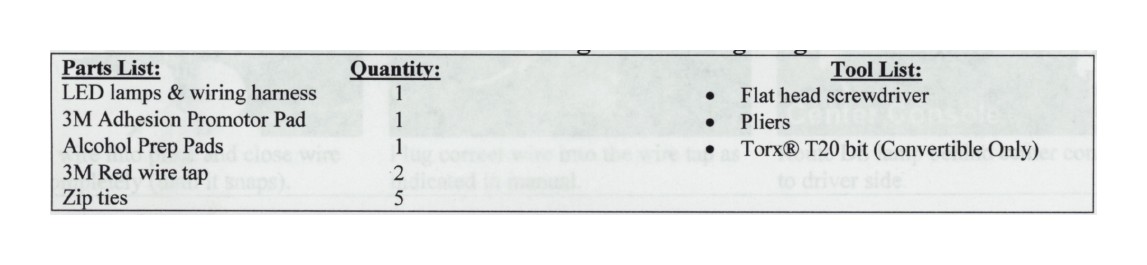
Parts List:
Please familiarize yourself with the parts included as well as the instructions before attempting installation. Please seek the help of a certified technician if you feel unable to complete the installation safely and properly. Failure to read and follow the instructions below may result in personal injury or damage to property.
Connecting the wiring:
Before beginning the steps below, turn off the vehicle, remove key, and engage the emergency brake. Open both doors and move your seats as far back as possible. Familiarize yourself with the wiring harness/ lamps. The end of the wiring harness with the red connectors will be connected behind the passenger side A-Pillar (next to windshield). On the other end of the wiring harness is the driver side lamp. The lamp in the middle is the passenger side lamp.
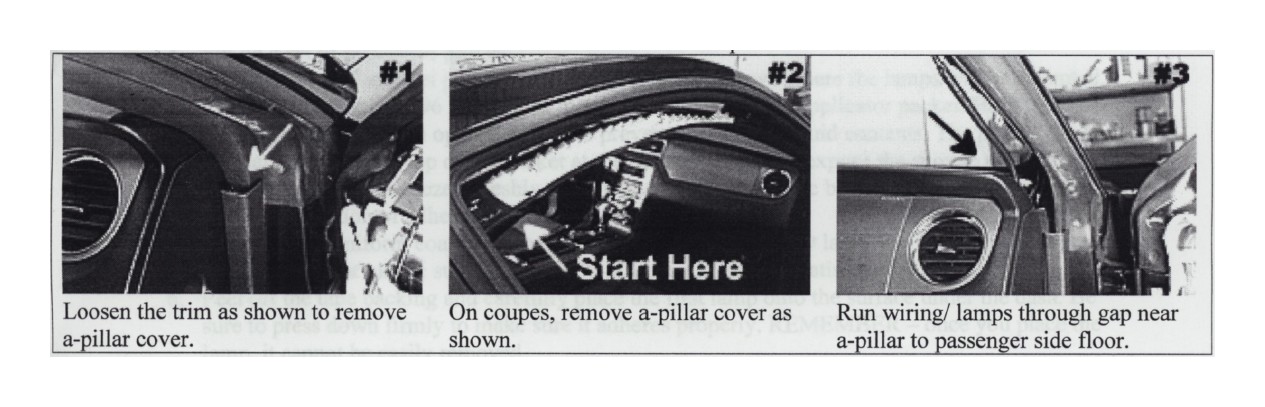
1. Locate the a-pillar trim on the passenger side of the vehicle.
2. Near the door jamb, you'll find a trim piece that needs to be loosened 1/2 inch with a flat head screw driver so that the a•pillar trim is removable. See picture 1 below. For coupes, follow step 3. For Convertibles, skip to step 4.
3. For Coupes = Loosen the a-pillar trim by starting towards the back of the vehicle and moving forward. Once you have released the clips that line the door frame, the trim can be lifted up and off the a-pillar. See picture 2. Skip to step 5.
4. For Convertibles = you'll need to remove your passenger side visor first. The mirror is held on by Torx T20 screws. Once the visor has been removed, you can pull the trim piece off starting at the top and working your way down the a-pillar. Once the tabs holding the trim have been disengaged you should be able to lift the trim up and off the a-pillar.
5. Run the LED lamps and wiring harness through the opening created by the missing a-pillar trim down to the passenger side floor. You'll run the entire harness through here with the exception of the red/black wires with red connectors on the end. See picture 3.
6. Locate the connector that runs up the passenger side a-pillar and unplug it. Then pull back the electrical tape on the high side of the connector to expose the wiring.
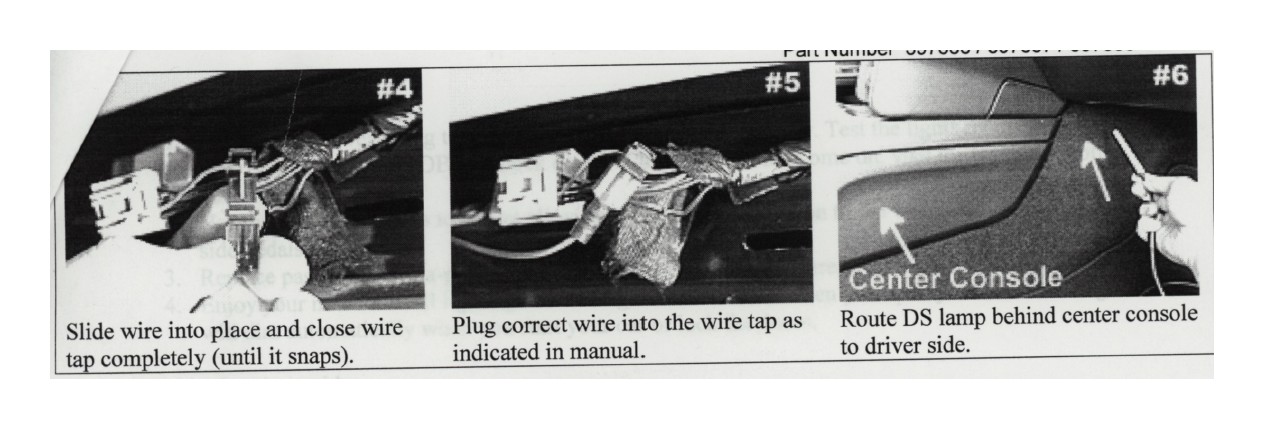
7. Using one of the supplied red wire taps, slide the correct wire onto the wire tap. 2005-2009 = Black with Blue stripe (Pin # 6). 2010-2014 = Gray with Purple Stripe (Pin # 3). See picture 4 above. The wire should sit in the middle of the two teeth. Squeeze down on the wire tap making sure it snaps closed. Do not cut wire!
8. Plug the Red wire from the wiring harness into the back of the wire tap. See picture 5 above.
9. Using the second red wire tap, repeat the process. 2005-2009 = Green with Yellow stripe (Pin # 7). 2010-2014 = Black with Yellow stripe (Pin # 11).Plug the Black wire from the wiring harness into the back of the wire tap connected to the wire.
10. Re-connect the factory connecter and secure the footwell wiring with a zip tie.
Mounting the LED lamps:
1. Locate the lamp intended for the driver side. Starting at the passenger side, pass the lamp assembly through the space behind the center console toward the driver side footwell. See picture 6. If you are having trouble getting the lamp to pass through, taping it to a bent clothes hanger may help.
2. Take a look under the dash on both the driver side and passenger side to determine where you would like to mount your LED lamps. We recommend you center the lamps on each side, but the length of wiring allows multiple possibilities. The lamps can be mounted to virtually any surface using the included 3M adhesion promotor. Be sure to keep the lamps out of the way of your pedals or feet to prevent an accident.
In the following steps we will prep the surface and apply an adhesion promotor to ensure a strong bond. Once the c-channel (the black piece each lamp sits inside) is installed, it will be difficult to move so you want to be sure of the placement.
3. Put on a set of protective gloves.
4. Use the included alcohol prep pads to wipe the surface down where the lamps will be mounted. 3MTM Adhesion Promoter 06396 is supplied in an easy-to-use sponge applicator packet. Hold packet upright and avoid squeezing an opened packet to prevent spillage of liquid contents. The packet can be opened by tearing across the top of the packet at the notches. This will expose the sponge applicator. Do not remove the sponge or squeeze a freshly opened packet. Handling the bottom section of the packet should enable application of adhesion promotor with no mess.
5. Apply a thin, uniform coating to the general area where the LED lamp will be mounted. It can be used on metal or plastic surfaces. Wait 30-90 seconds for the coating to dry completely.
6. Peel off the tape backing and carefully place the first lamp onto the surface under the dash. Be sure to press down firmly to make sure it adheres properly. REMEMBER - once you place the lamp, it cannot be easily removed.
7. Repeat the process on the other LED lamp.
Final Installation:
1. Double check everything to make sure it was connected properly. Test the lights by opening your door or using the key FOB to unlock doors. If the lights do not come on, visit the trouble shooting guide below.
2. Use the supplied zip ties to secure all wiring. Pay special attention to the wiring near the driver side pedals.
3. Replace passenger side a-pillar cover. Take your time to make sure everything lines up.
4. Enjoy your new footwell lighting kit! The lights will activate when you open your car door. Lights will dim automatically when you start your car or lock the doors.
Trouble shooting guide:
Lamp(s) won't turn on —
• Check to make sure you connected red wire taps to the correct wires (on a-pillar) outlined in the "Connecting the Wiring" section above. This is the MOST common mistake made during installation. There are many similar color wires so be sure you tapped into the proper wires.
• Check to make sure you plugged the connector back in on the a-pillar.
• Lamps will not come on when the car is running and the door is closed. Make sure the vehicle is off and your door is open. Lamps do not turn on/ off at the proper times (or they won't shut off) -
• Check to make sure you connected red wire taps to the correct wires (on a-pillar) outlined in the "Connecting the Wiring" section above. If you tap into the wrong wires, they may stay on.
If you are still having trouble with your product, please contact us for technical assistance.
