 FREE 1 to 3-Day Delivery on Orders $149+ Details
How to Install Roush Heat Extractors - Molded Black on Your 2015-2017 Mustang GT
Installation Time
2 hours
Tools Required
- 9mm Socket
- Plastic Pry Tool
- 1/8" Drill Bit
- T10 Torx Drive
- Center Punch
- Trim Removal Tool
- Commercially Available Clear Coat (Motorcraft Part Number: PM-19500-6000)

Shop Parts in this Guide

Application: 2015 Ford Mustang 5.0L with Automatic/Manual Transmission
Important Note:
Before installing your ROUSH Performance Product(s), read through the entire installation procedure and check to make sure all items are present. Contact ROUSH Customer Service at 1-800-59-ROUSH, weekdays from 9:00 AM to 5:00 PM EST, with any questions regarding fit, missing parts or instructions that are unclear.
PACKING LIST FOR 2015 MUSTANG HEAT EXTRACTORS
Description, Part Number, Quantity
Heat Extractor Assembly — LH, 1315-16C929, 1
Heat Extractor Assembly — RH, 1315-16C929, 1
Screw – M3 x 10 Self Tapper, 96817A350, 4
Adhesive Foam, 1315-HEFOAM, 4
Website Instruction Sheet, 1315-P1INST, 1
EQUIPMENT AND SUPPLIES REQUIRED
• 9 mm Socket • Plastic Pry Tool
• 1/8" Drill Bit • T10 Torx Drive
• Center Punch • Trim Removal Tool
• Commercially Available Clear Coat (Motorcraft Part Number: PM-19500-6000)
If you are missing any items, please call us toll free at 1-800-59-ROUSH.
LIMIT OF LIABILITY STATEMENT
The information contained in this publication was accurate and in effect at the time the publication was approved for printing and is subject to change without notice or liability. ROUSH Performance Products (RPP) reserves the right to revise the information presented herein or to discontinue the production of parts described at any time.
SAFETY PRECAUTIONS
STOP STOP
CAREFULLY READ THE IMPORTANT SAFETY PRECAUTIONS and WARNINGS BEFORE PROCEEDING WITH THE INSTALLATION!
Appropriate disassembly, assembly methods and procedures are essential to ensure the personal safety of the individual performing the kit installation. Improper installation due to the failure to correctly follow these instructions could cause personal injury or death. Read each step of the installation manual carefully before starting the installation.
• Always wear safety glasses for eye protection.
• Place ignition switch in the OFF position.
• Always apply the parking brake when working on a vehicle.
• Block the front and rear tire surface to prevent unexpected vehicle movement.
• If working with a lift, always consult vehicle manual for correct lifting specifications.
• Operate the engine only in well-ventilated areas to avoid exposure to carbon monoxide.
• Do not smoke or use flammable items near or around the fuel system.
• Use chemicals and cleaners in well-ventilated areas.
• Batteries produce explosive gases, which can cause personal injury. Therefore, do not allow flames, sparks or flammable substances to come near the battery.
• Keeps hands and any other objects away from the radiator fan blades.
• Keep yourself and your clothing away from moving parts when the engine is running.
• Do not wear loose clothing or jewelry that can get caught in rotating parts or scratch surface finishes.
• Allow the engine, cooling system, brakes and exhaust to cool before working on a vehicle.
WORK SAFELY!
Perform this installation on a good clean level surface for maximum safety and with the engine turned off.
INSTALLATION
The following section will guide you through the installation of the ROUSH heat extractors 421869 (1315-16C920).
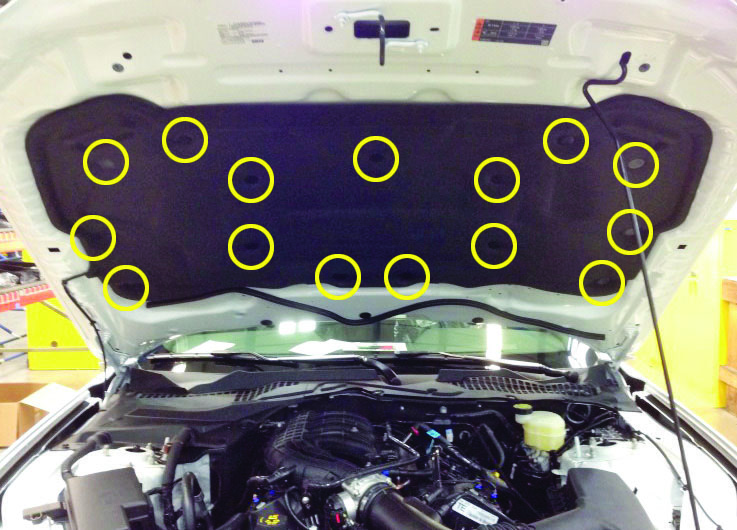
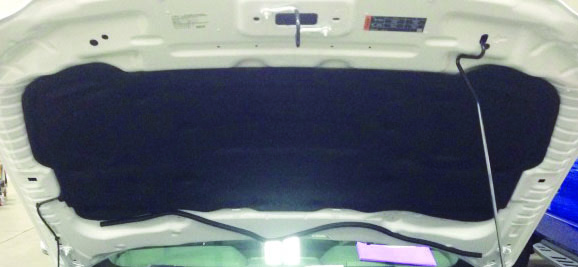
1. Open the hood and remove the hood blanket by taking out the fifteen (15) push pins that are highlighted below with an appropriate trim removal tool.
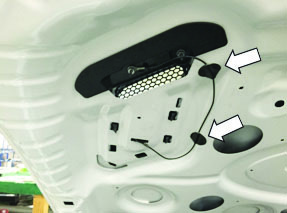
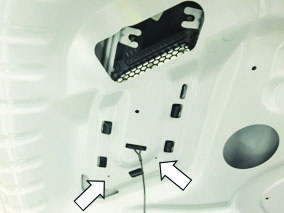
2. Remove the two (2) adhesive pads that retain the cables for each factory heat extractor.

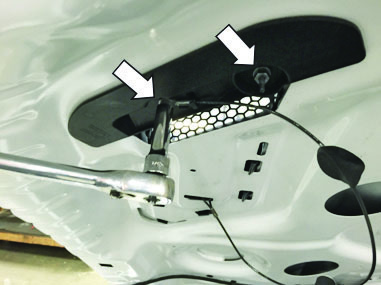
3. Remove two (2) 9 mm nuts at the bottom front edge of each factory heat extractor.
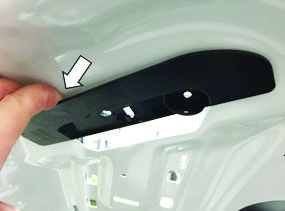
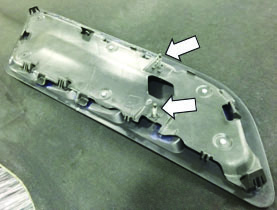
4. Remove the two (2) black plastic pieces from the hood by prying them off with your fingers or a plastic pry tool and then clean off any leftover adhesive.
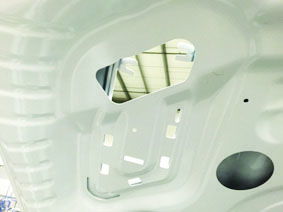
5. Release six (6) clips on each factory heat extractor and remove them from the vehicle.

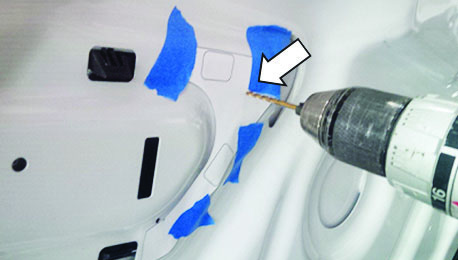
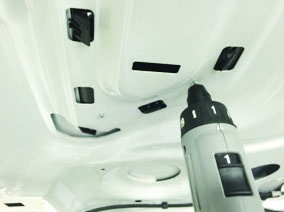
6. Cut out the drill templates from the last page of this instruction manual, tape them in place as shown below and then mark the two (2) drill holes with a center punch.

7. Drill each hole with a 1/8" bit. After the holes are drilled, apply commercially available clear coat (Motorcraft Part Number: PM-19500-6000) to the exposed metal so that it does not rust.
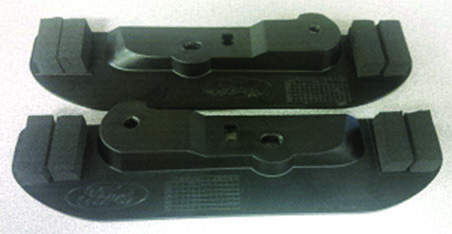
8. Install the supplied adhesive backed foam (P/N: 1315-HEFOAM-AA) to the bottom of the factory black plastic pieces as shown below.
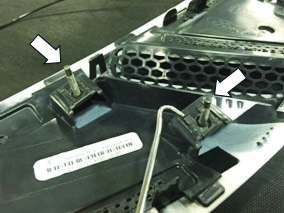
9. Remove the two (2) studs from the stock heat extractors and install them on the ROUSH heat extractors.
10. Install the ROUSH heat extractors by clipping them into the factory slots and installing two (2) T10 screws (P/N: 96817A350) in the holes that were drilled in step 6. Torque the screws to 0.4 Nm.
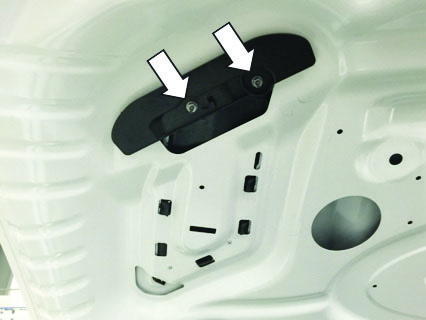
11. Reinstall the factory black plastic piece with the two (2) nuts that were removed in step 3. Torque them to 1.4 Nm.
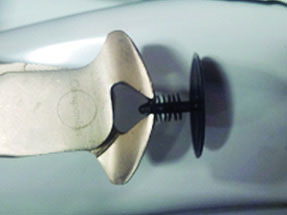
12. Trim two (2) of the hood blanket push pins as shown below.

13. Reinstall the factory hood blanket with the fifteen (15) pins that were removed in step 1. Be sure to use the trimmed push pins from step 12 in the locations that are identified below.
Congratulations!You have now completed the installation of your ROUSH heat extractors.

