 FREE 1 to 3-Day Delivery on Orders $149+ Details
How to Install an SLP Loudmouth Catback Exhaust on Your 1986-1993 Mustang LX or 1993 Cobra

Shop Parts in this Guide
Installation
Packing List
| Item # | Quantity | Part Number | Description |
|---|---|---|---|
| 1. | 1 | 310304796 | P-side Front Intermediate Pipe |
| 2. | 1 | 310304795 | D-side Front Intermediate Pipe |
| 3. | 1 | 310304798 | P-side, Mid Intermediate Pipe |
| 4. | 1 | 310304797 | D-side, Mid Intermediate Pipe |
| 5. | 1 | 310304791 | P-side, Tailpipe |
| 6. | 1 | 310304792 | D-side, Tailpipe |
| 7. | 2 | 310305785B | Tip, Polished, Slash Cut, Dual Wall |
| 8. | 8 | 308144380 | 2.5 in. Band Clamps |
| 9. | 1 | 307398723 | Passenger-side Exhaust Hanger |
| 10. | 1 | 307398724 | Driver-side Exhaust Hanger |
| 11. | 2 | 307334788 | Flange, Ball, 2.5 in. |
| 12. | 2 | 310013202 | Resonators, SLP Stamp, Polish |
| 13. | 1 | Instructions Instructions |
Warning: SLP recommends allowing the vehicle to cool (not running) for five hours before beginning the installation. SLP recommends wearing safety glasses for the complete installation.
Installation Instructions
1. Raise the vehicle to allow for a sufficient work area underneath the vehicle. A vehicle lift will make this installation much easier; however, raising the vehicle can be accomplished using ramps or a jack with jack stands.
2. Remove the old exhaust from the vehicle by unbolting the 2 flanges from the H-pipe and removing the exhaust hangers from the rubber insulators.
Note: You may need to cut the old pipes in the vicinity of the rear axle or disconnect the shocks to gain enough suspension clearance to remove them.
3. Remove the old muffler hangers from the vehicle underbody and frame, but save the fasteners, as you will be reusing them.
4. Bolt the muffler hangers provided to the vehicle under body using the same hardware and location as the original muffler hangers. The side of the hanger that will hang lowest should be facing the outside of the vehicle.
5. Insert the hangers on the driver side mid intermediate pipe into the rubber insulators on the new muffler hanger provided.
6. Next, slide the SLP Loudmouth Resonator with 2.5 in clamp onto the inlet of the mid intermediate pipe.
7. Next, slide the front intermediate pipe with clamp (Driver’s side is the shorter of the two front intermediate pipes) onto the inlet of the resonator.
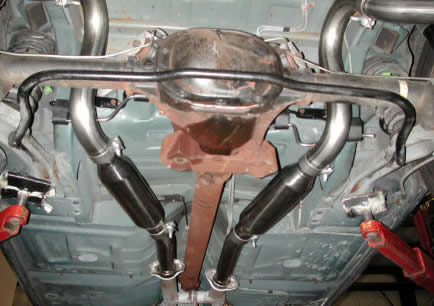
8. Next place the front intermediate pipe inlet onto the ball flange at the back of the stock h-pipe and slide the flange onto the studs. Thread the nuts onto the studs but leave them loose enough to allow later adjustment. See photo below for proper installation.
9. Next, slide a clamp onto the front of the driver side tailpipe and slip it onto the mid intermediate pipe where it comes over the axle. Loosely tighten the clamp.
10. Place a clamp onto the end of one of the tailpipe tips, slide the tip onto the tailpipe, and slide the hanger into the factory rubber hanger. Loosely tighten the clamp.
11. Repeat this procedure for the passenger side.
12. Now adjust all the pipes until the tips are located as desired and all the pipes have enough clearance from all suspension, brake lines, fuel tank, driveline, and body parts.
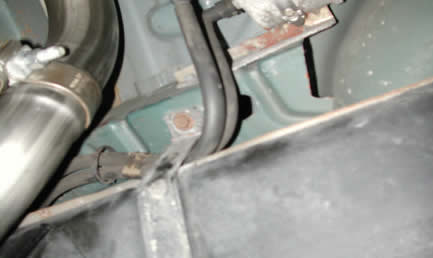
13. On some vehicles the fuel lines coming out of the fuel filter will need to be tucked behind the gas tank mounting strap. To accomplish this simply support the gas tank on the passenger’s side with a deadman and remove the bolt holding the strap to the body of the car. Next tuck the fuel lines between the tank and the strap and tighten the bolt back in its original location. See photo below. The fuel lines will NOT be crimped in any way as there is more than enough room between the tank and the strap to tuck the two fuel lines away from the exhaust.
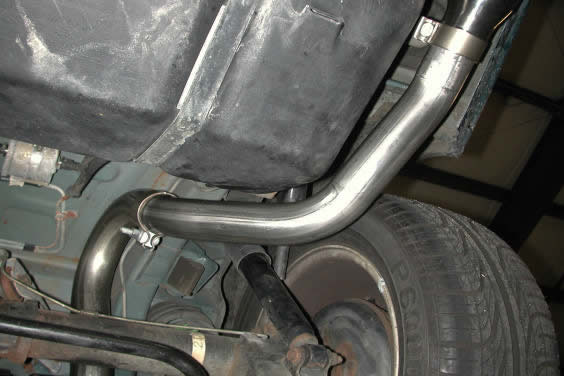
14. Please view photo below of suggested clearance of passenger side tailpipe to the passenger side of the gas tank.
15. Tighten all the clamps and fasteners working from the H-pipe back, while checking and maintaining correct tip location along the way. The H-pipe flange studs/nuts should be tightened to 26 lb/ft.
16. Start the vehicle and inspect for leaks.
17. Double check all fasteners and clearances after test driving. Adjust as necessary.
Related Guides
-
Installation
-
-
Installation

