Talk to a Mustang Sales Tech
1-877-887-1105
M-F 8:30A-11P, Sat-Sun 8:30A-9P
$20K Sweeps! 10 Chances to Win! Enter Daily >

SR Performance Lowering Springs; Touring (79-04 Mustang Coupe, Excluding 99-04 Cobra)

Item 397611
Verify parts fit and get product recommendations.
Mustang Sales Techs: Connect Now M-F 8:30A-11P, Sat-Sun 8:30A-9P
$0.00
Our Price

$139.99

FREE Shipping Market Price $164.99 You Save 15% ($25.00) Up to 10% off for Military & First Responders! See Details

Will this fit your Vehicle?

Select a different vehicle Help?
Update or Change Vehicle
Ship to: Ashburn - 20149
Sorry, please enter a valid US or CA postal code
We're sorry, zip can't be updated at this time.
    Create a list
    Add to New List

    Saved - View your saved items

    We're sorry. We couldn't save this product at this time.

    or use

      Video Review & Installation

      Hey guys, Adam here with americanmuscle.com. Today, we're taking a look at and installing the SR performance linear lowering springs fitting all 79 to 04 Mustang Coupes, excluding 99 to 04 Cobra models. Now, if you are the owner of that fox body SN95 or New Edge Mustang Coupe, you might be in the market for a set of lowering springs. Now, if you're looking for lowering springs, you already know that they'll give you that aggressive stance for your Mustang. Appearance is definitely a big factor when picking out a set of springs. Now, I'll break down more in detail what linear versus progressive means when we take a look at this one compared to our progressive stock spring. Now, if you're looking to get this linear spring for yourself, you can do so for just about 130 bucks on the site here. And again, there's a ton of different options so you wanna make sure if you're in one that fits your preference. If you like the look of the one-and-a-half-inch drop these SR springs half your Mustang, I'm gonna show you how to install it. So, for the installation, it's gonna get two out of three wrenches on our difficulty meter. It is a little bit more difficult than a direct bolt on here although it does not require any cutting and drilling. You're gonna wanna have the whole toolbox on deck, a variety of extensions, sockets, power drill, ratchets, wrenches, ratcheting wrenches, gloves, of course, eye protection, I'd say a pry bar, and definitely a mallet or hammer to get the job done. One of your best friends going through into this install is going to be PB Blaster or WD-40 because this thing is a rust bucket, 20 to 23 years old and even more for the fox body owners out there. There's a lot of rust under here which you can see in our frame, so our bolts are definitely going to be pretty bad. So I'm gonna show you and walk through all the steps I took to fix all that stuff. And of course, using a pry bar to pop in and out of our springs will definitely help. Some of these things actually broke off into our A-arms, you'll see me tackle that as well. Now, without further ado, I wanna show you guys how this got installed so expect about three, maybe four hours, if you're working on the floor. It's definitely gonna take some time here, maybe a little bit more for you guys who might not have as much experience. Without further ado, let's see how this gets done. Tools needed for this install are power tool, ratchet, PB Blaster or WD-40, extension, 10 millimeter ratcheting wrench, 10 millimeter wrench, 14 millimeter wrench, 15 to 17 millimeter ratcheting swivel wrench, 15 millimeter wrench, 18 millimeter wrench, 15/16ths wrench, flathead screwdriver, hammer, mallet, breaker bar, pry bar, blade, swivel joint socket, 10 millimeter short socket, 15 millimeter deep socket, 13 millimeter deep socket, 15 millimeter short socket, 18 millimeter socket, 21 millimeter socket, and 22 millimeter socket, impact gun. All right guys, to kick off the uninstall the first thing, of course, we need to do is pop all four wheels off in all four corners. I already broke the lug nuts loose. Make sure you have that key on deck if you have the keyed lug nuts. I already have that attached here so I'm gonna grab my 22-millimeter socket, pull the rest of the nuts off, grab our wheels out of the way, and we'll get to work. All right, guys, once you get your wheels off, the first thing you wanna do is to make sure you get your car in the air. If you're working on the ground, it can be a little bit easier to remove the top nut holding the shocks in from in the trunk liner. Now, if you are gonna go that route, you wanna make sure you're supporting the rear axle with jack stands on both sides. Support the weight because once you remove the top nut, the whole suspension is gonna drop down and decompress the spring which can be a little bit dangerous. Make sure you're supporting the rear axle before you do anything. We're working on a lifter today so we got it up in the air, so our next step is to support it with pole jacks. If you're working on the floor with just a hydraulic jack, you wanna have jack stands under both sides of the rear axle. You wanna make sure you're putting pressure on it so that once you relieve the pressure off of your shocks, the rear axle doesn't drop down decompressing your spring. That can be very, very dangerous. This is a very important step. So make sure you're using your pole jack or jack stands underneath the rear axle and putting pressure on it. All right, so before we remove any bolts, the first thing I wanna use is our PB Blaster, WD-40 obviously works very well, as well. So, the first thing I'm gonna do is lube up the bolt here on our brake line bracket. Now, I wanna remove this just because once I do start lowering down the rear axle, I don't want pressure to be put on the brake lines, that can also be pretty dangerous. I'm gonna lube up that bolt there, then I'm gonna put PB Blaster on the bolt and nut here on the bottom of our shock. Grab your 10-millimeter socket and extension, and remove the bolt here holding on the bracket for your brake line. Remove that clip there to get it out of place so it doesn't put pressure on it. All right, so I got my 15-millimeter wrench here on the backside of the bolt, 18-millimeter socket on the nut on the front. So this is the bottom of our shock here. This is exactly why you wanna have the pole jack underneath the rear axle here. Once this is removed, all the pressure is going to drop down off of the spring and the rear axle, so this will come down. That's why you want to support that with your jack. Just grab our mallet and knock this through. All right, since this is the solid rear axle, we're gonna do both sides simultaneously. So, we have our bolt out of our shock on the driver side, we're gonna do the same thing for the passenger. All right, so it's about that time, all we have to do now is lower down our pole jacks or if you're using jack stands, you can do it that way, or a hydraulic jack, if that's the route you're taking. So we're gonna lower down our pole jacks one at a time. Now, this is very crucial to do it very cautiously. Gonna make sure you're going very slow because it's going to start to decompress that spring. The spring is under a tremendous amount of load and pressure. So if you do it too quick it can decompress and even shoot out and be very, very dangerous and cause injury. So we're gonna do one at a time, lowering it very slowly, decompress that spring until it's fully decompressed. And we're gonna do it to the opposite side here and we'll be able to remove both springs simultaneously. We got all the tension off of our rear springs here, you'll be able to tell because your jack only lowers so much and the rear axle only go down so far. You'll be able to see...you can start to twist and turn, it's got a little bit of flex to the springs here. All I'm gonna do is hit it with some PB Blaster on the bottom and the top where the isolators meet. And simply because it is a 21-year-old car, it is a 97 Mustang, so these are factory parts. So it is pretty old, they've never been taken off before, so everything's a little rusty. I do expect maybe some of the springs to even break, isolators are gonna be cracking and rusted, falling apart. So hit a little PB Blaster in there. Then I'm gonna grab a pry bar and start to pop them out of their sockets. You're starting to have a little trouble getting your springs out, you can always raise the opposite end up a little more on the rear axle just to drop the one that you're working on a little bit lower. So that's what we're gonna do here and grab our pry bar again and try to get that spring out. We've got our driver side spring out in the rear, now we have to work on our passenger side. So we're gonna raise up the driver side axle, lower down our passenger side one to get that a little bit lower, decompress it some more and pop it out. All right, guys, so we finally got our factory spring off of the car and on the ground here sitting next to our SR performance linear lowering spring. Now, there are two big points I wanna point out here, the progressive versus linear and the ride height difference. So first off, ride height is something a little more obvious, right, you can take a look at these two springs and notice the difference in height. Now it does look like more than an inch and a half on the ground here, but you wanna keep in mind once it's under load here, you're looking at about an inch and a half drop in all four corners. There are other aftermarket springs out there that give you a staggered look, maybe two-inch drop in the rear, and an inch and a half in the front, or whatever the differences may be. So if you're looking for a consistent all four corner equal drop, the SR performance here gives you that inch and a half drop, which I think looks pretty good on the SN95 Mustangs. Now, the second thing here I wanna point out again is progressive versus linear spring rates, which we have the difference here. Now the SR performance linear spring is to my left, and our stock spring here is a good example of a progressive spring rate. So I do wanna just point out here that progressive springs are really gonna give you the best of both worlds. You get that comfortable ride height under normal driving conditions, great for daily drivers, people, just weekend warrior cars, going to car shows, and just cruising around town. But for guys who want that drop in ride height and still want that sporty feel under hard loads, whether it be tight corners, you're doing a lot of cornering there, you're doing some of the back roads, or if you're doing a lot of burnouts and drag launches and you just want that best of both worlds feel, progressive is gonna be the way to go. There's a ton of options out there in the aftermarket world. Now, if you're looking for something a lot more consistent, that has that sporty feel all the time, lets you know exactly how it's going to perform under every single driving condition, no matter what you're doing, whether it be the racetrack, the autocross course, or just you know driving to work, the linear spring is gonna be what you're looking for. This is typically race ready, great for guys out there who want to know exactly how it's gonna perform every time with one defined spring rate. That's the linear spring, and that's what we're working on today. So without further ado, I wanna get our one and a half inch drop linear springs installed on our Mustang. So let's get to it. So we're pulling out or factory isolators here. And as you can see they are a little beat up, the top ones a little mutilated, this bottom one is just completely ripped apart. What we're gonna do is actually completely replace this. Now, they don't include these in the kit for the SR performance linear lowering springs, you're gonna have to pick these up separately but they're pretty inexpensive on the site. It's a really good idea if you're working on a car that's upwards of 20, 21, 22 years old like our SN95 here. So we're gonna replace these isolators, put them on our springs and throw it up in the vehicle. Put our new isolators on top and bottom of our spring, the smaller pigtail side of our spring is actually going to be on the bottom. So we're gonna go ahead and seat that into place. All right, so might be a little easier for you guys to seat the isolator in place first, otherwise, you can feed it over just like this. Make sure you're seating that isolator into the factory position here, snap it into place, get the spring to seat properly there. Once you put a load on it, it'll start to seat a little more evenly on the bottom seat. Now, we can pop off the opposite sides old factory isolators, pop our new isolators into place, put our spring in. With our new SR performance lowering spring in place, what we need to do now is start to raise up our rear axle on both sides to get it to compress a little more, and we'll start to feed in the bottom of our rear shock into its place and bolt it down. Once we have it compressed a little bit more, everything will start to line up and we'll be good to move on to the front. Now, we have the bottom of our shock lined up with the factory mounting bracket, we can start to put our factory bolt straight through again, tighten it up with the nut. All right, at this point, take your 15-millimeter wrench and your 18-millimeter socket, and tighten up the bottom shock bolt. Now, we're here on the passenger side, we're gonna lift up this side of the axle, get our rear shock to line up through the bracket here, bolt it down, and move on to the front. I wanna make a quick note here that you wanna make sure both of your springs are coiled or facing in the same general direction. Now, if you didn't make note of where your factory springs are sitting, little pigtail at the bottom of your rear spring, I like to point it right at the end of the rotor here, right where the gap is between your rotor and the wheel well. Right here is where that pigtail is gonna sit, and you wanna make sure the opposite side is facing that same direction so they're not coiled in two different ways. The last thing we have to do after the bolts are replaced on the bottom of the shocks is bolt up the bracket holding on our brake line back into the hole on our frame. As we're wrapping up the rear here, I just wanna make a quick point for you guys working on the ground and not on a lift like we are. A lift obviously makes things a lot easier, pole jacks are easy to control to lower down our rear axle. But if you're working on the ground, you've probably got jack stand supporting your car at the pinch welds [SP], which is a really good spot for them or under the frame. And then, of course, you wanna have a hydraulic jack to be lowering and lifting your rear axle. Now, if you only have one hydraulic jack, you can just do it right under the pumpkin or the differential. That'll lower them both pretty evenly and you can work on them simultaneously. If you've got a couple hydraulic jacks, I like to put one on each side to make your life a little bit easier there for decompressing and compressing the springs. Of course, you wanna make sure you're putting that hydraulic jack on the axle itself, not on the control arms or anything like that. Under the axle or under the differential is where you wanna put it if you're working on the ground. Now, we're finished on the rear, we've got everything bolted back up. Let's move on to the front. The front end here has a couple more things you have to disconnect but it's really not too difficult. If you're working on the ground, make sure you still have your jack stand supporting your vehicle under the pinch welds. Make sure you're using your hydraulic floor jack to support underneath of the A-arm. Put a little bit of pressure on there, so once we just connect all of our bolts it doesn't decompress the spring all the way. Now, if you're using a lift like I am, a pole jack would be the exact same thing underneath of the A-arm. So the first thing we're gonna disconnect is our brake line bracket, and of course, we're not putting pressure on it. Number two is the top nut on our sway bar end link, that will disconnect the sway bar. And then there's two more bolts at the bottom of our strut tower holding our strut to the assembly itself. So three things to disconnect there. First thing we're gonna do is put our pole jack underneath the A-arm and then get to work on our bracket. All right, the first thing we're gonna disconnect is the brake line bracket here, bolt is on the other side. That'll come loose so we don't put pressure on it. Second thing we're gonna disconnect is the top nut on our sway bar end link. That's gonna disconnect our sway bar here so we're gonna do that. Third thing we're gonna disconnect is the two bolts on the bottom of our strut here. So our strut comes down and connects to the hub assembly, we're gonna remove those two bolts there. And you're gonna need both a socket and a wrench there to hold on from one side and disconnect it, the same thing for your sway bar end link. You're gonna disconnect this nut at the top but you're gonna have to hold on to the one underneath here to keep it from spinning. All right, so we're going to put a pole jack right here underneath of our A-arm. Here we go. So we're gonna use our ratcheting wrench here, a 10 millimeter to remove the bolt holding on our brake line bracket. This might be a little rusty, so you might wanna hit it with some PB Blaster and give it some good old elbow grease. Now, we're gonna put our 18-millimeter socket on the bolt underneath here, our sway bar end link and we're gonna use our 14-millimeter wrench to remove our top nut. All right, guys, when it comes time to take the bolts out of your strut on the front end here when working on the driver side, you're gonna wanna use on a lot of PB Blaster or WD-40 since it is upwards of 20 to 22 years old here. The bolts are factory, they've never been removed. So it is gonna be a little bit of a pain in the butt. If you're having that much trouble after hitting it with the PB Blaster, you can always use a breaker bar like I did. This makes life a lot easier, gives you a lot more leverage, you can put more strength on it. Once the nuts are out of place, the bolts might be a little tough to get out by hand, so you might need a hammer to knock them out of place. And then if it doesn't actually fully come out, you can actually remove some of the tension from the pole jack or jack stand underneath the car. That way it can kind of play with the threading there and it will actually allow you to pull the bolt out. I'm gonna release some of the tension by pulling this pole jack up a little more, that way the bolts will come out a little easier. It's about time we lower down the pole jack to take that compression off of our front spring here. Make sure you're doing this with caution. Just like the rear, it can be very dangerous if you do it too quickly. Just wanna make sure you decompress that spring with ease and go very slowly. So let's get to it. You'll start to see your sway bar end link coming out of the sway bar there. So, the fronts were a lot harder to get out than the rears, they were pretty stubborn and are pretty much rusted to the A-arm here. So what you're gonna need to do is use a lot of PB Blaster, WD-40, and a pry bar. It's pretty lengthy to give yourself some leverage to pop that out of place and stand out of the way so it doesn't pop right out and shoot at you. So just be smart and be cautious when you're trying to get the front springs out. Now what we're gonna do is take a flathead screwdriver and just scrape along the bottom of this A-arm to scrape some of that rust out, clean it out and then pop our new SR springs in. To assemble our isolators onto our spring here, obviously, the flat one goes over top of the flat and coil, that's gonna be the top of your spring. We're gonna flip this over and this is gonna be a little bit more difficult. So, we've got this tubing isolator that's gonna have to go all the way around the coil. So you're gonna wrap this around so it's wrapped around that coil there. So what I'm gonna do is take our PB Blaster and I'm gonna lube up real good the inside of this tubing and then I'm gonna lube up the coil here, so hopefully it'll slip right on. So if it gives us any trouble, we'll use our mallet to knock things in. But for now, let's lube it up and get to work. So we're having a little trouble getting our isolator tube over the spring coil, simply because the beginning of this coil here is a little too narrow for the thickness of this tubing, so we can't actually feed it over. So what I'm gonna do is use my knife for, is to cut this down the middle, I'm gonna feed it over and wrap it around the coil itself. So let's go ahead and get that started. It's time we put our spring into place with the isolators. We'll do the top first. All right, we got our spring back in place, we've jacked it up enough to put pressure on the spring to compress it a bit. What we wanna do is jack everything up so that our caliper and hub assembly lines up with the open holes on our lower strut. So what we're gonna do is make sure it's jacked up properly, line it up, feed this bracket into the open slot here, put the bolts through and tighten them down. We'll finish it up by putting our sway bar end link back in place and then our brake line bracket. All right, now, we can put our 15/16th wrench over top of the nuts on the inside and then, of course, use our 21 millimeters socket to tighten them down from the opposite side. All right, so now we're gonna put our sway bar end link through, we're gonna put our spacer in first, over our isolator in second, that's gonna sit up against our sway bar. Now we're gonna put our rubber, spacer, cap it off with a nut. All right, now, we can bolt back down our brake line bracket. All right, guys, we're starting on our final corner here of our 97 Mustang. The first things first, pole jack or jack stands or hydraulic floor jack goes underneath of our A-arm here to support the weight of our spring so when we decompress it, it's safe. So what we're gonna do is start off by using a 10 millimeter ratcheting wrench to remove the bolt holding on our brake line bracket, then we're gonna move in to the sway bar end link again, finish things off with the two bolts holding on our strut to the hub assembly, and then we'll be able to decompress the spring, pop it out, replace it, put it back together. First things first, the 10-millimeter ratcheting wrench on our brake line bracket. All right, next up we're using a 15-millimeter wrench and socket on the bottom to remove our sway bar end link. So I've got my 21-millimeter socket, my 15/16th wrench holding on the nut from the other side, gonna remove the bolts on the bottom of the strut. Right, now we can use our hammer and knock these bolts out. All right, guys, it's about time we lower down this jack cautiously. Now, remember, this is going to be a really dangerous part, it has potential to cause some serious injury. You wanna make sure that you're slowly lowering your jack down do decompress the spring. I know I've made that point with all the other three corners that we've done so far. But it's really important that you guys do this very slowly and cautiously, making sure that it's decompressing enough that it's not gonna shoot out of its seat. So what we're gonna do is rotate our pole jack here, if you're using a hydraulic jack, make sure you're twisting that arm slowly to get it on the ground. It's about the time we put in our last SR performance linear lowering spring. We're gonna put it in here to our A-arm, get it seated properly, start raising up our pole jack to meet it up a little bit more, put a little tension on it. We'll put in a new sway bar end link since the old one was a little worse for wear. We're also gonna put in our brake line bracket bolt and then, of course, finish it off with the bolts in our strut. So let's get to it. All right, we got our spring seated here. All we have to do now is put the jack underneath of it, jack it up a little bit, put some tension in, and we can start reconnecting our pieces. At this point, we got our spring seated. I used a pry bar to get it to seat properly, just push up on it and it pops back into place. We're gonna, at this point, replace our sway bar end link. Now, this is the old one, here's our new one. The old one got some, you know, worn out bushings going on here. They're not gonna see a whole lot more life and it's also rusted to all hell. So what we're gonna do is just completely replace this, this is good to go. All we gotta do is unbolt the top of this, slip it into place, bolt it back down with our bushings in the correct order. All right, at this point, all we have to do is line up our hub to the holes in our strut here, and put our bolt through them. Now in order to do so, we might have to start jacking this up a little bit just to get it to line up properly, but let's get to it. Right, now last step here is to put back our brake line bracket right near the hole here. You can thread it by hand and then work on it with our ratchet. That's gonna wrap up my review and install walkthrough of the SR Performance Linear Lowering Springs. Now, we detailed the difference between the linear and progressive options, both of which you can find for SR performance on our site here for approximately the same price of about 130 bucks. If you're looking for the SR lowering springs with the linear spring rate, you can get yours right here at americanmuscle.com.

      Product Information

      Features, Description, Reviews, Q&A, Specs & Installation

      Features

      • Sleek Muscle Car Stance
      • Lowers Center of Gravity for Improved Handling
      • Linear - Standard Spring Rate
      • Blue Finish
      • Estimated Drop: Front - 1.5-inch, Rear - 1.5-inch
      • Clears Stock and Aftermarket Wheels & Tires
      • Professional Installation Recommended
      • Sold as a Set of 4 Springs
      • Does Not Fit Convertible Models
      • Fits 1979-2004 Mustang Coupes, Excludes IRS Equipped Cobras

      Description

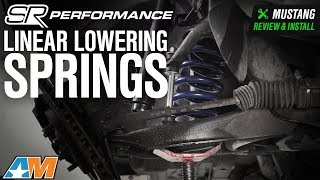
      Improves Handling. Are you looking for an inexpensive way to improve the handling performance of your 1979-2004 Mustang? If so, you should upgrade to a set of SR Performance Linear Touring Lowering Springs. These Touring Springs were engineered to lower your Mustang's center of gravity, which helps to reduce squat during rapid acceleration, body roll in the corners, and excessive nose-dive under hard braking. SR Performance Linear Touring Lowering Springs are ideal for daily driving, street, and even occasional track use.

      Sleek Lowered Stance. A set of SR Performance Touring Springs not only improve the handling performance of your Mustang, but they also improve its overall appearance. By lowering the ride height approximately 1.5-inch front and rear, that huge tire to fender gap is eliminated. These Touring Springs will provide your Mustang with a sleek, muscular stance that will be sure to get you noticed on the street and at the track.

      Linear Design. Linear springs (also known as standard rate springs) are engineered with a constant spring rate that remains the same as the spring compresses. This linear rate of compression allows for optimum traction and a more predictable handling feel at both low and high speeds. Linear springs will have a slightly rougher ride when compared to progressive springs. Linear rate springs are a popular choice for track and road course driven Mustangs. 460 lb/in - Front; 280 lb/in - Rear

      Clears Stock and Aftermarket Wheels & Tires. These lowering springs were engineered to be compatible with your stock size wheels and tires, as well as AmericanMuscle’s pre-configured wheel and tire combo kits (specific to your generation), to assure proper clearance with no rubbing issues.

      Professional Installation Recommended. Seeing that a spring compressor is required for installation of these Lowering Springs, AmericanMuscle recommends professional installment. With the proper tools, the install can be completed in about three hours. Please note that an alignment is highly recommended after installation.

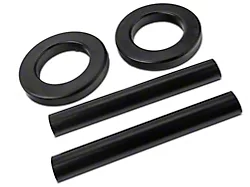
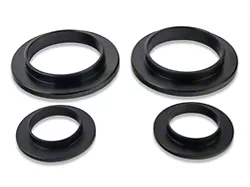
      Recommended Upgrade. When installing new Springs on your Mustang, you should also replace your old worn out rubber Spring Isolators with a new set of Polyurethane Spring Isolators at the same time, see ordering options above.

      Application. This set of four SR Performance Linear Touring Lowering Springs are specifically designed for use on 1979-2004 Ford Mustang coupes, including the LX 5.0, V6, GT, Bullitt, Mach 1, and 1993-1998 SVT Cobra models. Does not fit 1999-2004 IRS-equipped SVT Cobras. Does Not Fit Convertible models.

      SR Performance

      Fitment:

      Details

      SR Performance 397611

      CA Residents: WARNING: Cancer and Reproductive Harm - www.P65Warnings.ca.gov

      Installation & What's in the Box

      Installation Info

      What's in the Box

      • (4) Lowering Springs

      Tech Specs

      Springs Specifications
      Spring Rate:Front: 460 lb/in
      Rear: 280 lb/in
      Usage:Street
      Year:1979-2004 GT, V6, Mach 1, 1993-1998 SVT CobraModel:Fastback/Coupe
      Progressive or Standard:Linear/StandardEstimated Drop:

      1.5"F / 1.5" R

      4.7

      Customer Reviews (500+)

        Questions & Answers

        10 More Questions

        Will It Fit My Mustang

        • Bullitt - 01
        • Cobra - 81, 93, 94, 95, 96, 97, 98, 99, 01, 03, 04
        • Cobra R - 93, 95, 00
        • GT - 87, 88, 89, 90, 91, 92, 93, 94, 95, 96, 97, 98, 99, 00, 01, 02, 03, 04
        • LX - 87, 88, 89, 90, 91, 92, 93
        • Mach 1 - 03, 04
        • Other - 79, 80, 81, 82, 83, 84, 85, 86
        • V6 - 94, 95, 96, 97, 98, 99, 00, 01, 02, 03, 04

        Does not fit 1999-2004 SVT Cobra's with Independent Rear Suspension (IRS)

            Related Mustang Categories