 FREE 1 to 3-Day Delivery on Orders $149+ Details
How to Install Steeda Ultra Lite Chassis Jacking Rails (15-18 Fastback) on your Ford Mustang
Installation Time
45 minutes
Tools Required
- Jack and Jack Stands (optional)
- 15mm Socket or 15mm Wrench
- Socket Wrench
- Scraping Tool (Razor or Gasket Scraper)
- Blue Loctite
BEFORE
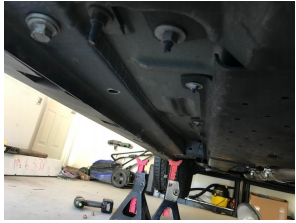
1. This installation can be done on the ground, but it is much easier to see what you are doing with the vehicle on jack stands. This installation will be done on jack stands.
2. Safely place the vehicle on jack stands.
3. The first rail installed in this guide will be on the driver side.
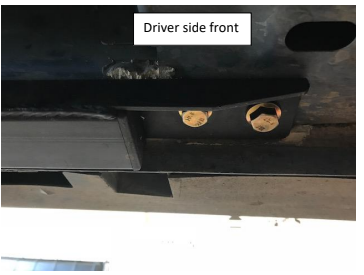
4. Behind the front factory jacking point there are two 15mm bolts approximately 1-2 inches from the pinch weld. Remove the bolts as pictured. These bolt holes will be used for installation.
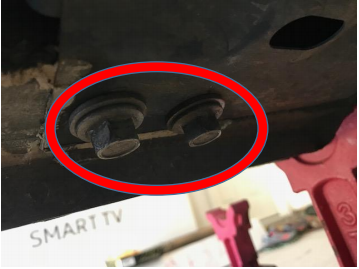
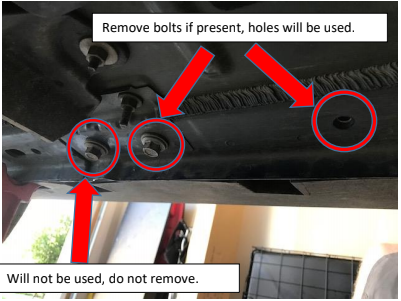
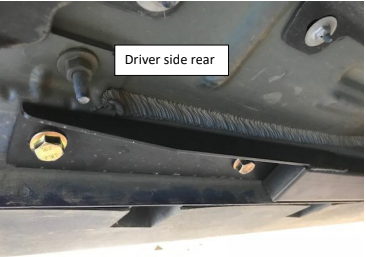
5. Located approximately 1-2 inches from the pinch weld near the rear factory jacking point there are two 15mm bolts to be removed. Remove the bolts as picture. These bolt holes will be used for installation. Not all models will have both 15mm bolts. Some will have an empty threaded hole with no bolt. The vehicle picture has one of the two bolts. There is a third bolt that is closest to the rear tire. Do not remove this bolt.
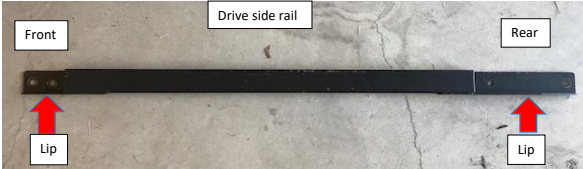
6. With all the required bolts removed. Test fit the side specific jacking rail. Identify the
appropriate jacking rail. The rail will have two bolt holes on each end. The end with the bolt holes that are closer together is the front and the end with the bolt holes with more space between them is the rear. The manufacturer recommends installing with the lip by the bolt holes oriented towards the inside of the car. Refer to picture.
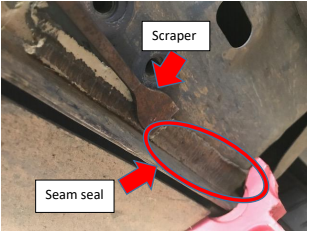
7. When test fitting note if the rail fits flush. It likely will not. In most cases the seam seal will push the rail out and prevent it from having a flat, flush fit with no gaps. In this instance, use a tool to scrape the seam seal off in the necessary locations. Only remove the seam seal required for a flush fit. A razor, gasket scrapper, or other scraping tool can be used. Be careful to not scrape too deep.
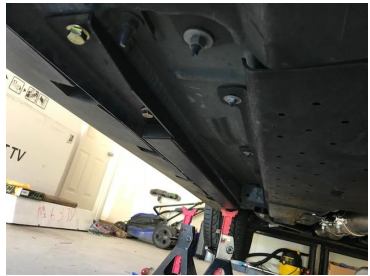
8. With the necessary seam seal removed and the rail fitting flush, locate the provided bolts for installation (4 bolts per side, 8 in total). Prior to installing bolts, apply 1-2 drops of Loctite to the threads on the bolts. Hold the rail in place and install one bolt at a time and do not completely tighten. Once all 4 bolts are installed, tighten all bolts. If you have trouble getting a bolt in, loosen other bolts as needed to get proper alignment. Refer to the pictures to ensure proper orientation.
9. Note in the following pictures this is the end of rail with the bolt holes that are spaced closer together and the lip is facing inward. This is the driver side front portion of rail.
10. Note in the following picture this is the end of rail with the bolt holes spaced further from each other and the lip is facing inward. This is the driver side rear portion of rail.
11. Repeat steps on passenger side of car.
12. Safely put vehicle back on ground from jack stands.
13. Check tightness of bolts after a few drives.
AFTER
Installation Instructions provided by AmericanMuscle Customer

