Talk to a Mustang Sales Tech
1-877-887-1105
M-F 8:30A-11P, Sat-Sun 8:30A-9P
$20K Sweeps! 10 Chances to Win! Enter Daily >

AFE Momentum GT Cold Air Intake with Pro DRY S Filter; Black (18-23 Mustang EcoBoost)

Item 409378
Verify parts fit and get product recommendations.
Mustang Sales Techs: Connect Now M-F 8:30A-11P, Sat-Sun 8:30A-9P
$0.00
Our Price

$442.00 (each)

FREE Shipping Market Price $508.99 You Save 13% ($66.99) Up to 10% off for Military & First Responders! See Details

Will this fit your Vehicle?

Select a different vehicle Help?
Update or Change Vehicle
Ship to: Ashburn - 20149
Sorry, please enter a valid US or CA postal code
We're sorry, zip can't be updated at this time.
Recommended Install Shops
How It Works
Install Shops are available near Ashburn - 20149

Add Local Shop Installation

Total cost of service $175.00
    Create a list
    Add to New List

    Saved - View your saved items

    We're sorry. We couldn't save this product at this time.

      Product Videos

      Justin: The AFE Momentum GT Intake that we have on the table today should appeal to the 2018 and newer EcoBoost-powered Mustang owners out there who might be after a premium, no-tune-required intake to help deliver more power and better throttle response by increasing the airflow by over 24% compared to your factory airbox. Now, this particular AFE intake will combine a sealed enclosure or sealed airbox along with AFE's signature Pro DRY S Filter and a solid two-year warranty, all for right around the low $500 price point.Let's focus in on some of the features here with the Momentum GT from AFE. And one biggie that I always like to point out when we're talking intakes, especially one like this, is that you are getting a very high-quality sealed enclosure or sealed airbox design that will ultimately be the best bet when it comes to keeping your intake air temperatures down and your horsepower up. Listen, those open element style intake systems on the site here, they certainly sound very cool, they look very cool under the hood, but they can be affected negatively by hot engine bay air leading to a loss in performance. Now, the sealed enclosure that we have here today will tap into your EcoBoost Mustang's factory cold air ducting immediately on the front of the car, but I also like how this option has this little portion right here along with a removable plug. According to AFE, this is gonna be a secondary inlet to basically draw air in from the inner fender of your EcoBoost Mustang, which is cool, right? Something that other intakes in the category certainly don't offer. And if you're not crazy about the design, they do give you that plug here to essentially eliminate that and just stick with the factory cold air ducting that this system does utilize.But let's talk about what matters most, at least to a lot of owners out there when looking at an aftermarket intake system like this, and that, of course, is performance. Now, the AFE is going to deliver in that regard, again, increasing the airflow by 24% over the factory setup. And as a result, you are gonna be looking at some pretty solid gains and some pretty realistic gains. I do wanna really emphasize that because AFE is claiming about 7 horsepower, 9 pound-feet of torque with this system installed, again, gained over your factory airbox. And by the way, guys, that is without the use of any tuning, canned or custom. This system does not require the use of any tuning whatsoever. And to see that you are picking up some meaningful gains with the system installed, that certainly is nice to hear. And again, these are realistic gains. Some manufacturers like to throw out big numbers when it comes to a no-tune required intake such as this, but AFE keeps it real here. And this is kind of what I tell a lot of owners out there when installing something like this. Best case scenario for a lot of guys, it's gonna be those high single-digit, low double-digit gains, and it seems like the momentum falls right in line with that.Let's shift gears and talk about construction a bit more here, guys. And the AFE kits consistently rank among some of the nicest in the categories from a build perspective. And this kit is no different. Now, the airbox, again, is a one-piece design made from polyethylene, while the tube itself is also going to be made from that same material, that polyethylene, but has been computer designed here to help increase, again, that airflow and performance. And this thing is dyno tested, according to AFE, to increase that power, as we talked about earlier. Now, inside that airbox will be one of AFE's Pro Dry S Filters. This guy is about 8 inches tall, consists of three layers of a high-flow synthetic material that does not require any maintenance, any oil, or anything like that. Obviously, an occasional cleaning may be necessary, depending on your driving conditions and where you live. But one of the nice things about this system is this little window here kind of allows you to keep an eye on that filter at all times, checking the condition over the years. I don't anticipate you're gonna need to clean this thing a lot, but you can tell when things do get a bit dirty, thanks to the white material, and that clear window kind of lets you keep an eye on things as the years progress.Now, finally, guys, the kit does include all of the necessary hardware, very nice clamps as well. It's little things when you start spending this kind of money that you might not expect, but you look forward to. And things like the clamps, yes, I know it's silly to talk about, are even considerably nicer than what you might see with a more budget-friendly kit. Last but not least here, guys, this kit is backed by a two-year limited warranty, just in case you should run into any issues.Price point for the AFE, again, certainly isn't gonna be the most budget-friendly system in the category. In fact, you're looking at, I would say, right around that low $500 mark. Certainly does make this one of the more expensive options on the site, at least at the time of this video. With that being said, still not quite as expensive as options like the Corsa, for instance. That's gonna cost you a couple hundred bucks more than the AFE. But just know, in general, when you start looking into a sealed enclosure, if this is really what you wanna go with, you will be spending a little bit more at the end of the day when compared to those open element-style designs.All right, last but not least here, guys, let's talk a bit more about the install. Site's gonna correctly peg this one at a pretty mundane one out of three wrenches on the difficulty meter. Call it an hour or so to complete from start to finish using some pretty basic hand tools. But now to give you a better idea of how this one will go down in the garage or driveway at home, check out our detailed walkthrough and tool breakdown.Man 1: The tools you'll need for this project are a half-inch and quarter-inch drive ratchet, a 7, 8, 10, 12, and a 20-millimeter socket, an extension, a swivel joint, and a pair of needle nose pliers. Hi, everyone, today we're installing a cold air intake on our EcoBoost Mustang. But first, let's watch a short video on how to uninstall the stock intake.Man 2: All right, guys, first things first, we have to disconnect the negative cable on our battery just to keep things safe. What you're gonna do is remove your battery cover from your engine bay, set that aside, 10-millimeter socket, loosen up the bolt, remove your negative cable on the battery. The first step in uninstalling our factory airbox is to use a 7-millimeter socket to loosen up the band clamp holding on the factory airbox here. We're gonna disconnect our sensor, pop off a couple of clips on the airbox itself, and pull it off. Next step to remove our factory air filter is to grab your ratchet, small extension, and your 10-millimeter socket and remove the bolt holding it to the firewall. There's a couple of hoses we have to disconnect from the factory tubing leading back to the turbo. Now, I'm gonna use needle nose pliers to disconnect some of the hose clamps. I can do some by hand with my thumb, which I'll show you in just a second. And then for the last clamp holding it to the turbo, you're gonna wanna have a decent extension, possibly a swivel socket to make your life easier, and then a 7-millimeter socket for your last clamp.So what we're gonna do now, disconnect those hoses with the needle nose, and we'll work from there. All right. So we're gonna use our needle nose to disconnect the hose clamp on our air bypass valve hose. Go ahead and pinch that if you are physically able, which I apparently am not. So here is this gray plastic PCV hose connect that you're gonna remove. You can pinch this back with your needle nose pliers. Or you can reach your finger in there. It's a little hot. Push up on the connect and disconnect it from the hose. All right. We've got our extension on our ratchet, our 7-millimeter at the end of a universal swivel joint. I'm gonna go ahead and loosen up the clamp at our turbo. All right. You can rotate our clamp here and we'll be able to disconnect our hose from the turbo and remove your factory hose from the engine bay.Man 1: So before we can install our new box, there's a couple things that we need to take care of. One, we need to remove this grommet here because we're going to use that for this post right here when we install the new one. And also we need to remove the grommet and washer from the old one and insert that into the new one to be able to secure it to the body. So to do that, what we're going to do is we're just going to pull down on this rubber grommet here. We're just going to pull down on this grommet here until it pops off. And for the other one, what we're going to do is slide the grommet out, slide this washer out from the bottom side here, and then we can go ahead and push the grommet out. Now, once we've got that out, We can go ahead and install the grommet into the new box, and just kind of work it around until it is seated into place. Once that's in place like so, we'll go ahead and reinstall the spacer. And then what we'll do is we can put this on here right now just to hold it into place. And now let's work on our intake tube itself.So the first thing we're going to do is install our PCV fitting here into this brass fitting on the tube itself. Now, it is recommended that you put some sort of a sealant on here like Teflon tape to make sure that it doesn't leak. Now we're not going to do that on ours because we're not making this a permanent change. So once you've got it wrapped up with your Teflon tape, Let's go ahead and screw that in. And then you can use a ratchet and a 20-millimeter deep socket to tighten that down. Now, you don't have to tighten this down real tight. Just make sure that it's snug and that'll take care of that. Next thing we need to do is insert our grommet and our fitting for our air temperature sensor when we put that back in. So we'll go ahead and install our grommet and just work it into place. Once you've got it into place, go ahead and insert the plastic fitting. Now, I will tell you that the fitting for this temperature sensor is going to be a tight fit, so you may want to consider using some sort of a spray lube to ease the installation when you push this in. Now that we've got it locked into place, we can go ahead and get our intake installed.Now, when we install our new airbox, you want to make sure that this end of the airbox here fits into the fitting. There's a plastic fitting right underneath this cover here up against the grille. So you want to make sure that this end of it here fits in there when you set it in place. So we'll go ahead and do that. Now, with our airbox in place, we'll go ahead and reinstall the 10-millimeter bolt in the corner and tighten it down with our 10-millimeter socket. Now we can go ahead and insert our filter into the airbox. We'll slide our large clamp over the outer edge of the airbox and just tighten it down enough to hold it in place. And to do this, we're going to use our 12-millimeter socket. And once we've got that done, we can go ahead and install our tube.Now, before we install our intake tube, we're going to go ahead and put our coupler on the end of it. Slide the large end over the end of the tube, then slide our clamp over the top, and just snug it up enough to hold it in place. Now we can go put the other clamp on the other end. Now let's go ahead and get this installed. Now we'll feed our clamp back down inside towards the turbo and insert the larger end after putting on the clamp over the filter. So after you've got your clamp on the outside of the filter, go ahead and feed our tube in, and then we'll just tighten that down to hold it in place. Again, we're using our 12-millimeter socket. Now we can connect the other end of our tube to the turbo itself. It's a little hard to get in here with the clearances, but you know where the end of the tube is at, so we're just going to slide that over the turbo, and then we can tighten down the clamps. Now we'll tighten up the two clamps on our coupler here on the turbo using our 8-millimeter socket and our swivel joint. Now we'll tighten up the two clamps on the airbox with our 12-millimeter socket.Now we can go ahead and connect our PCV hose to our fitting that we installed and that's just going to fit over the top and slide down and clip into place. Now we'll go ahead and connect our bypass hose and we'll open up this clamp, slide the hose down over top of the fitting and release the clamp. Now we can remove our air temperature sensor from our stock box simply by turning it counterclockwise and pulling it out. Once we've got that out, we go ahead and insert it into our grommet. Now we'll insert it into our grommet in our new tube and just work it in until it locks into place. Once you've got that in, we go ahead and reconnect our wiring harness. And that wraps up our review and install of the AFE Momentum GT Cold Air Intake with Pro DRY S Filter in Black for your '18 and newer Mustang EcoBoost. Thanks for watching, and remember, for all things Mustang, keep it right here at americanmuscle.com.

      Product Information

      Features, Description, Reviews, Q&A, Specs & Installation

      Features & Specs

      • Improves Horsepower and Torque
      • Increases Throttle Response
      • Integrated Design Directly Mates to EcoBoost Motor
      • Dyno-Proven Gains up to +7 Horsepower +9 Pounds x Feet Torque
      • Outflows Factory Intake by 24 Percent
      • Measured Flow: 285 CFM at 7 Inches H2O
      • Durable 1-Piece XLPE Housing/Black Finish
      • Captures Air Directly from the Front of the Vehicle
      • Washable and Reusable Pro Dry S Air Filter for Maximum Performance
      • Clear Sight Window for Convenient Filter Inspection Without Disassembly
      • Innovative Filter-to-Housing Interface
      • Installation Hardware Included
      • Easy Installation
      • 2-Year Limited Warranty
      • Fits All 2018-2023 Ford Mustang GT EcoBoost Models

      Description

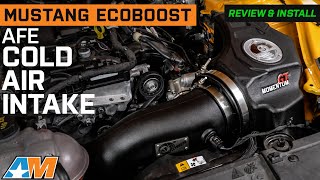
      Cutting-Edge Power. The AFE Momentum GT Cold Air Intake with Pro DRY S Filter; Black is built to strategically improve your horsepower and torque. Featuring an integrated design that directly mates to your EcoBoost motor, this cutting-edge intake will automatically increase your throttle response. Dyno tested and proven to deliver gains up to 7 horsepower +9 pounds x feet of torque, this high-impact design captures air directly from the front of the vehicle.

      Unmatched Innovation. Featuring a washable and reusable Pro Dry S air filter, this state-of-the-art construction showcases 3 layers of synthetic media that is progressive in each layer and provides superior filtration efficiency and dust holding capacity. Made to use without oils, this filter is great for street use and measures an impressive 8 inches tall with a 360-degree radial flow and a 5-inch flange.

      Unique Housing. Crafted from a heat-resistant cross-linked polyethylene (XLPE), this 1-piece sealed housing incorporates the OE air inlet and features an auxiliary air inlet that captures extra air from the inner fender. For easy filter inspection without disassembly, a clear sight window makes for convenient maintenance.

      Installation. This cold air intake is an easy installation process and comes with durable hardware for long-lasting performance. Common garage tools are required for successful completion. The install time is estimated at 1 hour.

      Warranty. Any defect found in the materials or workmanship as a result of faulty manufacturing will be covered in full with a generous 2-year limited warranty.

      Application. The AFE Momentum GT Cold Air Intake with Pro DRY S Filter; Black is precision built to be a direct fit for all 2018-2023 Ford Mustang GT EcoBoost models.
      Tech/Carb Note. This intake system is not CARB exempt nor is it legally for sale in California.

      Warning. www.P65Warnings.ca.gov.

      Fitment:

      Details

      AFE 50-70050D

      CA Residents: WARNING: Cancer and Reproductive Harm - www.P65Warnings.ca.gov

      Installation & What's in the Box

      Installation Info

      What's in the Box

      • (1) Air Filter (Pro Dry S)
      • (1) Tube
      • (1) Housing
      • Installation Hardware
      4.7

      Customer Reviews (122)

        Questions & Answers

        10 More Questions

        Will It Fit My Mustang

        • EcoBoost - 18, 19, 20, 21, 22, 23