 FREE 1 to 3-Day Delivery on Orders $149+ Details
How to Install BMR Lowering Springs - Handling on your Mustang
Installation Time
1 hours
Tools Required
- Hydraulic jack and jack stands
- Strut type spring compressor
- Sockets: 10mm, 13mm, 18mm, 19mm

Shop Parts in this Guide
Front Installation
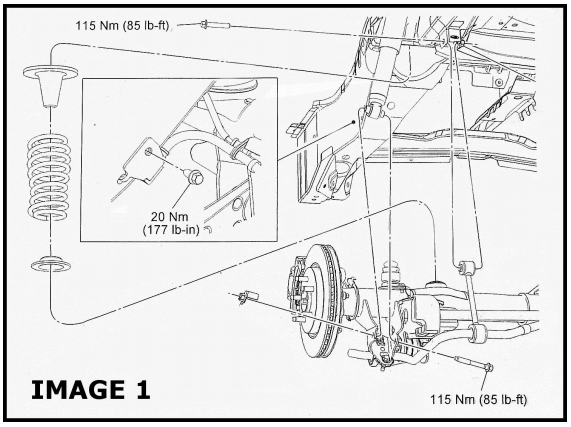
1. Open the hood and remove the (4) 13mm bolts on each side that retain the upper strut mounts. See IMAGE 1 for reference.
2. Lift vehicle and safely support it on stands. Remove the wheel and tire assemblies.

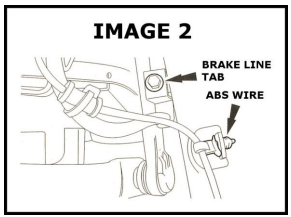
3. Locate the ABS line where it attaches to the strut. Slide the line out of the bracket as illustrated in IMAGE 2.
4. Using a 10mm socket, remove the brake line retainer bolt where it attaches to the strut. See IMAGE 2 for reference.
5. Using an 18mm socket, remove the upper sway bar end link from the strut as illustrated in IMAGE 1.
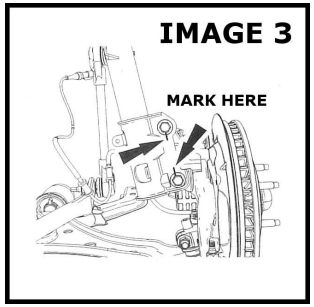
6. Using a permanent market, grease pencil, or paint pen, mark the strut and bolts along their mating surface. This mark will be used later during reassembly. See IMAGE 3 for reference.
7. Support the rotor/hub/caliper assembly then remove the (2) large bolts that retain the strut to the spindle using an 18mm wrench and socket. See IMAGE 3 for reference.
8. Remove the strut/spring assembly.
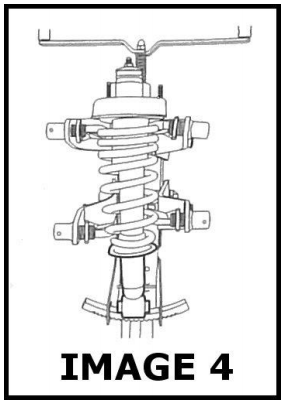
9. The next step is removing the spring from the strut. Using a spring compressor, compress the spring to relieve tension from the upper mount. See IMAGE 4 for reference. With the spring compressed, remove the upper strut nut using a 19mm socket.
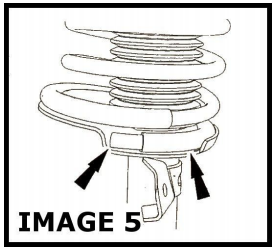
10. Disassemble the individual assembly components and the OE spring. Place the BMR spring onto the strut and index it in the lower spring seat as shown in IMAGE 5.
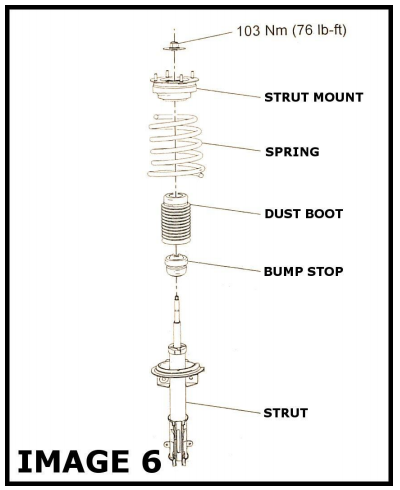
11. Assemble the strut/spring assembly in the order shown in IMAGE 6 then tighten the upper strut nut to 76 ft/lbs.
12. Re-install the strut/spring assembly into the strut tower and thread the (4) retaining bolts onto the strut mount. Torque to 26 ft/lbs. using a 13mm socket.
13. Bolt the strut assembly to the spindle and snug the bolts. Line up the strut and bolts to the marks made in step 6 then tighten the bolts to 166 ft/lbs. NOTE: the alignment marks made previously will only get the alignment close. Your newly lowered vehicle will still need an alignment to reach the desired specifications.
14. Re-install the brake line retainer and tighten the 10mm bolts to 15 ft/lbs.
15. Re-install the ABS wire to the strut tab.
16. Re-install the sway bar end link to the strut and tighten the nut to 85 ft/lbs.
17. Duplicate these steps for the other side then re-install the wheels and tires.
Rear Installation
1. Lift vehicle and support with jack stands.
2. Place a hydraulic jack under the differential.
3. Remove both rear wheel and tire assemblies.
4. Using an 18mm socket, remove the lower shock bolt. See IMAGE 1 for reference.
5. Lower the rear end until the rear springs can be removed.
6. Insert the BMR springs making sure to retain the OE spring isolators.
7. Lift the rear end and insert the lower shock bolts. Do not tighten at this time.
8. Re-install the wheels/tires.
BMR Recommends the Following Alignment Specs
| Street Performance | Pro Performance |
|---|---|
| Camber: -0.75 degrees /- .75 degrees | Front camber: -1.0 degrees /- .75 degrees |
| Front caster: 7.1 (OE not adjustable) | Front caster: 7.1 (OE not adjustable) |
| Toe: 0 to -1/16” max | Toe: 0 to -1/16” max |
