 FREE 1 to 3-Day Delivery on Orders $149+ Details
How to Install Ford Performance Boss Style X-Pipe and Side Exhaust (15-19 GT Fastback) on your Ford Mustang
Installation Time
2 hours
Tools Required
- 13mm and 15mm deep-well Sockets (3/8” Drive)
- 3/8” Ratchet
- 6” Extension for 3/8” Ratchet
- 13mm and 15mm Wrenches (ratcheting if you have them)
- Exhaust cutting tool of your choice (Chain Cutter, Hacksaw, Sawzall, etc)
- 3/8” Torque Wrench
- Flathead Screwdriver
- Optional: 3/8” Impact Driver (I used a Ryobi cordless)
- Optional: High lift transmission jack or similar extendable brace for installation on a vehicle lift.

Shop Parts in this Guide
Foreword: This guide is meant to be an addendum to the Installation Instructions supplied with the system by Ford Performance. The instructions provided will give a general lay down of the steps required to install the X-Pipe but will result in misalignment of the side pipes due to the misinformation contained within the guide.
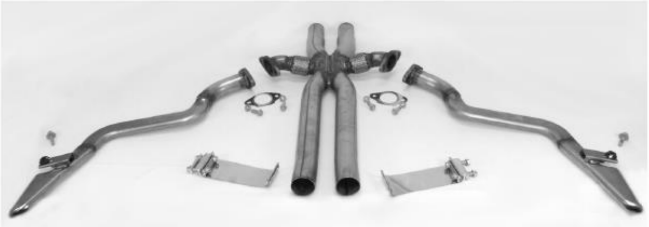
The parts above should all be present in the box. Not pictured are the restrictor plates that are included to mount between the x-pipe and the side pipes if you are not quite looking for the full Trans-Am-era exhaust experience.
Vehicle Prep:
Jackstands: If installing in a garage, pull the vehicle in nose-first so that the exhaust may be removed from the rear and out the garage door to the driveway. Lift the vehicle as high as your jack and jackstands will allow; this will give you increased space to work underneath. Recommend you keep enough space underneath so that your jack can fit under the center of the car to help hold the x-pipe in place during installation, especially if being installed by a single person.
Vehicle lift:
Recommend using a drive on lift if available. The location of the side pipes near the rear pinch-weld jacking points may make a four post lift installation difficult. Removal of the exhaust system not recommended with less than two people when utilizing a lift. If using a lift, proceed to Page XXX for installation without removal of entire exhaust option. WARNING: Ensure all appropriate safety measures are in place regardless of the type of lift being utilized.
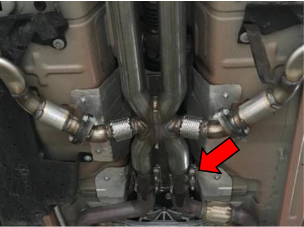
STEP 1: Resonator Clamps
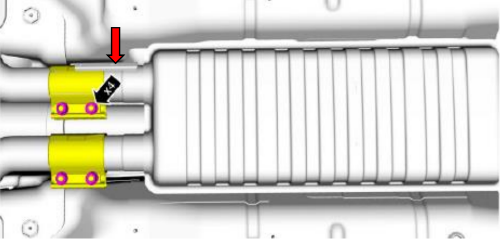
1.a: Using 15mm socket, loosen nuts on exhaust clamps between mid-pipe and resonator.
1.b: Red arrow is pointing toward exhaust retaining clip between resonator pipe and the exhaust clamp. Bend this clip away from the clamp or wedge the flathead screwdriver between the clip and the exhaust pipe if unable to maintain enough bend to allow removal of the system from the clamps.
STEP 2: Exhaust hangers
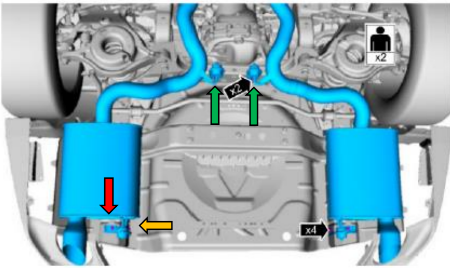
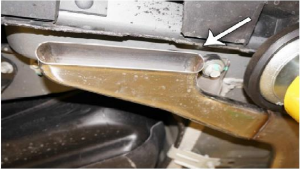
2.a: Using 13mm wrench (or small socket) remove muffler hanger retaining bolt indicated by the orange arrow. The bolt is located up adjacent to the spare wheel cavity.
2.b: Using the 13mm socket and extension, remove the muffler hanger retaining bolt indicated by the red arrow. The mufflers will remain in position (unless jostled) due the small hooks on the hangers into the floorpan. *Repeat steps for opposite side muffler.
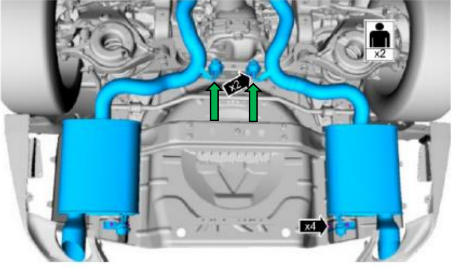
2.c: Using the 13mm socket, remove the bolts for exhaust system hangers indicated by the green arrows.
STEP 3: Remove OEM exhaust system
3.a: Recommend two person job. Push up on rear of exhaust system to separate hangers from floor pan and then pull entire system out of resonator clamps. Steps 1-3 are performed in line with Ford Performance instructions with added tools and tips. The following installation tips are different from the supplied instructions due to measurement inconsistencies in the Ford product. Inconsistencies: The Ford instructions advise installing the x-pipe first, followed by cutting the stock tail
pipes at 4” from the OEM resonator and bolting the system together, and finally installing the side pipes last. This order is faulty in that it fails to index the x-pipe correctly to line up with the side pipes. The result of installing in this order are misaligned side pipes. This is caused primarily due to the inlet side of the x-pipe being approximately 1.25” too short. If the x-pipe is installed into the mid-pipe clamps as it appears that it should, then the x-pipe will be mounted to far forward
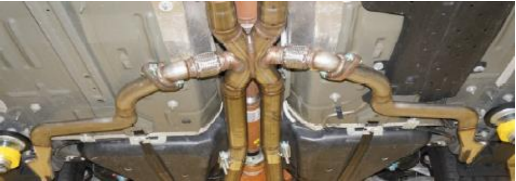
of the side pipes. It will end up in this orientation from the parts photo.
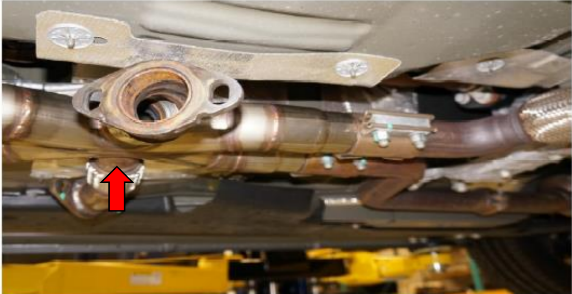
As evidenced by this photo from another buyer on American Muscle, the x-pipe was installed as it appears that it should be: fully inserted into the clamps. (Notice minimal gap between the step-down clamp portion and the clamp). The forward installation of this x-pipe prevented the side pipes from lining up and required extensions to be welded into them to make the system fit.
Ford’s own photo from the installation instructions show a significant gap between the step down clamp portion of the x-pipe and the clamp. Only about 1” of the x-pipe are actually able to be inserted into the clamp and still ensure that the side pipes will be able to attach from their intended mounting locations.
STEP 4: Hang the X-Pipe
4.a: Install the X-pipe into the mid-pipe clamps loosely. Consider placing a floor jack (jackstands) or transmission jack (lift) under the x-pipe to hold it in place while you install the side pipes.
Step 5: Install Side Pipes
5.a: Using 15mm socket, Install the side pipes using supplied hardware into the forward threaded holes near the rear pinch weld jacking point.
5.b: Using 13mm and 15mm wrench, bolt the side-pipes to the x-pipe using supplied
hardware, do not install the gasket at this time.
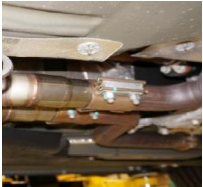
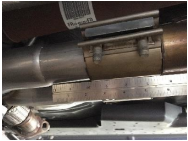
5.c: Adjust x-pipe fitment in clamps to center the pipe in the transmission tunnel and, once bolted to side-pipes, press as far forward into the clamps before tightening the clamps with a 15mm socket. Expect a significant amount of the stepped down section of the x-pipe to remain outside of the clamp similar to this picture.
Step 6: Cutting the tail-pipes
Here is the result of the changes necessary to make the x-pipe fit. Working Right to Left, the first mark (denoted by “4”) is the 4-inch cut mark recommended by Ford. The next series of marks, denoted by “M”, is the measured point when I laid the x-pipe on top of the resonator with the inlets aligned. Finally, the “I” mark indicates where the installed x-pipe ended on the vehicle, as measured from the end of the clamp to the end of the x-pipe.
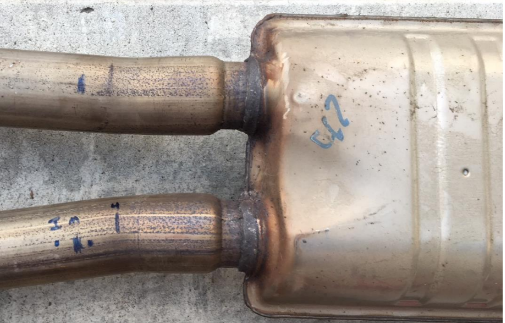
My final cuts ended at approximately 6.75” from the resonator.
WARNING: Because of the nature of the install, it is not recommended to rely solely on measurements to determine your cuts due to the risk of cutting too much material away from the tailpipes.
5.a: Assuming your x-pipe was not able to be installed fully into the clamps due to the side-pipe locations; you can make an initial cut at the 4” mark to separate the resonator and each tail-pipe into manageable pieces.
5.b: Reinstall the exhaust hangers onto the car with a 15mm socket, snug- not tight.
5.c: Install one tail pipe assembly into the exhaust hanger, and then loosely reinstall the muffler hanger onto the floor plan. Adjust the tail pipe forward and back for fitment in the rear fascia.
5.d: The remaining tail-pipe and x-pipe will overlap. Mark your cut line on the tail pipe leaving approximately 1⁄2” of gap with the x-pipe.
5.e: Remove tail-pipe from car and make your cut along the specified mark.
5.f: Install the provided exhaust clamp onto the tail pipe, and reinstall into the car. Reinstall all hanger bolts and then center the clamp over the x-pipe and tail-pipe joint before snugging down with a 15mm socket.
5.g: Repeat with other side tail pipe.
Step 6: Final installation
6.a: Using a buddy, adjust the position of the mufflers to center in the rear fascia cutouts. Once centered, tighten down all of the clamp bolts for that side with a 15mm socket. Repeat on the other side.
6.b: Unbolt each side pipe flange and install gasket and optional restrictors. Reinstall hardware using 13mm and 15mm wrench.
6.c: Re-torque all fasteners according to Ford Performance Instructions.
Step 7: Enjoy
Special Lift Installation Instructions
If you are installing on a lift, you may be able to save significant time by not removing the OEM exhaust.
Step 1: Bolt x-pipe and side-pipe assembly together.
Step 2: Utilize transmission jack to position x-pipe assembly under OEM resonator.
Step 3: Install side pipe tip mounting bolts, and bolt side pipes to car.
Step 4: Ensure x-pipe inlet overlaps resonator clamp to allow the clamp to function.
Step 5: Mark stock tail-pipes at the end of the x-pipe leaving approximately 1⁄2” of gap.
Step 6: Cut tail pipe along marks.
Step 7: Remove middle exhaust hanger bolts to allow tailpipes to clear resonator for removal.
Step 8: Remove stock resonator.
Step 9: Install included clamps on x-pipe and install x-pipe onto vehicle.
Step 10: Reinstall middle exhaust hanger hardware.
Step 11: Continue from Step 6: Final Installation listed above.
Installation Instructions provided by Kris Ljunggren
