Installation Time
(approx) 2 Hours
Difficulty Level:
Light to Moderate mechanical skill required.
FREE 2 or 3-Day Delivery on Orders $119+ Details
$919.63 (kit)
FREE Shipping Market Price $1,057.99 You Save 13% ($138.36)Add Local Shop Installation
Saved - View your saved items
We're sorry. We couldn't save this product at this time.
or use
Jake: Jake here for American Muscle, and today I've got the Kooks 3-inch Muffler Delete Axle-Back Exhaust with the Black Quad Tips, for 2016 and newer Camaro SS and ZL1. If your Camaro just simply isn't loud enough, then Kooks has got the answer right here for you. This 3-inch muffler delete axle-back is perfect for the Camaro owner who wants a high-quality, easy upgrade to their exhaust, that's gonna bring some serious noise to the table. Now, don't get me wrong. The SS and ZL1 Camaro sound stock, but nobody wants to leave it stock. And if you're looking for more noise without being too unhinged, this setup from Kooks is gonna be right up your alley. Unlike some other axle-backs that have a muffler or a resonator, these are just straight through. And as the name implies, they're basically just a muffler delete.So, you're gonna unlock a lot more of that V8 rumble, and more of those pops and crackles on the overrun. Now, not everybody likes those pops and crackles, but I know I sure do. And I also appreciate a louder exhaust, and this one is gonna get a four out of five on our loudness meter. So, it's not entirely unhinged, but definitely enough to rile up your neighbors, and maybe rattle your windows a little bit. Now, these really work to amplify that signature V8 exhaust note, so you get that characteristic burble at idle, and it almost sounds like the car is cammed with a hint of lobe to it because you're hearing so much. When you get on it though, it gives you that loud, aggressive wail, and again, it really amplifies the pops and bangs when you let off the throttle. You're probably gonna find yourself driving a little bit differently than you're used to, just because you're gonna wanna hear the noise. Plan on having to turn up the radio as well, because you are naturally going to get quite a bit more noise in the cabin.Now, it won't be quite as intrusive as, say, some of the full cat-backs out on the market, but it is gonna be a noticeable increase, because you are losing those mufflers in the back. Still acceptable for a daily driver, though. Now, the sound is vitally important to an exhaust, but construction is also important, since this is exposed to the elements, and that's another big reason to consider this setup. Kooks makes these out of 3-inch diameter aircraft-grade T304 stainless steel all the way through. As you can see, there's no weird bends or crinkles in the pipes, and they're cut very nicely. And that T304 means that they're gonna withstand the elements, and provide lots of good corrosion and rust resistance too. Kooks also proudly manufactures their exhausts right here in U.S., so that's a nice little bonus. And you also get a pair of these dual 4-inch tips to finish it off.Now, these are staggered, as you can see, and they are slash-cut, dual-wall tip, in this black powder coat finish. They give a bit of a stealthy look, something that's just a little different from those stock quad tips. Not so much that they're gonna be the first thing you notice, but a nice little detail for those in the know. Now, if you have one of the SSs with the stock dual tips, you are gonna need to cut or replace your factory valance to make room for these. However, if your car came from the factory with the quad tips, you can just bolt these right up and get moving.Now, as far as pricing goes, this does fall towards the lower end of the category when it comes to axle-backs for these cars. Coming in around $925 does represent a good value as compared to some of the other options. Now, that's not to say that you're gonna get everything, because you obviously don't get the active exhaust valves as part of this setup, and that is part of the cost savings. But you also aren't gonna be sacrificing on quality, either, so it's a good compromise for somebody who wants the volume from the engine without the volume of cash.Now, when it comes to installation, this is gonna get a two out of three on our difficulty scale, and you should budget about two hours to get everything buttoned up. Now, since the stock system on the Camaro is not a bolt-together setup, you are gonna need to cut off your stock mufflers. However, this is very easy to do, and you get instructions on how to measure them out in the box. Once you've got that done, this new system bolts right up, uses your existing exhaust hangers, and you get new hardware and clamps in the kit. So, if you've done an exhaust in your driveway before, you know it can be a little fiddly because of lack of space. But even with the cutting for this one, it's absolutely something you can do at home, especially since you're only removing the mufflers and not the whole exhaust system. And with that, let's head to the install bay now, and we'll show you how to get this one done.Man: Tools required for this install include an impact gun, an electric ratchet, a hand ratchet, an exhaust hanger remover tool, a wire wheel, a 5/16 ratcheting wrench, a 3/8 to 1/4-inch adapter, a 7, 13, and 15-millimeter sockets, 8-millimeter Allen, a tape measure, a pair of safety glasses, a marker, and a Sawzall.What's up, guys? Today we're gonna be installing an exhaust on our Camaro, so let's get started. So, our first step to removing our exhaust is gonna be to disconnect our valves. Now, these are gonna be found on the outside of each side tip, so we'll get the harness, press the tab, and disconnect them. So, now our first step's gonna be to disconnect the wiring harness to our valve controller. So, to do that, we're gonna remove these two 7-millimeter bolts to clear up some access. You're gonna have to take these out later on eventually, because we're gonna have to slide our exhaust back this way, and the valves are gonna slide under this.So, I'll get a 7-millimeter socket to get these off. Then we can push that back out of the way, and then reach in there and disconnect our wire harness. And then we'll do that same thing on the other side. So, the factory exhaust system has six hangers. We have two here, two here, and then two by our tips. So, we're gonna remove the inner four here. That way, we can still have our two hangers in the back holding our exhaust up while we disconnect our flanges up front.So, we can get the two on our passenger side first. So, I'll grab an exhaust hanger remover tool and pop off this isolator. And then on this one, the hanger on our pipe's a little longer than the one from our chassis. So we'll pop off our top isolator, and then we can pop it off at the bottom and slide it back on the top. Now we can do the same thing on our driver's side. Now, our next step is to remove our brace here. We have five 13-millimeter bolts holding that in. So, I've got a 13-millimeter socket on an impact gun to get these off. Now, our next step's gonna be to disconnect our O2 sensors on both sides. Now, you can do this either by unscrewing the O2 sensor, or simply just unplugging the harness. We're gonna unplug the harness. So, there's a white tab that you're gonna push up and then push in, and then it'll separate our connector. So, we'll take our white tab, push up on it, and then we can press down and slide our connector out. Now, this side's gonna be the same thing, just a little deeper in there. Pull back on that tab. And then disconnect our connector.So, now we can work on our two flanges. We'll get those disconnected with a 15-millimeter socket. I've got a pole jack here to hold the exhaust in place, so it doesn't drop down once we disconnect it. And then once we have our two flanges disconnected, we'll grab a buddy to help us pull the whole exhaust out of the car. So now, on this side, we don't have much clearance, so I'm gonna get a 15-millimeter socket with a ratchet on this side. And then we can use our impact gun on this side. So, I've got some penetrating lubricant I sprayed on here, just to make it a little bit easier to get these off.Now, on this side, we can use a 15-millimeter socket on an impact gun to loosen this clamp. So, now I have a pole jack set up underneath our muffler, to keep it in place. And then we're gonna be removing the two bolts on our hanger, on both sides, to release the muffler. So, now we can take a 15-millimeter socket on a ratchet to get our two nuts off. And then we'll do that same thing on the other side. So, now would be a good time to grab yourself a buddy, and you can take one end while your buddy takes the others, and then we'll just simply slide it out and remove it from the car.So, now with the exhaust removed from our car, we can take our valves off, and we'll be using a 5/16-inch ratcheting wrench to remove this. And then we can repeat that same process on the other side. And now we can remove our final two hangers on our stock exhaust, using an exhaust hanger remover tool. Now, before we start installing our new exhaust, it's important to note that you're not gonna be able to retain your factory valves with this kit. So, to prevent getting a check engine light, we're gonna plug in our valve actuator, zip-tie it to a harness up out of the way, and then when you zip-tie it, make sure to stay clear of this silver piece, because this will still spin back and forth like it's opening the valves, even though there's no valves there. So, we can take our zip tie and fish it up over our wire harness here, and then we'll take our actuator. We can plug that in, and push our tab down here to lock it in place. And then we'll just pull down on our zip tie, making sure to keep it away from our silver piece, so that will still be spinning.And then we can take our heat shield and bend that back up into position, and reinstall our two 7-millimeter screws. And then we'll take our 7-millimeter socket to tighten these down. And then we can repeat that same process on the other side. So now, with our stock exhaust removed, we're gonna come to right behind the rear muffler, where we're gonna make our cut for our new exhaust. So, now we can grab our tape measure and a marker, and we're gonna measure out 8 inches from the rear muffler back. Eight inches puts us right here, so we'll make our line. And then we'll do the same thing on the other side. Measure out our 8 inches, and mark our spot.So, now with our measurements made and our cut lines in place, you can grab yourself a Sawzall, or your cutting apparatus of choice, and a pair of safety glasses, and we can make our cuts. And now that we have our exhaust flipped over to the other side, to make it a little bit easier to cut, we can make our cut on our other pipe. So now, with our cuts made, we're gonna take a wire wheel to clean up our edges a little. So now, with our exhaust cut and our edges cleaned up, now's a good time to grab yourself a buddy to help you line up the secondary cats in the front while you get the hangers into the isolators.Now we'll reinstall our two 15-millimeter nuts on our passenger side secondary cat. Now we'll take a 15-millimeter socket, going back and forth tightening these down, to put even pressure on our flange. And then we'll take a 15-millimeter socket to tighten down the clamp on our driver's side. And now we can reconnect our O2 sensor harness. So, we're gonna slide that up out of the way, so that doesn't hang on anything hot or moving. And then we'll just click it in like that. And now we can reinstall our brace with our five 13-millimeter bolts. And then we'll just make sure all of our holes are centered, and then take our 13-millimeter socket to tighten these bolts down.So, now we can stall our driver's side tailpipe. Now, we have stickers on the pipes that say "L/S," for left side. That's gonna be the driver's side. And then other side will be "R/S," for the passenger side. So, we'll take a 2.75-inch clamp, and slide that over our tailpipe, and then we can slide it up onto our exhaust. And then once we have our pipe in place, we can take our clamp, and move that into position. And then we'll grab our 15-millimeter socket to tighten this down. Now we can grab a 3-inch clamp, and we'll slide that over our tailpipe, and then we can grab our Y-pipe. It's gonna have that same left-side sticker on it.Now we can slide that in, and then we'll just slide our clamp up into position, and we'll tighten that down with a 15-millimeter socket. Now we can install our hanger bracket. So, we're gonna slide this over our hanger first, and then we can raise it up to meet our studs. And then we can reinstall our two 15-millimeter nuts. And then we can grab our 15-millimeter socket to tighten these down. And then once we're finished with this side, we can do the same thing on the other side.So, that'll wrap up this review and install of the Kooks 3-inch Muffler Delete Axle-Back Exhaust with Black Quad Tips, for your 2016 and newer 6.2-liter Camaro with NPP dual-mode exhaust. Thank you for watching, and for all things Camaro, keep it right here at americanmuscle.com.
Subscribe to our YouTube Channel
Features, Description, Reviews, Q&A, Specs & Installation
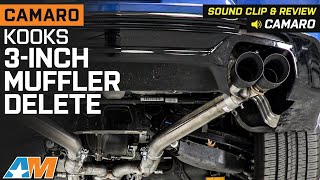
Brand | Kooks |
Exhaust System Type | Axle-Back System |
Exhaust System Material | Stainless Steel |
Exhaust System Tip Finish | Black, Black Chrome |
Exhaust System Tubing Diameter | 3.00 Inch |
Exhaust Loudness | Loud |
Loud, Aggressive Sound. Add a loud aggressive sound to your Camaro's exhaust with a Kooks 3-Inch Muffler Delete Axle-Back Exhaust System. This Axle-Back exhaust features a muffler delete design that will produce an extremely loud aggressive exhaust note that will be sure to wake up the entire neighborhood. Besides an increase in sound, this Kooks Muffler Delete Axle-Back, with its full mandrel bent piping, will reduce restrictions giving your Camaro a more free-flowing exhaust for gains in both power and performance.
Stainless Steel Construction. This Kook's Muffler Delete Axle-Back Exhaust System is proudly manufactured in the USA from 3-inch diameter, mandrel-bent, aircraft quality T-304 stainless steel tubing for excellent exhaust flow and corrosion resistance. The system features a pair of quad, 4-inch black coated stainless steel exhaust tips.
Cut and Clamp Installation. The installation of this Kooks Axle-Back Exhaust system will require cutting and removing the stock muffler assemblies. The new Axle-Back assemblies will install in place of the old. Installation of this Kooks Axle-Back can be completed in about two to three hours. This Axle-Back reuses the existing factory hangers for installation. Clamps and instructions are provided.
Application. This Kooks 3-Inch Muffler Delete Axle-Back Exhaust with Black Quad Tips is designed to fit 2016-2023 Chevrolet Camaro SS and ZL1 models.
Fitment:
Kooks 22606280
CA Residents: WARNING: Cancer and Reproductive Harm - www.P65Warnings.ca.gov
Installation Info
Installation Time
(approx) 2 Hours
Difficulty Level:
Light to Moderate mechanical skill required.
What's in the Box
10 More Questions