Talk to a Mustang Sales Tech
1-877-887-1105
M-F 8:30A-11P, Sat-Sun 8:30A-9P
$20K Sweeps! 10 Chances to Win! Enter Daily >

GT350 Track Pack Style Rear Spoiler; Gloss Black (15-23 Mustang)

Item 426751
Verify parts fit and get product recommendations.
Mustang Sales Techs: Connect Now M-F 8:30A-11P, Sat-Sun 8:30A-9P
$0.00
Our Price

$284.99 (each)

FREE Shipping Market Price $328.99 You Save 13% ($44.00) Up to 10% off for Military & First Responders! See Details

Open Box from $31.35

Will this fit your Vehicle?

Select a different vehicle Help?
Update or Change Vehicle
Ship to: Ashburn - 20149
Sorry, please enter a valid US or CA postal code
We're sorry, zip can't be updated at this time.
Recommended Install Shops
How It Works
Install Shops are available near Ashburn - 20149

Add Local Shop Installation

Total cost of service $249.00
    Create a list
    Add to New List

    Saved - View your saved items

    We're sorry. We couldn't save this product at this time.

    or use

      Product Videos

      Justin: Hey, guys, Justin here. And listen, if you're a fan of that Shelby track pack styling and want the convenience of a pre-painted part, well, then you should certainly consider the GT350 Style Spoiler shown here in Gloss Black, available for your 2015 through 2023 S550 Fastback Mustang. Now, this spoiler has been constructed from durable ABS plastic and is finished in an OE quality Ford gloss black, all for right around that $300 price point.Now, the spoiler category is a rather large one and will feature mild stuff like the factory blade type spoilers all the way down the line to the over-the-top GT350R stuff and really everything in between. Now the option that we do have here today is another factory-inspired part, one that I think will live somewhere in the middle of the pack in regards to overall size and aggressiveness and that is the standard GT350 Track Pack spoiler. Now if you guys didn't know, Ford did release two versions of the non-R version of the early GT350, we're talking just 2016 through I would say 2019, and that was the Tech Pack and you also had the Track Pack.Now, the Tech Pack was short-lived, it had a very basic and unassuming blade type of spoiler, which was very subtle. In fact, in my opinion, almost too subtle for a car like the Shelby GT350. Now the Track Pack spoiler, on the other hand, was a nice fit for the car, did offer a good amount of aggressiveness, if you will, and sure, at the same time, maybe not as aggressive or radical as the GT350R option, but let's be honest, that spoiler in particular is a little much for the casual Mustang fans out there.Let's focus in on the Track Pack style spoiler that we have here today. And again, on the surface, guys, you're looking at a very durable, very lightweight ABS plastic build with a lot of the same detail here, shape, and all of that good stuff as the factory spoiler, but obviously for a lot less money than buying an OE part from Ford and then having it sprayed on your own. Now, as you can see, this part has been finished in gloss black. It's gonna be a great option for owners out there who either wanna match an existing gloss black car or maybe you're looking just to add a little contrast to any other color S550. I do also wanna point out here, guys, that we do offer this spoiler pre-painted to match your ride here on the site. Price is gonna jump up slightly, but it is available. As always, feel free to check out the rest of our selections before pulling the trigger on this option.As far as your price is concerned, well, the gloss black option that we have here today, again, 300 bucks in that ballpark, again, certainly one of the more affordable options on the site when you're looking at a Shelby-inspired part that is going to offer that pre-painted finish.Let's segue into the installation here, guys, and again, gonna go down one of two different ways. If you do have a factory spoiler installed, well, no drilling necessary. However, you will need to get rid of all that factory tape and adhesive, kind of a pain in the you-know-what. On the other hand, if you do not have a factory spoiler currently installed, well, you will need to break out the drill. Now, either way, the site's gonna stick with a pretty strong one out of three wrenches on the difficulty meter here, guys. I would say at least an hour to get things in place from start to finish. But hey, what do you say we head out to the shop? Let's give you our detailed walkthrough and tool breakdown.Man: The tools you'll need for this project are a quarter-inch drive ratchet, a short extension, a 10-millimeter socket, a trim removal tool, and a flathead screwdriver. Hi everyone. Today we're installing a rear spoiler on our Mustang, so let's get started with the uninstall of the old one first. Once you've got your deck lid open, first thing we're going to do is remove this trim panel here so that we can access the bolts up inside the deck lid. So to do that, we're just going to remove these plastic push pins here. So we've got nine push pins that we need to remove, and then we're going to remove these two bumpers here, and then the latch cover. So let's use our trim removal tool and get these pins out of the way.So we're going to put our trim removal tool under the lip of the push pin and just pry it away. Now once you've got your push pins out of the way, then we can go ahead and just unscrew these two bumpers here at the top. And now using your trim removal tool, we can pop off this latch cover here and then just pull it away. Slide the emergency escape handle through the slot. and remove it from around the wiring harness.Next thing we need to do is remove the plastic grommet here at the end on both sides so that we can access the studs underneath. To do that, just go ahead and grab a hold of the lip and pull it away. Now, everything that we're talking about right now is going on the assumption that you have a factory spoiler already installed. If you don't, we'll get to the part about how to install the new spoiler in a little bit, but this is how you take care of the old spoiler before we install the new one. Now you're going to use a 10-millimeter socket. And we've got two nuts in the center section here and then the one underneath the grommets that we just pulled out.Now, when you take these nuts off, you want to be very, very careful not to drop them because if you drop them down inside the deck lid, It's a real mess trying to get it out. So what I like to do is tilt the deck lid down so that if it does fall, hopefully it will fall out through the hole. And once we've got it laid down so that if it does fall out of our socket, hopefully it'll fall right out of the hole. And here we've safely retrieved our first one. We'll go ahead and take the one off the other end. Now we'll take out the two in the middle. And our last one.Now, with all four of your nuts removed from the studs, we can go ahead and start to lift up on our spoiler and get it removed. Now our spoiler has been on and off the vehicle several times, so normally there is like a double sided tape that goes around the outside edge here. So you're not going to be able to just lift it off like I just showed you. So you're going to need something like this, which is a soft trim removal tool, and to be able to slide it underneath the edge or the lip of the spoiler and just kind of gently pry it up. You don't want to do too much prying on it because you could damage the deck lid or scratch the paint. But you just kind of work your way around and eventually it will come off.Now, once it does come off, then you can use some sort of adhesive remover and a clean cloth and remove any residue that's left over there before we attach our new spoiler. Now as you can see by looking at the bottom side of our spoiler here, we've got several holes that have nuts inserted into them. Now, you'll have to figure out which holes match up to your vehicle based on the spoiler that you took off. And the kit comes with these miniature studs that will screw in to the holes. And also some rubber pads to help it from vibrating so much. And they also supply the nuts to go with them.So we've already done a little pre-work on ours so we know which holes we're going to have to use. So we're going to use the two inside on the outer edge of the spoiler. This one here, and then this one here on the outside. So we're just going to put this in like so. You also want to note that one side has a slot in it, the other end does not. Obviously the one that has the slot in it is the one that you're going to use for your screwdriver. So we just screw those in by hand and then use your flathead screwdriver to just make sure that they are tight. Now, you might also want to consider using maybe some blue Loctite on the ends of these threads just to make sure that they stay in like they're supposed to.Now, once you've got those tightened down, then you can use these insulation pads here. It has a sticky tape on the outside. Just remove the backing, slide it over the stud, and press down. Now, once you've got those in place, we can go ahead and put our spoiler onto our deck lid. Now once you've got your studs into the bottom of your spoiler, it's a good idea just to double check. Make sure that the holes line up and everything is even before you actually put this on. So we've already checked that. Got them inserted into our holes. Now we can go ahead and put our nuts into our socket and go ahead and screw them onto the studs in the bottom of our spoiler.Again, it's always a good idea to just lay it down just in case there's an issue with the nut falling out of the socket. Now, once you've got everything started, go ahead and step back, take a look, make sure everything is lined up and it fits the way you want it, and then we can go ahead and tighten them down. Now, with all of our nuts tightened down, then we go ahead and replace our panel, our bumpers, our grommets, and our latch cover. Now we slide our emergency release handle through, install our rubber bumpers. Go ahead and slide our harness through that slot. Now we'll replace our original push pins, reinstall our latch cover, and then finally, replace our grommets. And that wraps up our review and install of the GT350 Track Pack Style Rear Spoiler in Gloss Black finish for the 2015 and newer Mustang Fastback. Thanks for watching and remember, for all things Mustang, keep it right here at AmericanMuscle.com.

      Product Information

      Features, Description, Reviews, Q&A, Specs & Installation
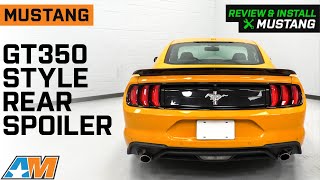
      Features & Specs

      • Black Modern Spoiler
      • Sleek Speedster Look
      • Cutout for Backup Camera
      • ABS Polymer Material
      • Glossy Black Exterior
      • Easy Installation
      • Fits 2015-2023 Mustang Models

      Description

      Aggressive Sleek Styling. Optimize the look of your Mustang with this GT350 Track Pack Style Rear Spoiler; Gloss Black. It features a sleek molding with strong a curved geometry to bring out the speed monster I your mean machine. It offers better wind direction and emphasizes the contours of your vehicle.

      Lightweight Strong Material. This Spoiler is made from high quality ABS polymer, that is both lightweight and durable. It adds very little weight to your rear end while boosting style and aerodynamics. It is also durable against heat and weather, giving it looks that last.

      Installation. This product is easy to install and should take about 1 hour.

      Application. The GT350 Track Pack Style Rear Spoiler; Gloss Black fits 2015-2023 Mustang Models.

      Fitment:

      CA Residents: WARNING: Cancer and Reproductive Harm - www.P65Warnings.ca.gov

      Installation & What's in the Box

      Installation Info

      What's in the Box

      • (1) Rear Spoiler Set
      • Mounting Hardware
      4.5

      Customer Reviews (22)

        Questions & Answers

        10 More Questions