Talk to a Mustang Sales Tech
1-877-887-1105
M-F 8:30A-11P, Sat-Sun 8:30A-9P
$20K Sweeps! 10 Chances to Win! Enter Daily >

LED DRL Headlights; Black Housing; Clear Lens (99-04 Mustang)

Item 416011
Verify parts fit and get product recommendations.
Mustang Sales Techs: Connect Now M-F 8:30A-11P, Sat-Sun 8:30A-9P
$0.00
Our Price

$169.99 (pair)

FREE Shipping Market Price $196.99 You Save 14% ($27.00) Up to 10% off for Military & First Responders! See Details

Will this fit your Vehicle?

Select a different vehicle Help?
Update or Change Vehicle
Ship to: Ashburn - 20149
Sorry, please enter a valid US or CA postal code
We're sorry, zip can't be updated at this time.
Recommended Install Shops
How It Works
Install Shops are available near Ashburn - 20149

Add Local Shop Installation

Total cost of service $174.99
    Create a list
    Add to New List

    Saved - View your saved items

    We're sorry. We couldn't save this product at this time.

    or use

      Product Videos

      Justin: The LED DRL headlights that we have here today will be a great option for the '99 to '04 owners looking to freshen up the headlights on their ride while adding some modern LED lighting at the same time. Now these DOT-approved headlights will feature a stealthy, black housing topped off with a crystal-clear polycarbonate lens along with the diffused LED running lights all for right around that high $100 price-point. So again, I feel like these headlights will be for the new Edge owners out there looking to freshen things up and go with something after-market, but maybe don't want to stray too far from that factory recipe.Now in fact, thanks to that black housing, amber reflector, and clear lens, I'm getting big '03 - '04 Cobra vibes here, with one big exception. And that is the LED accent that separates these from some of your other options that you'll find here on the site. Now that diffused LED running light does feature the T2Pro LED check technology, and will separate the turn signal from your main headlight here, and does run along the bottom of the headlight housing. Now when wired up, those LEDs will illuminate with a bright, white light whenever your parking lights or your headlights are switched on for a very distinct look.Now as I mentioned at the top of this video, guys, these headlights will feature that durable, automotive-grade ABS plastic housing which is finished off in kind of this sleek, matte-black color which gives off those Cobra looks. Now these lights are topped off with that crystal clear lens which will allow for maximum visibility. And I think paired with that black housing, gives off a very aggressive look. Now with that being said, if these aren't aggressive enough for you, and you maybe like more of that dark, smoke look, well then feel free to check out the rest of our selection back on the site if you haven't done so already. And hey, while you're there, check out some of the customer-submitted images of these headlights installed just to get a better idea of how they might look on your own ride.But switching gears, let's get into the install. And so, I'm just gonna call this one a pretty soft 1 out of 3 wrenches on the difficulty meter. Maybe 10 minutes or so of your time to complete from start to finish. And while yes, I will say these are probably one of the easiest headlights to swap, there is the smallest amount of wiring needed to get those DRLs up and running. So that might add a little bit more time to your install. But regardless, to give you a better idea of just how this job will go down on your new Edge at home including that wiring, here is an AM customer to walk you through it.Man: Hi, everybody. I'm gonna show y'all how to install some headlights. I got some of these right here off of American Muscle. They're the...I don't know the exact description, but they do have the LED light here across the bottom. Clear lenses. At nighttime it's so hard for me to see. As you can tell, my car's got a front-tinted windshield on it. So it is a bit harder to see at night with tinted windows. So, I'm gonna show you how to install them. I've done some prestuff on it already just to kind of make sure everything was gonna work right. So, here we go. Of course, we'll need some '99s to '04s. And they've got some little clips on these things. So you pull your clips, put them to the side. Sometimes they can be aggravating. I got me a little pry tool to kind of pry it out a little bit and it'll come right out. Next step, all you want to do is grab the light loose. Come back here and unplug your tire signal bulb. Unplug your original bulb, and your housings are completely out.I'm a go ahead and install the one side and repeat on the same side. On this one here, you've got to wire your lights in directly to some power for the running light and stuff which is here on the bottom. So what I've done is I used my fog light switch down at the bottom of my fog-light housing. I found one plug. I've just spliced into it, and I'll show you what part you gotta use for all that right there. I'm getting tangled with my wires here. The day is a little cold this morning. What I'm doing with these right here, I'm just running them through the back of the housing, just sitting them out of the way for right now. I may go back and rewire them later. But just to kind of get the video going, I'm gonna show you how to properly do it, and this is the way I'm gonna do it.Okay. With these housings here, they give you this little switch or pieces like that that holds the headlight in. I'm gonna set that off to the side right now. On my car, I've got aftermarket LEDs on mine, BEAMTECH, real good brand of headlight by the way. So the way you want to put them in there is put the BEAMTECH facing down to the car. Put them in and twist your locker in. You don't have to actually use the aftermarket housing thing that comes with it. Bring your turn-signal bulb out of the [inaudible 00:05:44.755] socket. Try not to drop your light. Go ahead, insert that. Push it around, lock it in place. Take your light switch or your light piece, plug it back in. Come over here and do the same thing with your turn-signal bulb. That way you know you've already got it done. Normally, I don't pull my plastic off mine because I know I've got everything done right. I go ahead and test everything first before I do everything. So, keeping all that on there. Make sure your holes line up over here on your guide pins. Take your bracket pieces, lock them back down in place.Now we'll repeat the other side. Like I done it before, I done took the lights out. All you gotta do here is just pull the switch out, or pull the housing out. Take your pieces off again, set them to the side. Pull your new housings down. Again like I said, I had prewired all this stuff. What I'm pretty much doing here with the LEDs is these cars here don't have daytime running lights. So pretty much what I'm doing is I'm adding a set of running lights to my car because it's a 2002. I do drive it on occasions. Mainly it's just drove on weekends, but that's beside the point.So, back to your other housings again, pull your bulbs and stuff back out. Again, you don't have to use that piece if you've got LEDs in. If you've got regular bulbs, you can reuse that same piece. Again, I've got BEAMTECHs. You want to put the BEAMTECH facing the passenger side. Put it back inside the housing. You'll finally feel the bulb go into the housing. It should pop right in. [Inaudible 00:09:07.483] again. Plug your light bulbs back up. Now before you connect this one right here, the way I've done this over here is I pulled my...where I have got my fog light here, you got two different colors, one is red, and one is black. Your positives are gonna go into the red side. So just take the plugs, plug them in there. If you've got some wire splicers...I try to keep mine at the same location where the other one is. Okay.Bring your next side over and do the exact same, red with red, black with black on the same side. Now pull the plastic back a little bit after you've got everything lined up where you want it at. Feed your wires back through so you don't bend [inaudible 00:10:48.757]. Sometimes these LEDs can be a pain in the butt, guys. I'm just letting you know, but they do come in handy. Okay. After you get all that right there situated, that pulls behind there. Pull your housings, or pull your wires and stuff through. Headlight should fall right back into place. Grab your clamps, push them back down inside there. Pull your lights up. Make sure that everything is connected the way it needs to be connected. That [inaudible 00:12:27.984]. There's your low beam, and there's your high beam. Now, at daytime, I have got running lights now off my fog lights. I hope that was a helpful video. Y'all have a good day. Be safe.Justin: All right, guys, wrapping this one up. If you are looking for an aggressive, OE-style light that also packs some modern LED accents, well then be sure to check out the LED DRL headlights right here at americanmuscle.com.

      Product Information

      Features, Description, Reviews, Q&A, Specs & Installation

      Features & Specs

      • LED DRL Headlights
      • Black Housing
      • Clear Lens
      • Easy, Plug-and-Play Installation
      • 9007 High Beam and 9007 Low Beam
      • T2pro LED Chip Technology
      • Easy to Install
      • Compatible with the 1999-2004 Ford Mustang

      Description

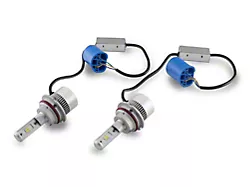
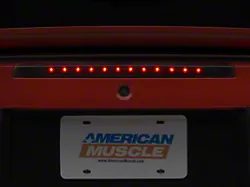
      OE-Style Replacement LED DRL Headlights. Improve visibility on the trails with the LED DRL Headlights; Black Housing; Clear Lens. These LED DRL headlights offer an easy, plug-and-play installation with a 9007 high beam and 9007 low beam configuration for outstanding illumination.

      T2PRO LED Chip. This unit offers T2PRO LED Chip technology for superior illumination over OEM halogen.

      Installation. It takes no more than 10 minutes to install this product if you have moderate-to-expert level mechanical skills.

      Application. These LED DRL Headlights; Black Housing; Clear Lens are compatible with the 1999-2004 Ford Mustang.

      Fitment:

      CA Residents: WARNING: Cancer and Reproductive Harm - www.P65Warnings.ca.gov

      Installation & What's in the Box

      Installation Info

      What's in the Box

      • (2) Headlights
      4.4

      Customer Reviews (36)

        Questions & Answers

        10 More Questions