FREE 1 to 3-Day Delivery on Orders $149+ Details
How to Install SR Performance V2 Coil Over Kit on your Mustang
Installation Time
4 hours
Tools Required
- Jack
- Jack Stands (2)
- Pliers
- Flat Screw Driver
- Ratchet
- Breaker Bar
- Torque Wrench
- Sockets (10mm, 13mm, 15mm, 17mm, 18mm)
- Wrenches (13mm, 15mm)

Shop Parts in this Guide
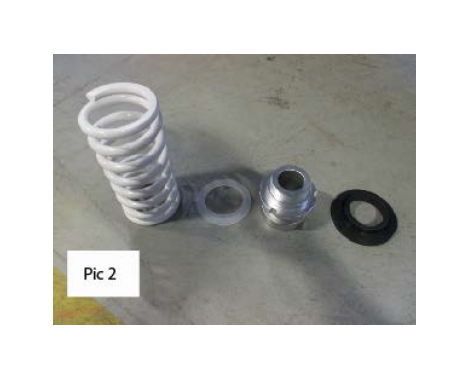
Contents:
• (2) Front Coil Overs
• (2) Rear Shocks
• (2) Rear Springs
• (2) Spanner Wrenches
• (2) Adjustable Spring Perches
• (4) Brackets
**Important Notes:
• Professional Alignment is Highly Suggested after the install and ride height is set.
• Assure that all lock collars are tight before operating vehicle.
Front
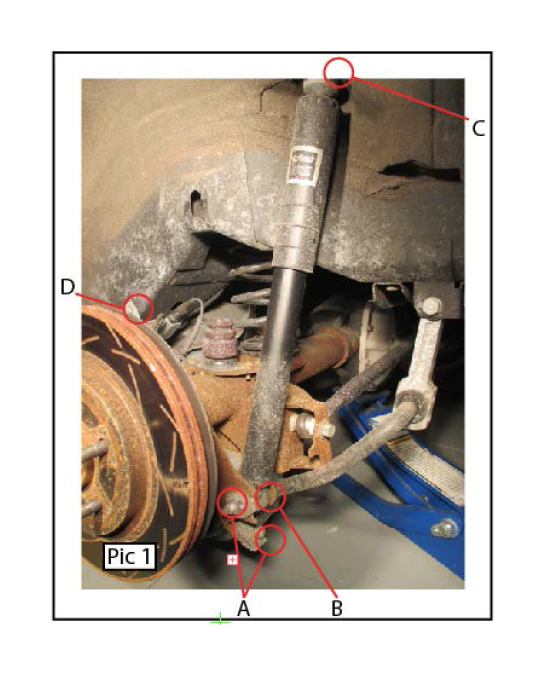
Step 1: Raise front of vehicle, support with jack stands. Remove front wheels
Step 2: Remove Sway bay end link (A).
Step 3: Remove the brake line bracket from the chassis and the strut (B&C).
Step 4: Remove the clip that holds the abs sensor wires from the strut.
Step 5: Remove the 2 lower strut mount bolts (D) from the hub, and support the caliper/rotor/hub so that there is no tension in the brake line once the strut is removed.
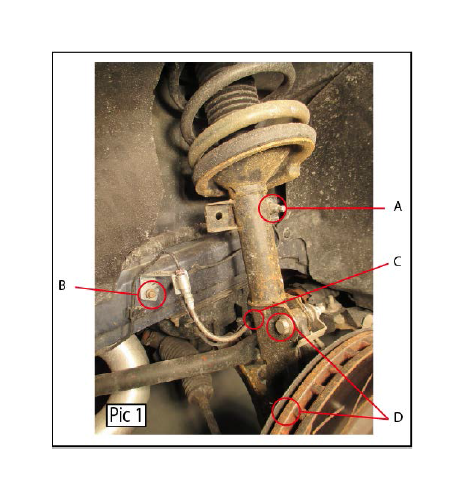
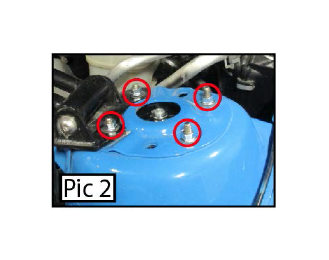
Step 6: Remove the 4 upper Strut tower nuts (Pic 2).
Step 7: Remove the factory strut from the car.
Step 8: Install the new strut assembly using the 4 upper strut mount nuts. Keep them loose for the time being.
Step 9: Reinstall the 2 lower strut bolts.
Step 10: Reinstall the brake line bracket to the back of the strut with the supplied nut.
Step 11: Install the provided sway bar end link.
Step 12: Test fit the wheel and lower the car then tighten the 4 upper strut mount bolt.
Step 13: Adjust the suspension to achieve the desired ride height, ensure all the lock collars are tight so that the strut doesn’t loosen.
** Torque Specs
(A) 85 ft/lbs.
(D) 148 ft/lbs
Strut Mount Bolts 26 ft/lbs

Rear
Step 1: Raise the rear of the vehicle support with jack stands under the rear frame rails. Keep the axle supported by a floor jack. Remove wheels.
Step 2: Remove the rear sway bar mounting points on either side (A). Push the sway bar rearward so that it is out of the way.
Step 3: Remove the lower shock mounting bolt (B). Note: you may need to jack the rear up or down so that the bolt comes out easily.
Step 4: Fold the inner trunk liner out of the way so that you can access the upper shock mount nut. Remove the Shock.
Step 5: Remove the brake line bracket (D) so that you can lower the rear axle without putting strain on the brake line.
Step 6: Lower rear axle slowly and remove the factory spring and factory rubber bushing.
Step 7: Place the supplied aluminum spring perch on axle reusing the factory rubber bushing.
Step 8: Install the new shock
Step 9: Re-install the sway bar mount, and the brake line bracket. Then the wheel.
Step 10: Adjust the rear ride height until the desired ride height is achieved. Ensure all the lock collars are tight.
**Note: Once desired ride height is achieved, professional alignment is highly suggested**
** Torque Specs
(A) 52 ft/lbs
(B) 85 ft/lbs
(C) 30 ft/lbs