 FREE 1 to 3-Day Delivery on Orders $149+ Details
How to Install a 3DCarbon Boy Racer Wing on your 2005-2009 Mustang
Installation
CAUTION!!!! IF A HEATED SPRAY BOOTH IS USED FOR BAKING THE PRIMER OR PAINT, DO NOT BAKE OR CURE GREATER THAN 120 F DEGREES FARENHEIT. THE PARTS CAN BE DISTORTED AND PERMANENTLY DAMAGED
NOTE: There are two different installation instructions, depending if your vehicle already has a factory spoiler installed. Please note this and follow the correct instructions for your vehicle.
Note: Always check fit the spoiler on the car prior to the prepping and painting. The small holes on the bottom of the spoiler are for the venting of the spoiler. DO NOT FILL these holes. The holes are required so it can expand and contract.
INSTALLATION INSTRUCTIONS - FOR MUSTANGS WITH FACTORY SPOILER ALREADY INSTALLED
STEP 1) Open deck lid and locate the (4) nuts on the inside of the deck lid that secure the spoiler to the car. Remove these and remove the spoiler.
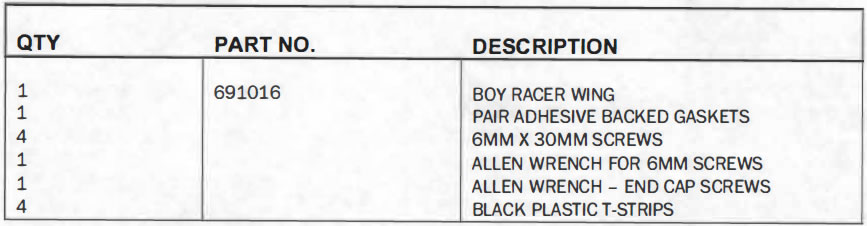
STEP 2) Place the new Boy Racer Wing on a soft, clean surface. Remove the backing paper from the adhesive gaskets and determine which is right and left. Align the holes in the gasket with the holes on the spoiler leg.
STEP 3) Place the spoiler on the deck lid and carefully slide the (4) 6mm screws and washer provided through the factory spoiler hole and into the spoiler - Threaded insert on the spoiler.
STEP 4) Hand-tighten the screws only. Do not over tighten.
INSTALLATION INSTRUCTIONS - FOR MUSTANGS WITH FACTORY SPOILER INSTALLED
STEP 1) Open deck lid and cover the carpet with a drop cloth so the hot metal shavings will not burn into the carpet.
STEP 2) Place the spoiler on the rear hatch and align the spoiler from right to left. The rear edge of the leg of the spoiler should be 1/4" from the rear edge of the deck lid.
After the spoiler is properly aligned, draw a line around the base of the spoiler, using a grease pencil. Remove the spoiler and place it upside down on a clean surface. Place the (4) black plastic t-strips into the threaded insert holes on the bottom of the spoiler legs and secure with a small piece of tape, so they do not fall out.
STEP 3) Place the spoiler back on the rear hatch, using the grease pencil line as a reference. Secure the (4) T-Strips to the painted surface of the deck lid with masking tape.
STEP 4) Carefully remove- lift the spoiler off of the t-strips, leaving them in place on the rear hatch.
STEP 5) Using a paper clip, slide it through the (4) small holes on the t-strip stem to mark the painted surface. This will locate the center of the hole to be drilled. Remove the t-strips from the deck lid and using a 1/8" drill bit, drill through the marks made through the t-strips.
STEP 6) Using a 5/16" drill bit, drill through the 1/8" holes. Use a rat-tail file to deburr the bare metal around the holes.
STEP 7) Using a zinc chromate primer, touch up all the bare metal to prevent corrosion.
STEP 8) Place the spoiler on the rear hatch and secure it with the (4) 6mm screws and flat washers provided. Hand tighten only. Do not over tighten.
