 FREE 1 to 3-Day Delivery on Orders $149+ Details
How to Install BBK Heavy Duty Bump Steer Kit on your Mustang
Installation Time
1 days
Tools Required
- Angle Finder
- floor jack
- basic tools
- drive on lift or drive on ramps

Shop Parts in this Guide
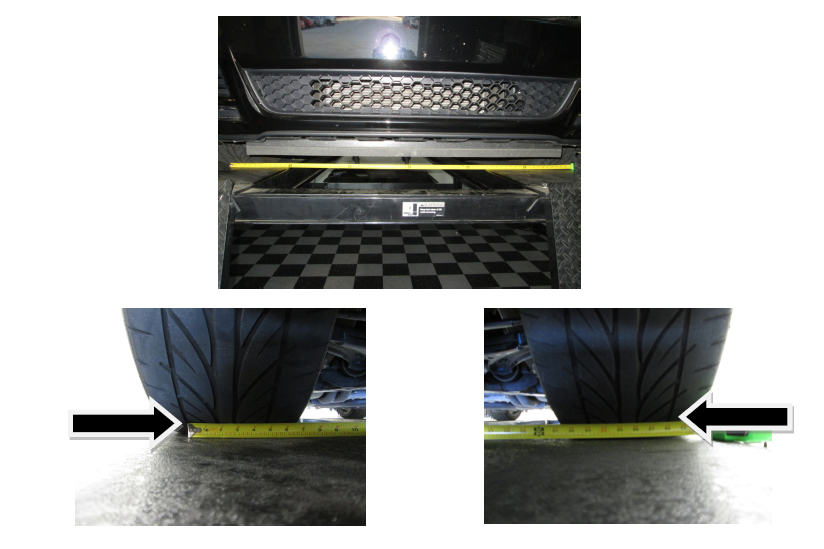
Step 1 In order to get proper “Rough” measurements this installation MUST be done on a drive on lift or drive on ramps,that way the alignment and tie rod angles are close enough to how it was before the installation so that the vehicle can be driven to the performance alignment shop
Before installation insure that the steering wheel is centered and measure the distance between the front tires, using the same grooves in the tread on each tire as a reference point. If vehicle is lowered then you’re going to need to lift the front end to the stock ride height using a floor jack and also measure the angle of the tie rods before removal using an Angle Finder as a rough starting point. Once you have both angles you can lower the vehicle to normal ride height and begin the installation.
! CAUTION !
Use extreme caution when working under vehicle
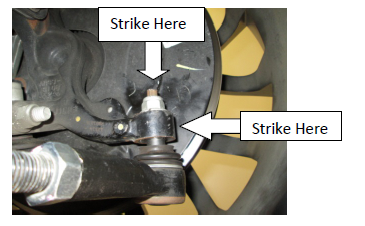
Step 2 Loosen the top nut of the tie rod end. Using a steel hammer, gently strike the side of the spindle until the old ball joint stud falls out. If the stud still doesn’t break loose then thread the nut back on to the stud enough to cover the threads and strike the top of the stud.
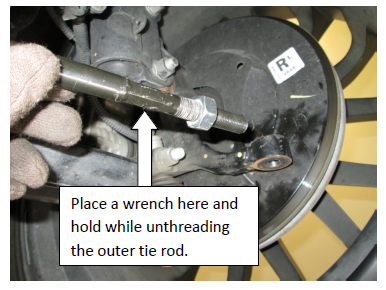
Step 3 Remove the outer tie rod by using one wrench to hold the Jam nut and another wrench to turn the tie rod. Once the jam nut is broken loose, keep the wrench on the inner tie rod and thread the outer tie rod off.
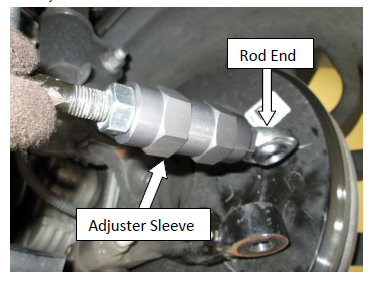
Step 4 Thread the Gripp Adjuster Sleeve onto the inner tie rod, and then thread the supplied Rod End into the Adjuster Sleeve all the and tighten the jam nut.
Step 5 Insert the tapered end of the tie rod stud into the spindle and tighten it using the supplied hardware. After insuring that the wheel is still centered and after tightening the tie rod stud you will need to adjust the Gripp Adjuster Sleeve so the outer tie rod end lines up with the rod stud. Once proper alignment is achieved tighten the Jam nut.
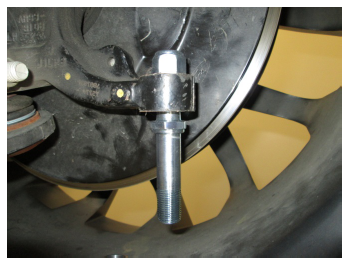
Step 6 If the vehicle is at stock ride height then slide the tie rod end over the straight shank of the bottom of the tie rod stud then install the appropriate amount of spacers for tightening. If the vehicle is lowered you are going to want to install the appropriate amount of spacers between the spindle and rod end to achieve the measured angle from step 1, and then install the appropriate amount of spacers for tightening.
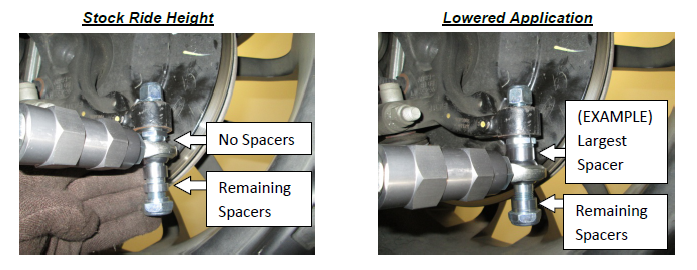
Step 7 Torque the top nyloc nut to 65 ft.-lbs and the bottom nut to 60 ft.-lbs of torque. NOTE!!! The final choice of spacers will be determined by the performance alignment shop.
Step 8 Repeat steps for the other side.
Step 9 After installation is complete double check that the steering wheel is still centered and the tires are pointing straight and the measurements from tire to tire and the tie rod angles are correct. The vehicle should be taken to a performance alignment shop.
