FREE 1 to 3-Day Delivery on Orders $149+ Details
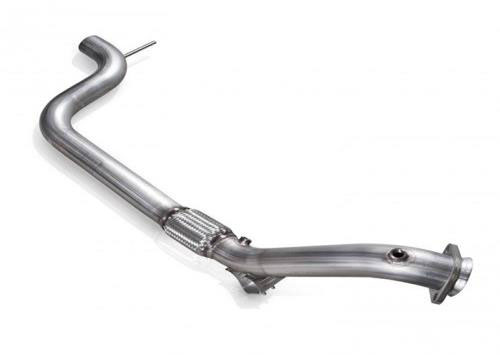
How to Install BBK Down Pipe - Catted on your Mustang

Shop Parts in this Guide
STEP 1
- Disconnect the negative battery terminal.
- Lift vehicle as high as possible utilizing approved jack stands or preferably a vehicle hoist.
STEP 2
- From underneath the vehicle presoak the rubber exhaust hanger and hardware to aid in removal of the stock down pipe.
- Remove the (2) nuts that secure the down pipe to the outlet of the turbo.
STEP 3
- Loosen the 2 bolts that connect the down pipe to the cat back portion of the exhaust. Remove the rubber exhaust mount from the chassis. This mount will be reused to install the BBK High Flow downpipe.

STEP 4
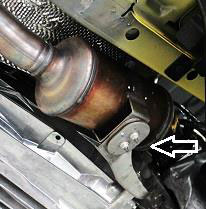
- Unbolt the downpipe support bracket from the down pipe.
STEP 5
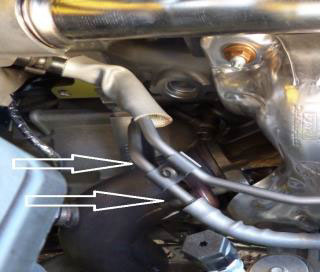
- From underneath the vehicle disconnect the 2 oxygen sensors from the wiring harness. Unclip the wires from there mounting points.

STEP 6
- Separate the stock downpipe from the cat back portion of the exhaust by pushing the down pipe forward towards the front of the vehicle.
- The down pipe comes out towards the rear of the vehicle.
STEP 7
- Now that the stock downpipe is removed from the vehicle, remove the 2 oxygen sensors from the stock downpipe and install them in their corresponding locations on the BBK High Flow downpipe.
- NOTE!!! Be sure to add a small amount of anti-seize to the top thread of each oxygen sensor using the supplied anti-seize packet. As you thread the oxygen sensor back into the part the anti-seize will spread evenly throughout the threads.
STEP 8
- Remove the rubber mount from the stock downpipe and install it onto the BBK High Flow downpipe.
STEP 9
- Install the BBK High Flow downpipe front section onto the outlet on the turbo and the hard mount bracket.
- Install the stock hardware to hold the BBK High flow down pipe into place.
- Do not completely tighten down until final fitment is complete.
STEP 10
- Connect the 2 oxygen sensors plugs to the wiring harness and reattach the mounting clips for the oxygen sensor wiring.
STEP 11
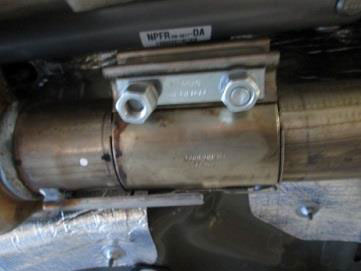
- Lift the BBK high flow down pipe rear section into place slide the 3 “ barrel clamp supplied in the kit over the end of the pipe. Line it up with the front section of the BBK High flow down pipe slide the barrel clamp onto the front section to join the two.
- Lift the rear of the down pipe upward and line it up with the stock barrel clamp on the resonator, slide the barrel clamp onto the downpipe to connect the two. Reinstall the rubber exhaust mount to the chassis.
STEP 12
- First tighten down the clamp on the outlet of the turbo that connects it to the BBK High Flow downpipe. Tighten down the (2) bolts that secure the down pipe to the hard mount.
- Adjust and level out the resonator and tighten down the 3” barrel clamp that connect the two pieces of the BBK High flow down pipe.
- Tighten the bolts on the stock barrel clamp that connects the down-pipe to the cat back portion of the exhaust.
- Reconnect the negative battery terminal.
- Start the vehicle and check for leaks.
- NOTE!!! Be sure to recheck and re-torque the exhaust clamps and hardware after 500 miles of driving.
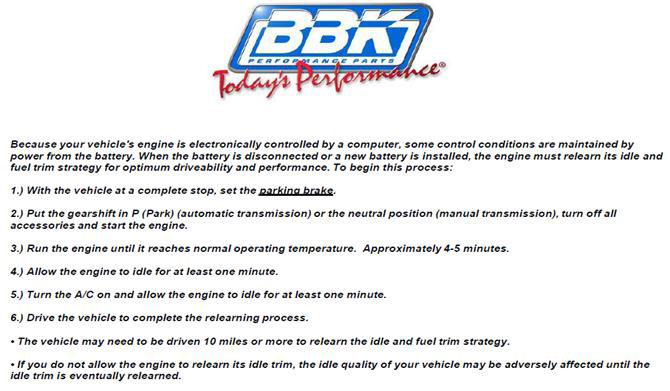
Please follow ECU Relearn Procedure before driving on the road.