FREE 2 or 3-Day Delivery on Orders $119+ Details

Talk to a Challenger Enthusiast
1-877-887-1105
M-F 8:30A-11P, Sat-Sun 8:30A-9P
Win $3,000 in Store Credit! Enter Daily >

Borla ATAK Cat-Back Exhaust with Polished Tips (09-14 5.7L HEMI Challenger)

Item CH1524
Call a Challenger Enthusiast at 1-877-887-1105
M-F 8:30A-11P, Sat-Sun 8:30A-9P
$0.00
Our Price

$1,890.99 (kit)

FREE Shipping Market Price $2,211.99 You Save 15% ($321.00)

Will this fit your Vehicle?

Select a different vehicle Help?
Update or Change Vehicle
Ship to: Ashburn - 20149
Sorry, please enter a valid US or CA postal code
We're sorry, zip can't be updated at this time.
Recommended Install Shops
How It Works

Add Local Shop Installation

Install Shops are available near Ashburn - 20149
Total cost of service $299.00
    Create a list
    Add to New List

    Saved - View your saved items

    We're sorry. We couldn't save this product at this time.

    or use

      Video Review & Installation

      Hey guys, Adam here with americanmuscle.com. Today we're taking a closer look at, installing and listening to, of course, the Borla ATAK Cat-Back Exhaust for the 2009-2014 5.7 Challenger. You should be checking this out for your 5.7 Hemi if you're looking to ditch that factory boring restrictive, not so powerful stock exhaust to switch it up to something that is one of the loudest in the category. This Borla ATAK as you just heard from our sound clips is gonna get a four out of five, bordering on five out of five on our loudness meter. This thing is not just your average straight pipe however, this has a lot of technology built in from Borla, their patented technology, to make sure that it is using the highest possible decibel meter available for a street legal exhaust while still keeping its tone, its aggression without distortion. That's all what the ATAK is about. ATAK, after all, is standing for Acoustically-Tuned Applied Kinetics. Again, not your average straight pipe, most of the exhausts that get four almost five out of five are just essentially straight piping. They're going from the cats all the way back with very little baffling, if any, not the case with Borla. Borla built in the resonators and their mufflers to have a lot of very specifically calibrated and technologically advanced baffling, and interiors, and chambers to make sure that each vehicle is pretty unique sounding while still keeping all that tone and volume at a decent level without distortion. With that said, it's really loud, it's really aggressive and it's got a great tone. It's really rumbly, it's deep, it's throaty, it's not too raspy. It'll definitely wake the neighbors if you want to at wide open throttle with very little drone in the inside of the car. Now, of course with something this loud you can expect a little bit, but I actually got the drive this, as you heard from those sound clips, and I really didn't have it bother me inside the car. So, that's huge for something with this caliber of volume and noise. With all that in mind the kit is an extremely premium option. Borla is known for making the top quality stuff on the market. 304 stainless steel throughout, two and a half inch mandrel bent tubing through the whole thing, so you know you're getting nice backfires on downshifts, lot of back pressure in there which also, you know, contributes to that sound you just heard. With that you're getting a 7% to 10% increase in airflow, great for the guys looking to increase some power and torque. You can expect that with this, some good throttle response. And really it's just waking up the Hemi. All of this is built into this one package with some new tips. As you can see, you're keeping that four by two and a half rectangular tip but it is cut into two. Now, this whole kit comes in right around 1,400 bucks. It is more on the expensive side of the spectrum but for a very good reason. All of that technology built in mixed with the 304 stainless, mixed with some of the best quality sounds without distortion. It's not really matched very well in the category, there isn't a ton like it. Actually, there really isn't anything like it with all the tech built into this. If you wanna pick this up, of course, you can get it in the product page. This is available for the 2009-2014 5.7. And the install, I'm giving a very soft two out of three wrenches on our difficulty meter. Now, the reason I give it two and not one is simply because you are gonna require a little bit more mechanical skills than say a cold air intake. This is getting underneath the vehicle, you want to strategically unbolt your factory exhaust which can be a little awkward by yourself, a helping hand goes a long way. I'm actually going to have a helping hand help me get the factory exhaust off, you guys will see that in a little bit. But getting this bolted up is pretty simple. Regular hand tools do the trick. No cutting, no drilling, no welding, none of that nonsense. It can be a little bit tricky to get your exhaust tips lined up because they are bolted on separately. So, just take your time getting those aligned properly and you'll be good to go. I wanna show you guys every step of the process from start to finish. It takes two, maybe three hours if you're not as experienced with exhaust, but I'll take you guys through every step of the way, starting with the factory uninstall. Let's take a look. The tools used in this install include an impact gun or a ratchet, extension,13 and 15-millimeter deep sockets, a 13-millimeter swivel socket is also recommended, hanger removal tool, PB B'laster or WD-40 and a mallet. Now, the first thing we're gonna to start with for the uninstall is popping off our factory tips. So, grab your 13-millimeter socket, you're just gonna loosen up this band clamp here. Of course, you can grab some PB B'laster to loosen it up here. All right, we're gonna do the same thing for the other side. Use that 13 socket to loosen up that clamp. All right, now our other side was welded on, this one is broken loose, so it should be a little easier to get that tip out of place. Once that's off, pop that off. The next step here, we're back by our factory H-pipe, you wanna grab your 15-millimeter socket and we're gonna loosen up these clamps around that H-pipe as well. Once we get both sides loosened up, I'm gonna put a pole jack underneath of that split H-pipe portion just to hold it up in the air while we work on the hangers on the rest of the exhaust. But for now, grab that 15 and work these off. All right. So, at this point, like I said I'm gonna put this pole jack up in the place just to hold this end in. If you guys are working on the ground, a hydraulic jack does the trick, jack stands are also a good idea. Whatever you can have just to hold this end up while you remove the other piece. At this point, we can disconnect these clamps, loosen up the H-pipe and get that disconnected from the opposite end of our stock exhaust. Next up here we're actually gonna use a hanger removal tool to pop our factory hangers out of the isolators on our frame. We're gonna do that right behind the factory resonators toward the rear end. There's a couple different hangers we're gonna have to do this on. So, using this tool can definitely make a huge difference. If you struggle at all with these you can use PB B'laster or WD-40, some kind of lubricant, just spray them on a little bit. You don't need too much, and that should help pop these out of place. All right. Now, instead of us removing the hanger from the isolator by the factory muffler, what we're gonna do is grab a 13-millimeter socket and anextension and actually just remove the bolt holding the whole bracket to the frame. That way it's easier, we can just remove it off car instead of struggling above our heads here, especially a little easier for you guys working on the ground. So grab that 13 socket, remove that bolt, that hanger will drop down. Save this bolt to reinstall later. We have to do this one more time for the front of the muffler by the exhaust tip. All right, now we do the same thing like I said right by the exhaust tip. Now, be careful because this whole thing will start to drop down, so you wanna have one hand on it to make sure it doesn't drop right on ya. All right, now we're doing the same thing for the other side. All right. At this point we can remove the whole exhaust in one piece. My buddy Tony is here to help me out because it can be a little awkward since it all is still connected. I'm gonna remove our H-pipe and Tony is gonna help me out guiding this down. So, we finally got our factory exhaust off of our 5.7 Challenger and on the ground here sitting next to our Borla ATAK Cat-Back. Lots of differences I wanna talk about here because not only is quality of construction gonna be different, the way that the Borla ATAK mufflers and resonators are gonna be constructed differently than the factory one I want to talk about, as well as starting back here at our mid-pipe. Now, the factory mid-pipe is going to be different than your Borla ATAK. That factory option is an H-pipe. The H-pipe has that crossover pipe which does tend to restrict airflow more than an X-pipe would. The H-pipe here is also pretty kinked up from the factory. It creates a lot of air turbulence going through the exhaust gases which can really, you know, obstruct some of the power that you would get out of a more smoother mandrel bent tubing. Now, our new Borla ATAK option is an X-pipe. The X-pipe does not have that crossover but instead they mesh into one streamlined airflow. So, you're gonna get less restriction, you're gonna get more power, you're also gonna get more volume and tone from an X-pipe. It tends to be a little bit raspier than an H-pipe. H-pipes do tend to be known to be a little bit deeper, but this is gonna have a lot more volume and more power results. Moving on from there you're gonna see full two and a half inch, 304 stainless steel tubing, also all mandrel bent for unrestricted airflow. 304 being, of course, the highest quality materials on the market. Borla is known to have some of the most premium exhaust systems out there in the category and that doesn't change here with this ATAK option for your Challenger. Moving into those resonators or mufflers in the middle of the exhaust here, they have a very specific construction inside of them. The ATAK or Acoustically-Tuned Applied Kinetics, actually has a patented technology inside of that to make sure that even at the highest volumes, the highest decimal reading for this exhaust, it's staying street legal without distorting the tone. So, the louder this gets, the more tuned in that sound is unlike some of the other options out there. Sometimes when you have a full five out of five on the loudness meter, you get that distorted tone at the highest peak volumes at wide open throttle, something that loses its quality, it might not sound as good, it's more just volume. The ATAK option here keeps a nice tone so you have a really aggressive muscle car sound even at the highest decibel level available for a street legal exhaust like this one. Moving on, you'll also see that we're keeping the same general shape going all the way back here for our tailpipes. The muffler, completely different, you don't have this giant weirdly shaped factory muffler anymore. We're going with the ATAK muffler here which again still has the same sort of technology built in. It's all patented by Borla, very unique to their system, getting that 7% to 10% increase in airflow with these options over the stock. This also finishes off with polished 304 stainless steel quad tips, so to speak. These are the four by two and a half inch double box rectangular shape. It's a little more unique than the factory option, it's got that split right down the middle, it's got a slash cut rolled end which basically just gives it a little bit more quality, I think, to the ending tips. Of course, you have the Borla name right on top there. Now, the only thing we have to do for transferring anything over from the factory exhaust is those are factory brackets with the isolators. If you remember, we unbolted this from the frame, we're gonna pop these off, transfer them over to our new hangers on the Borla ATAK. From there we'll be able to bolt this up. All right. So, what I'm gonna do is use PB B'laster to just lube up that factory hangar, it just makes life so much easier. Using our hanger removal tool, we're just gonna pop that right off. Same thing for the front one. All right, now we can do the same thing for the other side. Now let's transfer them over to a new Borla ATAK. All right, now the same thing on the other side. All right, now what do you say we start installing backfire X-pipe? The first step of the process, grab your X-pipe from Borla, make sure you have clamps over the end. The end that's going toward the front of the vehicle into your factory manifolds will be the side with the splits. The opposite side is just solid tubing, that's the outlet going through the rear of the vehicle. We're gonna slide this into place. If you need help getting these in place, a hammer or a mallet works a little bit better, just give you the proper leverage that you need. Just make sure you don't put them on too far. They will eventually just max out. From there, grab your clamps, rotate them upward so you can see that bolt head and just tighten them down. Now, you don't want to get everything too tight, just get it nice and snug, still leaving a little bit of room for adjustment in case you need to come back and change things up just to align it properly. But for now, 15-millimeter socket, we'll get them snug. All right. Next step is our resonator. Now, they are marked L and R, left being the driver side, and you want to make sure you're putting the side that has that curve in it into your mid-pipe or your X-pipe. Now, you want to make sure you also have a clamp on the end that you can bring back down here. Now, as you can see it curves in a certain way, so you want to make sure it's curving in toward the middle. They will push in toward each other when going into the X-pipe and outward when it comes to the resonator. So, just as you see here is how it'll get installed. So, we're gonna grab our 15 socket, get this nice and snug. Do the same thing for the passenger side. Now, the next step would be your tailpipes. Now, I find it easier to actually remove the isolator from the frame before installing the tailpipes, that way we can take this off, install it on the new Borla, and then install that all together. I find that to be a little easier, it's all personal preference, whatever you find the easier yourself. But for us, what we're going to do, hit this with little PB B'laster, WD-40 works as well, do that on both sides. I'm gonna use my hanger tool to just pop this out of place. We'll install this on to the Borla tailpipe and then this back on the frame once the tailpipe is installed.All right, next up, make sure you have a clamp over your tailpipe. As you can see we just reinstall that isolator to our new hanger. Just going to pop this into place on the resonator outlet. From there just lift this up, rotate it so you can hang up that isolator back onto the frame. All right, and just get this clamp nice and snug as you rotate up the exhaust tailpipe. All right, next up we're gonna rotate that driver side tailpipe upward and reattach our hanger bracket to the frame using that 13-millimeter bolt. I'll thread it up there by hand at first just to make sure it's in the proper position. Grab your 13 socket, I'm gonna use a swivel, makes life a little easier, and just tighten that up. All right. Now, we're gonna do the exact same thing for the other side starting with removal of this isolator. All right, starting up with our tailpipe, we have that isolator installed on our new hanger, clamp and position, rotate the exhaust upward and slide that over the outlet. Make sure you have this rotated up and hang that up. With your hanger in position, just tighten up that clamp. All right, now we can hang up that bracket back onto the frame on our passenger side. Now we can do our driver side muffler marked L for the driver side. Wanna make sure you have a clamp on the inlet side. You're gonna have to tuck this up into the rear valence, up into that rear bumper pocket like your factory one was in. Slide that back and just align it so that your bracket has room to hook into that frame again. You might have to rotate a little bit just to get it to tuck nicely. Rotate your clamp up and we're gonna tighten that down. All right, now we can attach the bracket on this muffler to the frame using that factory 13-millimeter bolt. This is where that swivel socket can really come in handy. All right, repeat this for the other side. Same thing on this side. We're gonna top that muffler up into position, slide it over the tailpipe. Now we can tighten down that clamp. Now we can attach the bracket to the frame on our final muffler. Now we can put on our tips. As you can see, everything does need to be realigned, so we're just gonna put this into place and then we'll go back and make adjustments. Now we can go back, make adjustments, and do the same thing for the other side. That's gonna wrap up my review, install, and sound clip test for the Borla ATAK Cat-Back Exhaust. And if you want to pick this one up you can do so right here at americanmuscle.com

      Product Information

      Features, Description, Reviews, Q&A, Specs & Installation

      Features & Specs

      • ATAK Cat-Back Exhaust
      • Delivers 7 to 10% Gains in Horsepower and Torque
      • Eliminates Restriction in Exhaust Gas Flow
      • Durable All Stainless Steel, Mandrel-Bent Tubes
      • 2.50-inch Diameter Tubing
      • Uses Patented Straight-Through Mufflers
      • Supplied with 4 Rectangular, Angular-Cut Stainless Steel Tips
      • Proudly Made in the USA
      • Direct Bolt-On Replacement
      • Backed by a Million-Mile Warranty
      • Fits 2009-2014 5.7L Dodge Challenger Models

      Description

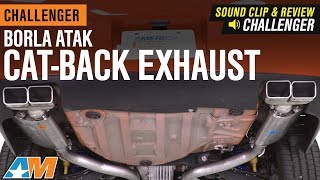
      Aggressive Sound. Get the best and aggressive sound level that fits your Dodge Challenger’s impressive performance with the Borla ATAK Cat-Back Exhaust. This cat-back exhaust assembly uses a patented straight-through and multi-core muffler that reduces the backpressure while absorbing sound waves. With this design, your engine will emit a low and aggressive tone that will definitely match the awesome performance of your ride.

      Strong, Efficient Performance. With the Borla ATAK Cat-Back Exhaust installed on your ride, you’re sure to get up to 7 to 10% increase in horsepower and torque. Specifically designed to increase the exhaust flow in your engine, this cat-back assembly is capable of delivering an improved overall engine performance while enhancing the fuel economy on your ride.

      All Stainless Steel. Crafted to deliver ultimate durability and material rigidity, the Borla ATAK Cat-Back Exhaust features a purely stainless steel build. The main tube measures 2.50 inches in diameter, and is mandrel-bent in order to reduce air flow restriction while maintaining an excellent gas speed. The tips included are also made of stainless steel, and come in an angular and rectangular shape.

      Installs Easily. This cat-back assembly is designed for an easy bolt-on installation - no modifications required. For your convenience, each cat-back exhaust comes with all the necessary hardware needed for mounting.

      Application. The Borla ATAK Cat-Back Exhaust is the perfect upgrade for all 2009-2014 5.7L Hemi V8 Dodge Challenger models.

      Fitment:

      Details

      Borla 140708

      CA Residents: WARNING: Cancer and Reproductive Harm - www.P65Warnings.ca.gov

      Installation & What's in the Box

      Installation Info

      What's in the Box

      • (1) X-Pipe Assembly
      • (1) Passenger Side Muffler Assembly
      • (1) Driver Side Muffler Assembly
      • (1) Passenger Side Intermediate Pipe Assembly
      • (1) Driver Side Intermediate Pipe Assembly
      • (1) Passenger Side Rear Muffler Assembly
      • (1) Driver Side Rear Muffler Assembly
      • (1) Passenger Side Tip Assembly
      • (1) Driver Side Tip Assembly
      • (8) 2.50 inch Clamps
      • (2) Half Moon Clamps
      4.9

      Customer Reviews (500+)

        Questions & Answers

        10 More Questions

        Will It Fit My Challenger

        • R/T - 09, 10, 11, 12, 13, 14
        • R/T Classic - 12