 FREE 1 to 3-Day Delivery on Orders $149+ Details
How to Install Blowfish Throttle Body Adapter Kit on your Ford Mustang

Shop Parts in this Guide
Congratulations on the purchase of your Blowfish Racing LLC GT350 Throttle Body Adapter! You have chosen a quality, American Made product that has been Engineered for the demands of the racing world.
The Coyote 5.0's breathing capabilities are beyond what the stock throttle body can flow. Aftermarket throttle bodies are proven to make better power, but they lack the 100k mile durability testing and have a tendency to degrade in performance and can trigger limp mode conditions over time. With the new Voodoo 5.2 in the GT350, Ford upgraded to an 87mm round throttle body. This new OE Ford offering is durability tested, flows much more air and is inexpensive. The 87mm is a great addition to your Coyote with a GT or Boss intake, but needs and adapter because its bolt pattern is unique. The Blowfish Racing Adapter features a smooth transition from the 87mm TB to the 84mm intake opening, which can be ported easily. It also features E85 friendly Viton o-ring seal similar to the factory seal on the intake, so you only need to bolt it up and go. No sealant or shifting paper gaskets to deal with. A CUSTOM TUNE WILL BE REQUIRED!
WARRANTY: This product is guaranteed to be manufactured to a high quality standard. If the part or finish fails within 1 year, it can be returned for a new replacement. Shipping costs back to us is the customer's responsibility. Any mis-use or alteration of this product will void the warranty.
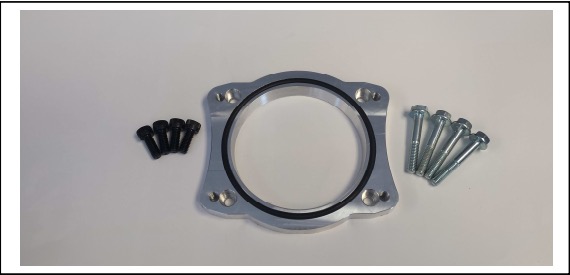
KIT CONTENTS:
(1) CNC Machined Adapter Plate w/pre-installed seal
(4) M6 x16 Socket Head Screws - for Plate to Intake
(4) M6 x 40 Hex Flange Head Screws - for TB to Plate
STEP 1: Remove MAF/Cold Air Intake Tube
Disconnect MAF Connector. Loosen the worm clamp attaching the intake tube to the throttle body. Continue to remove the intake tube/MAF assembly (procedures vary, depending on brand used).
STEP 2: Remove Throttle Body
Disconnect TB connector. Remove 4x Screws holding the Throttle Body to the Intake Manifold.
STEP 3: Attach Adapter Plate to Intake Manifold
Using the 4x M6 short Socket Head Screws, attach the Adapter Plate to the Intake Manifold such that the adapter's o-ring is facing out. The Adapter is symmetrical, so it can be installed upside down without issue. Torque screws to 20in/lbs.
STEP 3: Attach Adapter Plate to Intake Manifold
Using the 4x M6 long Hex Flange Screws, attach the GT350 Throttle Body to the Adapter Plate such that the throttle blade motor is on top. Torque screws to 20in/lbs. Plug existing factory wire connector into throttle body connector.
STEP 4: MAF/Cold Air Intake Tube
The GT350 TB requires a larger Silicone Coupler to mate to your existing Air Intake Tube. Actual TB attachment is 3.75" diameter, but a 4" will compress down with a worm clamp. Reattach the Air intake tube and reconnect MAF connector.
STEP 5: TUNE VEHICLE AND ENJOY!
Blowfish Racing LLC
200 Old Love Point Road
Stevensville, MD 21666
www.blowfishracing.com
