FREE 1 to 3-Day Delivery on Orders $149+ Details
How to Install Borla Stinger S-Type Cat-Back Exhaust - Black Tips on your Mustang
Installation Time
2 hours
Tools Required
- 3/8” Drive Ratchet
- 3/8” Drive Extension 3”
- 15mm Deep Well Socket
- Pry Bar
- Flat blade screwdriver
- Spray Lubricant
Original Exhaust System Removal Note: With a used vehicle, we suggest a penetrating spray lubricant to be applied liberally to all exhaust fasteners and allowing a significant period of time for the chemical to lubricate the threads before attempting to disassemble.
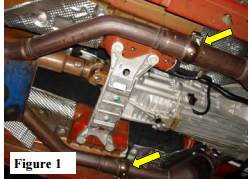
1. (X-PIPE REMOVAL for 140370, 140371, & 140372 ONLY) Loosen front ball clamps in front of H-Pipe. (See Fig.1)
2. Loosen the front band clamps shown located just behind the H-pipe. Do not discard band clamps as they will be used for installation of your new exhaust. (See Fig. 2)
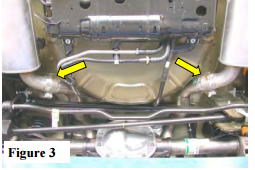
3. Loosen the clamps located just in front of each muffler assembly. (See Fig. 3)
4. Beginning with the left (driver) side, using a flat blade screwdriver, pull the clip to disengage it from the pipe. (See Fig. 4)
5. Remove the left (driver) side over axle pipe by removing the front of the pipe first then sliding it out of the muffler assembly.
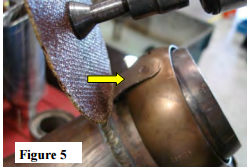
6. Take over-axle pipe and trim tab as shown and remove OE ball clamp. Do not discard ball clamps as they will be used for installation of your new exhaust. (See Fig. 5)
7. Repeat steps 3 thru 6 for the removal of the right side over axle pipe.
8. Lubricate hangers and rubber isolators.
9. On left (driver) side muffler assembly, remove the hangers from the rubber isolators and remove the muffler from the vehicle.
10. Repeat step 9 for the removal of the right (passenger) side muffler assembly. Warning: Use extreme caution during installation. Torque all fasteners according to manufacturer’s torque values and tightening sequence. DO NOT use air impact tools to tighten fasteners on Borla Performance Exhaust Systems. Use of such tools may result in bent flanges or gasket contact areas leading to exhaust leaks.


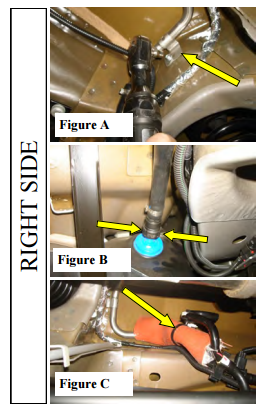
RIGHT SIDE:
1. Fuel Vapor Return Hose is located above the rear axle on the passenger side. Locate retaining clip and remove 8mm bolt. (See Fig. A)
2. Locate fuel-vapor return hose connector and unlock hose by squeezing together retainer as indicated by arrows. Carefully remove retainer free from container. Do not remove connector from hose. (See Fig. B)
3. Carefully undo zip-tie on hose assembly. Using provided Protective Sleeve, carefully slide sleeve over fuel-vapor return hose. Re-install zip-tie over Protective Sleeve and reattach c-clip. (See Fig. C)
4. Snap hose connector into container. Re-install retaining clip using factory 8mm bolt. Verify position of Protective Sleeve to insulate Vapor Return Hose from hot over-axle exhaust pipe.
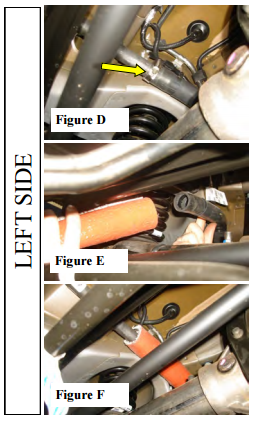
LEFT SIDE:
1. Fuel Filler Hose is located above rear axle on the driver-side. Loosen hose clamp with flat screw driver. (See Fig. D)
2. Using provided Protective Sleeve, carefully install sleeve over hose. (See Fig. E)
3. Re-install hose clamp over hose and tighten screw. Verify position of Protective Sleeve to insulate hose from hot over-axle exhaust pipe. (See Fig. F) CAUTION: Special attention must be given to the over-axle exhaust pipe installation area. Vehicle damage may result if hot exhaust pipes are in close proximity to any unshielded fuel, brake, electrical, or vent lines. Figure A Figure B Figure C Figure D Figure E Figure F Note: When you first start your vehicle after the installation of your new Borla Performance Exhaust System, there may be some smoke and fumes coming from the system. This is a protective oil based coating used in the manufacturing of mandrel bent performance exhaust tubing. This is not a problem and will disappear within a very short period of time after the exhaust has reached normal operating temperatures.
Borla Performance Exhaust System Installation
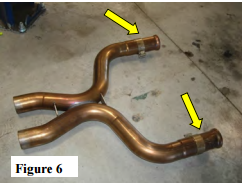
1. (X-PIPE INSTALLATION for 140370, 140371, & 140372) Install (2) Flared Nipples on front pipes using OE band clamps. Place an Accuseal clamp over each end of the expanded end of the X-pipe and insert into Nipples. Lightly tighten clamp. **PLEASE REFER TO DRAWING ON PAGE 2 and See Fig. 6**
2. Place the OE band clamp over the expanded end of the (driver side) L/H Over Axle Pipe and position curved end of pipe over axle. Insert (band clamp) end it into X-Pipe and center clamp over pipe seams. Lightly tighten clamp. ****CHECK OVER-AXLE PIPE ANGLES TO MAKE SURE THE PIPE IS CLEAR OF ALL HOSE AND WIRES.*****
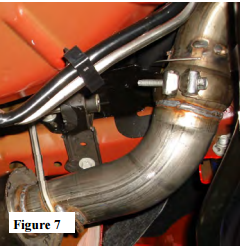
3. Place OE ball clamp over L/H Muffler Assembly and insert expanded end into L/H Over Axle Pipe. Insert hangars into OE rubber isolators and lightly tighten clamp. (See Fig. 7)
4. Repeat steps 2-3 for the installation of the right (passenger) side over axle pipe.
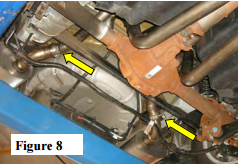
5. Check your exhaust system for proper clearance under the vehicle and also for tip alignment. (See Fig. 8)
6. Once position has been determined to be correct, tighten the Accuseal™ clamps to 32-35 ft. lbs.
7. Before starting your vehicle, make sure to check all wires, hoses, brake lines, body parts and tires for safe clearance from the exhaust system.
8. Start vehicle and check for any leaks. If any leaks are found, determine cause (such as loose or incorrectly positioned clamp) and repair as necessary. Note: When you first start your vehicle after the installation of your new Borla Performance Exhaust System, there may be some smoke and fumes coming from the system. This is a protective oil based coating used in the manufacturing of mandrel bent performance exhaust tubing. This is not a problem and will disappear within a very short period of time after the exhaust has reached normal operating temperatures. Congratulations!!! You have completed the installation of the world famous Borla Performance Stainless Steel Exhaust System.