Talk to a Camaro Sales Tech
1-877-887-1105
M-F 8:30A-11P, Sat-Sun 8:30A-9P
$20K Sweeps! 10 Chances to Win! Enter Daily >

V2 Style Chin Spoiler; Unpainted (10-13 Camaro SS)

Item CC15379
Verify parts fit and get product recommendations.
Camaro Sales Techs: Connect Now M-F 8:30A-11P, Sat-Sun 8:30A-9P
$0.00
Our Price

$189.99 (each)

FREE Shipping Market Price $219.99 You Save 14% ($30.00) Up to 10% off for Military & First Responders! See Details

Will this fit your Vehicle?

Select a different vehicle Help?
Update or Change Vehicle
Ship to: Ashburn - 20149
Sorry, please enter a valid US or CA postal code
We're sorry, zip can't be updated at this time.
    Create a list
    Add to New List

    Saved - View your saved items

    We're sorry. We couldn't save this product at this time.

    or use

      Product Videos

      Jake: Jake here for American Muscle, and in this video, we're taking a look at the V2 Style Chin Spoiler with the Unpainted Finish, fitting 2010 to 2013 Camaro SS models. This is perfect for the Camaro owner who's looking for an easy way to add some aggressive style to their car. It combines sleek, good looks and solid construction for an affordable price, and is sure to turn some heads out on the street.Now I don't think anybody will argue that Camaros look aggressive right out of the gate in pretty much any form. That scowling face and the wide grille make for a rather imposing looking machine. But a car that mean-looking deserves a little extra something to set it off. And this chin spoiler we have here is a perfect way to do exactly that. It has some nice sharp angles to it and it complements the styling of the front end of the Camaro quite well. And it's not just some tiny lip. This is actually a pretty big piece that works to accentuate and exaggerate the front end of the Camaro in a way that looks like it could have been a factory option.This has definitely got a track-inspired look to it. And while the center section here follows the angles and lines of the lower bumper pretty closely, it's actually much deeper than what you get on most Camaros from the factory. Now that track-focused look extends literally out to the sides as well with these large winglets over here. Now these are typically used in airplanes or on the edges of spoilers and splitters in dedicated race cars to help reduce drag caused by that spoiler or wing. And given this thing's size and shape, if you do take your Camaro to the track, you may reap some additional benefits from this as well. Now that's not to say you're gonna be able to drive your car upside down in a tunnel or anything crazy like that, but a little extra airflow is never a bad thing.Construction is taken care of by way of polypropylene, meaning that this thing is strong, lightweight, and also easily paintable. Now, it comes out of the box in this unpainted finish, just like you see it here. And while you could run it just as it is, the idea is to do it in whatever color works with your build. If you want body color or an accent color, it's easy to do. Just a little bit of prep work and some paint.Pricing comes in at about $225, and that makes it a pretty affordable option within the category. Now, it's not the least expensive, but it is pretty close, and it certainly undercuts a lot of other options in the category too. Now, part of that cost savings is, of course, this is a one-piece thing, and you are not getting a painted or finished edge to it. Now, part of that cost savings is, of course, the fact that this is not painted right out of the box. Now, that may save you a little bit upfront, and when you have to pay a little bit more to get it painted exactly the way you want it, you'll get it painted exactly the way you want it. And of course, like I said earlier, you can just run it right out of the gate like this, so it gives you a little bit more flexibility.Installation is going to get a 1 out of 3 on our difficulty meter, and it should take you about one hour to complete the job. Now, this is a pretty straightforward install. However, as you can see here, nothing is pre-drilled. So you are going to have to drill some holes into the splitter and possibly even into the bottom of your bumper in order to get it attached properly. But never fear. We've got one of our AM customers here now to show you the process.Customer: The tools that you're going to be needing today, you're going to need a drill gun with a little drill bit impact with it. Then you need drill bits, specifically a quarter-inch drive drill. Then you're gonna need a rivet gun with a quarter-inch by half-inch rivet. You're going to need a marker to mark where your holes are going to be, and your rivets. First thing you're going to need is your drill gun with your quarter-inch drive. You want to make sure that you have your splitter centered to your front bumper. Make sure that both triangles are aimed at the same direction. You want to place your leg, maybe uncomfortable, but you want to place your leg about evenly like shoulder apart to make sure that your splitter stays up. Then you want to get your drill gun.Then you want to go underneath. You want to basically drill in a hole in the center. Okay, once you drill your hole, then you're going to get your quarter-inch rivet. You want to put it in your rivet gun. Separate it. Okay, then once you have your splitter up like this, enter it in your hole. It's going to be a tight fit. Once it's already in, then you want to put it inside that hole where it was at. Like this, put it all the way in. Make sure that your splitter is aligned straight and then you're going to squeeze the gun until you hear a pop. Once you hear a pop, it should be nice and tight on there. Okay? See that's how you have it done on one side already. Here you are going to do the same thing to the other side.Now bridge this side up. Make sure it's firm on there. Drill your hole as close to the front as possible. You want to aim as close as you can to the front. Drill your hole like that. Get your rivet and put your rivet inside your rivet gun like that, open it wide. Insert in the hole through your splitter and your front bumper at the same time and you're basically gonna be clipping it until you are completely inside and you hear a pop, like that. So we're gonna do the same thing, screw a little bit over and make sure it's straight. Make sure it's straight on this side like that. And what you can do is you could go to the edge first and hit it that way and then go your way from left to right or center to the side. But for me, I'm going to go middle and I'm going to go edge on both sides and then work my way from the middle out.So I am underneath. Okay, I am on the driver's side right here. Okay, we're basically going to go from this corner right here. And we're going to basically go on the edge of this white so probably right about here and then go right on the edge, right as close as you can to the edge of the bumper, go on this side right here and then work your way down here. Make sure when you're on this side right here, you see this lip right here? I do recommend you do put some rivets there, okay, so it holds it inward and upward like this. Okay. I'll show you how it is.So I did put the one in right there. I'm going to put one right here, right above it. Get your rivet, put it in your rivet gun. Make sure you put it in that hole. Make sure it goes in all the way. Once you hear that pop, once you hear that pop, make sure it's on there. It's on there pretty good for me. All right, I like that. Yeah. You're just going to do the same process all the way across.Pull one down right here and one right here. Then you go here and then right. Make sure it's straight so that your rivet goes in straight because if your rivet gun is crooked, it will not engage, meaning it won't go in all the way and you're struggling. So I always recommend make sure that your hole is straight. Once it's all the way in and you can engage with the rivet gun. Once you hear that pop, that's it. See, nice and hard. Once you do that one on the bottom, you can do the one on top. Once you hear that pop, there you go, it's all the way in. Okay, sturdy on the bottom, sturdy on the top. Okay, that's what you want.Okay, we're gonna move on to here. Okay, we're gonna go right about, so since this one's here, we're gonna go right about here. One in here, one in this way. Go up like that. Make sure that the drill is always straight. Grab your rivet, put it in, it's gonna be a tight fit, as always. If it does not go in, you could make it a little bit bigger. But it's always right there over. You keep the hole as small as possible. Confirming nice and tight. Okay, once you put that one in, you can engage right here. And about here, you have a lip here. Put it right about here, a little bit off, so that you have force going in this way and you force going in this way.Okay, once you hear that pop, that means it's engaged nice and tight. So far this has only been the edge part right here. We haven't even worked our section right here. Okay, you're basically gonna stagger it back and forth until you feel like it's not moving anymore and it's sturdy. And you're making sure it's flush with the body. Once you hear that pop, it should be good and then it's all tight here and here. You just got to make sure that you feel comfortable with what you have. If you feel like it's not sturdy enough, then you can add more if needed.All right, everyone, so I'm going to show you what the finished product looks like for me. So basically, we're gonna go underneath. So basically I'm showing you all the rivets right here. These little pieces right here. This is what they start off like. Here you're gonna use your rivet gun. And you're basically going to stagger yourself back and forth, okay? Now there's certain spots where there's more than usual, okay? But you always want to work from the center to make sure that your centered on top. Okay? You want to make sure that your centered here and here. Once you're done with that, then once you put your rivets in, it should be nice and sturdy. If you feel like it's wiggling anywhere, add another rivet. Well this is what it looks like on the edge right there, towards the front, this centered. And this is what it looks like on this side. Turned out pretty nice.Jake: That's going to wrap it up here for our review and install of the V2 Style Chin Spoiler in the Unpainted Finish, fitting 2010 to 2013 Camaro SS models. Thanks so much for watching, and as always for all things Camaro, be sure to keep it right here at americanmuscle.com.

      Product Information

      Features, Description, Reviews, Q&A, Specs & Installation
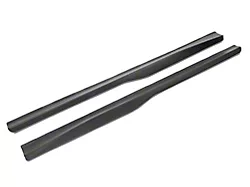
      Features

      • Chin Spoiler
      • Aggressive Racer Look
      • Improved Aerodynamics
      • Better Cornering
      • Bolt-on Mounting
      • Polypropylene Construction
      • Matte Black Color
      • Easy Installation
      • Fits 2010-2013 Camaro SS Models

      Description

      Racer Styling. Add a sleeker appearance for your ride and improve aerodynamics with this V2 Style Chin Spoiler; Unpainted on your Camaro. Made from hard plastic, it features a lightweight structure that can handle stress and road debris, as well as improve cornering by reducing body lift through air down force.

      Installation. This product is easy to install and should take about 1 hour.

      Application. The V2 Style Chin Spoiler; Unpainted fits 2010-2013 Camaro SS models.

      Fitment:

      • 2010 Chevrolet Camaro
      • 2011 Chevrolet Camaro
      • 2012 Chevrolet Camaro
      • 2013 Chevrolet Camaro
      Details

      CA Residents: WARNING: Cancer and Reproductive Harm - www.P65Warnings.ca.gov

      Installation & What's in the Box

      Installation Info

      What's in the Box

      • (1) Bumper Lip
      4.2

      Customer Reviews (10)

        Reviews of similar Exterior products have an average rating of 4.3 out of 5

          Questions & Answers

          10 More Questions

          Will It Fit My Camaro