 FREE 1 to 3-Day Delivery on Orders $149+ Details
How to Install Cervini's C-Series Body Kit - Unpainted (15-17 GT Premium Fastback) on your Ford Mustang
Installation Time
3 hours
Tools Required
- T-20 TORX BIT
- 1/4” 9-MM SOCKET
- 1/4” 13-MM SOCKET
- 1/4” 11-MM SOCKET
- PHILLIP SCREWDRIVER
- FLAT SCREWDRIVER
- 1/4” DRIVE RATCHET
- MEDIUM STRENGTH LOCKTITE
Notice: Install new, unpainted parts according to these instructions! You can also download these instructions at: www.cervinis.com
Then remove parts, paint them and re-install.
Painted or Altered Parts are Non-Refundable!
Step 1: Tools: 13mm-1/4” Drive Socket
Removing the factory hood: Remove the striker bar from the hood, the factory bolts will NOT be reused on the Cervini hood. Remove the plastic push pins to remove underside heat insulator. Unplug the washer fluid hose from the washer nozzle. Unplug the turn signal wire harness (some 2016 and newer models) and remove it from the factory hood (this can be used on the Cervini hood). Remove the nuts that hold the hood to the hinges (this will require at least 2 people) the factory nuts will NOT be reused on the Cervini hood.
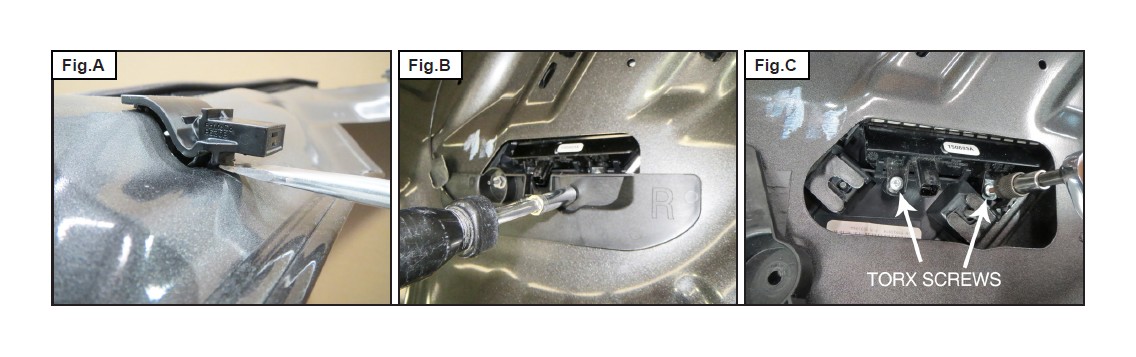
Step 2: Tools: Flat Screwdriver, 9mm-1/4” Drive Socket, T-20 Torx-Bit
Remove washer nozzles and turn signals from factory hood: Place the factory hood upside down on a stand protected with a cloth to avoid scratching the painted surface of the hood. Use a flat head screw driver to push the plastic locking tabs(Shown in Fig.A), releasing factory washer nozzles from the hood. These washer nozzles will be used on the new Cervini hood. On some 2016 and newer models the turn signals may need to be removed. Using a (9mm Socket) remove the plastic cover shown in Fig.B. Then remove the torx screws holding the turn signals in place as shown in Fig.C.They will be installed to the Cervini hood louvers at a later time.
Step 3: Tools: 11mm-1/4” Drive Socket
Aligning the hood: Using the bolts supplied in the hood, install the new Cervini hood to the hinges. Before tightening the bolts, pull the hood all the way forward on the hinge adjustment. Note: Pay proper attention to the hood gap at the rear corner, where the hood meets the fenders. Failure to do so may result in the hood rubbing the back part of the fender, causing damage when opening and closing the hood. Close the hood slowly and make adjustments to achieve an even gap from front to rear along the fenders. Next, adjust the hood to properly align the gap between the hood and front bumper.
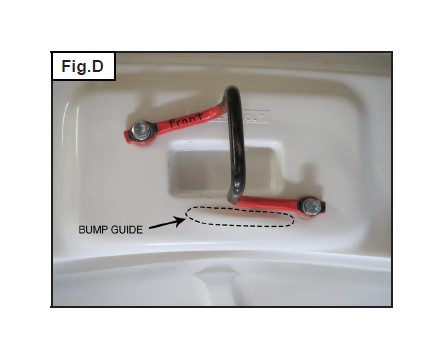
Step 4: Tools: 11mm-1/4” Drive Socket, Medium Strength Locktite
Install Striker Bar: Now that the hood is aligned to the fenders and the front bumper install the hood striker bar using the 1/4”-20 x 1” bolts and lock washers installed in the Cervini hood. The hood has a molded in bump to guide you in the positioning the striker bar. DO NOT overlay the striker bar on this bump. As shown in Fig.D Use medium strength Locktite® when installing the bolts.
Stetp 5:
Adjust the primary latch if needed until striker bar aligns with the latch. The latch adjusts Up/Down and Left/Right. Locate and adjust the hood stoppers on the radiator support so they apply a small amount of pressure to the underside of the hood. Adjust the hood stoppers until the hood meets the fenders flushly. Properly adjust to prevent the hood from shaking and rocking. Make sure when you close the hood you hear the striker bar “click” into the latch.
Step 6:
After you hear the hood “click”, test to confirm the latch is working properly by grabbing the front edge of the hood and slowly pulling upward with steady even pressure. If the hood opens, it’s not adjusted properly; Repeat step 5 until the hood cannot open after you close it.
Step 7:
WARNING: MAKE SURE THE SAFETY CATCH IS WORKING PROPERLY! To ensure the safety catch is working properly, close the hood, pull the hood release from inside the car and the hood will partially open. Slowly pull upward on the hood while firmly shaking the hood up and down. If the hood opens without pulling the safety catch lever then the latch needs to be re-adjusted. The safety catch prevents the hood from opening in the event that the primary latch fails.
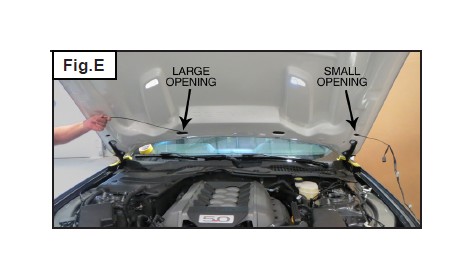
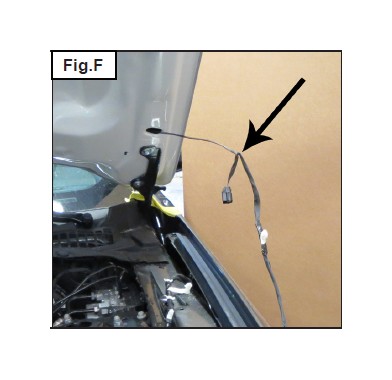
Step 8:
REWORD--- Hood turn signals on some 2016 models and newer: (If your Mustang does not have hood turn signals go to step 13) Supplied in the hardware packet is a rolled up wire, straighten this wire and make a 1” hook at one end. Feed the wire through the small opening on the driver side and keep feeding it through till it can be pulled out or the larger opening on the passenger side cowl area as shown in Fig.E. Hook the end plug on the wire as shown in Fig. F.
Step 9:
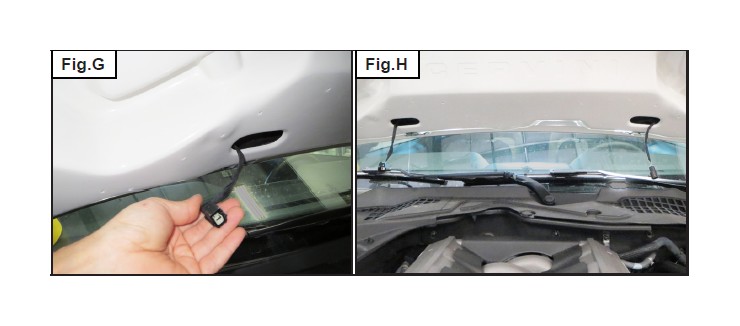
Slowly pull the wire harness though the smaller opening until it comes out the larger opening on the passenger side as shown in Fig.G. Reach into the other larger opening on the driver side and pull the wire harness plug out as shown in Fig. H.
Step 10:
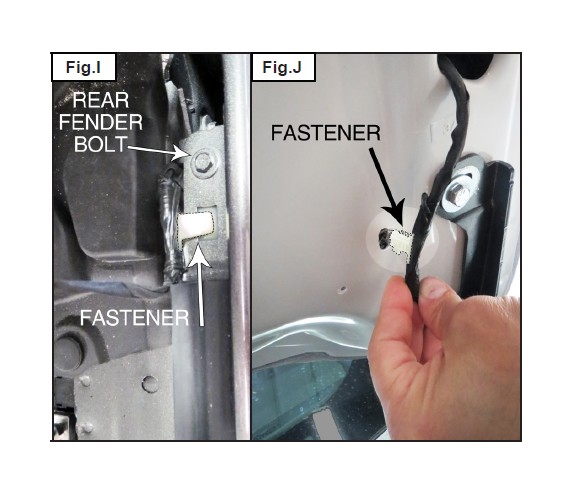
The remainder of the harness that was not pulled through the hood has 2 white plastic fasteners. Install one white plastic fastener to the opening in the drivers fender as shown in Fig. I. Install the second white plastic fastener in the oval hole in the hood as shown in Fig. J.
Step 11:
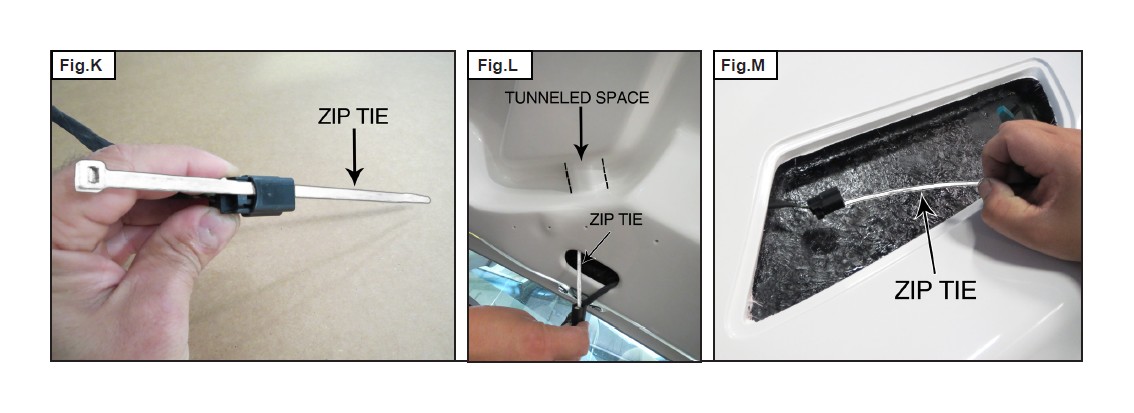
The wire harness plug ends need to be fed up to the openings in the top of the hood. Install the zip tie through one plug end as shown in Fig.K. Then feed it back into the large hole in the direction of the tunneled space as shown in Fig.L. The zip tie will exit on the top side of the hood as shown if Fig.M. Repeat this step for the other plug end.
Step 12: Tools: Phillip Screwdriver
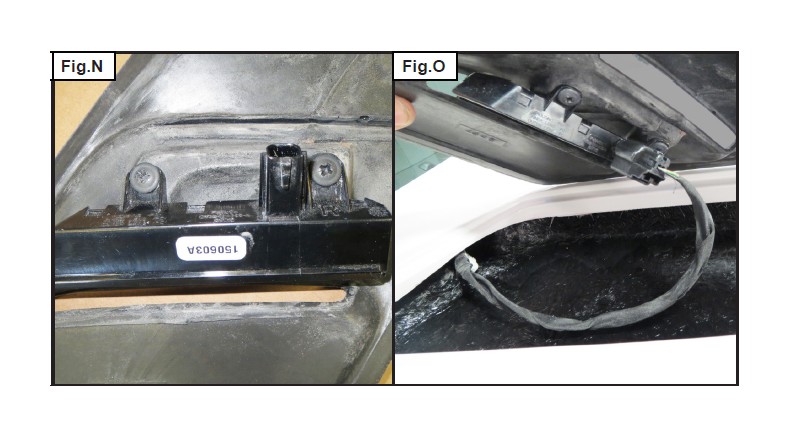
Install the factory hood turn signals onto the bottom side of the Cervini hood louvers using the 4 short black Phillips screws as shown in Fig. N. At this point the lights can be tested. Close the hood and plug the harness into the turn signal lights as shown in Fig.O and place them in the opening of the hood and test them. Once they have been tested unplug harness from turn signal lights and go to step 13.
Step 13:
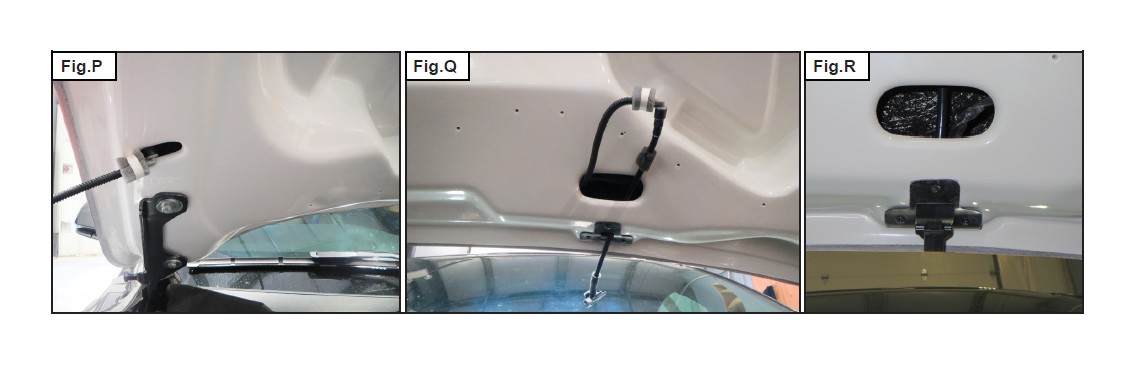
Windshield washer nozzles: Feed the washer nozzle tube through the small opening on the passenger side of the hood as shown in Fig.P until it reaches the large opening in the drivers side cowl and pull it through. Feed the washer nozzle through the black plate in the back of the hood and pull it through the large opening in the hood and make the connection as shown in Fig.Q. DO NOT snap washer nozzle into place at this time. After the connection is made push the washer nozzle line into the hood and then snap the washer nozzle into place as shown in Fig.R. Repeat this step for the other washer nozzle. You have successfully routed the washer nozzles.
Step 14:
Once the washer nozzles have been installed close the hood completely and test them. You have now test fit your new Cervini hood. You can now remove the hood and get it ready for paint. Follow all painting instructions exactly. A qualified auto body technician must inspect your hood prior to prep and paint. Failure to properly inspect and prep your hood may void your warranty.
Step 15:
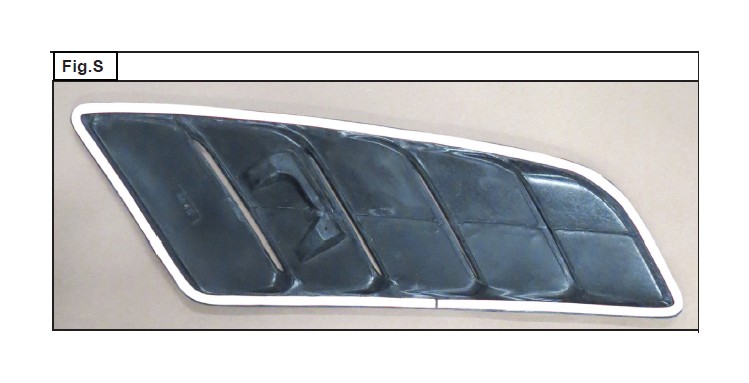
Installing the Vent Inserts: Included in the hardware packet is a roll of 3M double sided tape. After the vent inserts have been painted, install the 3M double sided tape along the inside edge of the inserts as shown in Fig.S. Be sure to center the inserts in the opening. Firmly press on the edges of the trim ring to secure it to the hood. For urethane painting instructions read below.
URETHANE PAINTING INSTRUCTIONS
VERY IMPORTANT: The following painting procedures MUST be followed EXACTLY for PROPER ADHESION and to prevent fish eyes.
1. To remove any mold release contaminants, clean the back of the p art first. Using 2 new clean rags, saturate the first rag with pl astic prep cleaner* and begin cleaning. Then use the second rag to remove the prep cleaner. Continuously fold both rags to their clean sides during the process. Use 3 sets of new rags throughout the process. This prevents mold release contaminants from transferring to the painted surface.
2. Repeat step one on the front of the part.
3. Rinse the part with water. Apply a generous amount of Ajax® or sand fix* to a red scuff pad* (3M Scotch Brite Brand) and scrub the surface to be painted THOROUGHLY (especially where the 2-sided tape is installed, on the back side of the part, and all the hard to reach areas). Then rinse with water and dry. The scrubbed surface should be dull. If any shiny spots show, repeat the process on those areas.
4. Using another set of clean new rags, again clean the surface to be painted with plastic prep cleaner.
5. Spray the surface to be painted with adhesion promoter* including the areas where the 2-sided tape is installed (follow the instructions on the can for application and drying time).
6. Apply 3 to 4 coats of urethane primer* with flex additive* (foll ow the instructions on the can for application and drying time).
7. Wet sand primer with 600 grit sandpaper. Be careful not to sand through the primer. If you do, you MUST clean those areas with plastic prep cleaner, apply adhesion promoter and prime. Once the primer has dried, wet sand the areas that were touched up. Your surface is now ready for paint.
* These items can be purchased at any auto body supply store.
NOTE: Make sure you PRIME and PAINT the areas where the 2-sided tape is used as you would if it was the outside of the part. The tape adheres best when it is applied to a painted surface.
