 FREE 1 to 3-Day Delivery on Orders $149+ Details
How to Install Cervini's Type II Chin Spoiler - Textured Black (10-12 GT) on your Ford Mustang

Shop Parts in this Guide
Notice: Install new, unpainted parts according to these instructions! Then remove parts, paint them and re-install.
Painted or Altered Parts are Non-Refundable!
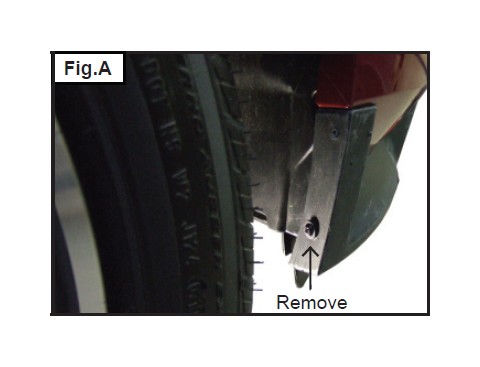
Step 1:
Pre-fi tting the Chin Spoiler: Remove the factory lower screw that is through the chin in wheel well as shown in fi g.A . The new style chin spoiler is designed to fi t over top of your factory chin spoiler. Place new chin spoiler over top of the factory chin spoiler, it will cover the lower painted portion of the factory bumper.
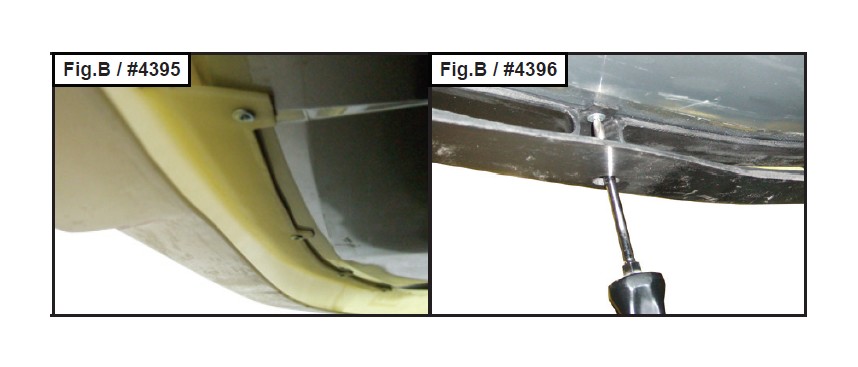
Step 2:
Install lower screws: Apply slight inward pressure to each corner, holding the chin spoiler tight to the car, install 4 silver phillips screws into the 4 locations under the chin spoiler as shown in fi g. B (Do not drill holes the screws are design to go directly into plastic.)
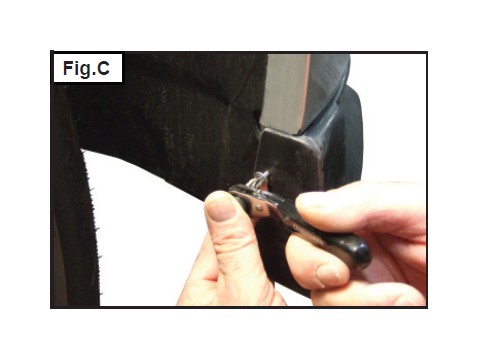
Step 3:
Install wheel well screws: Reinstall the factory wheel well screws through the new chin spoiler then install the supplied black screws in the wheel well as shown in fi g. C (Do not drill holes! The screws are self tapping and are designed to thread directly into plastic.)
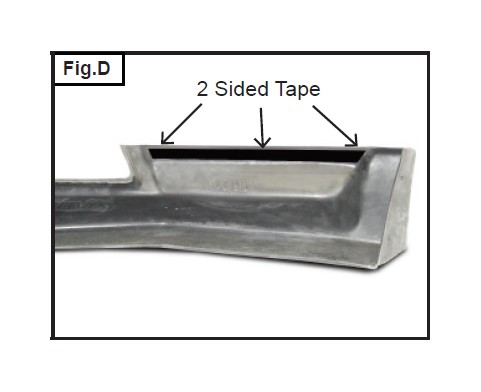
Step 4:
Install the 2 sided tape: After the part has been painted install the 2 sided tape as shown in fi g. D. Before installing the fi nished painted part to the car you must peel back about 2 inches of the tape backing. while holding the part in place reinstall all screws and then continue to pull the tape backing untill the part is completely attached. (The top edge of part lines up with body line on the factory bumper.)
URETHANE PAINTING INSTRUCTIONS
VERY IMPORTANT: The following painting procedures MUST be followed EXACTLY for PROPER ADHESION and to prevent fish eyes.
1. To remove any mold release contaminants, clean the back of the part fi rst. Using 2 new clean rags, saturate the fi rst rag with plastic prep cleaner* and begin cleaning. Then use the second rag to remove the prep cleaner. Continuously fold both rags to their clean sides during the process. Use 3 sets of new rags throughout the process. This prevents mold release contaminants from transferring to the painted surface.
2. Repeat step one on the front of the part.
3. Rinse the part with water. Apply a generous amount of Ajax® or sand fi x* to a red scuff pad* (3M Scotch Brite Brand) and scrub the surface to be painted THOROUGHLY (especially where the 2-sided tape is installed, on the back side of the part, and all the hard to reach areas). Then rinse with water and dry. The scrubbed surface should be dull. If any shiny spots show, repeat the process on those areas.
4. Using another set of clean new rags, again clean the surface to be painted with plastic prep cleaner.
5. Spray the surface to be painted with adhesion promoter* including the areas where the 2-sided tape is installed (follow the instructions on the can for application and drying time).
6. Apply 3 to 4 coats of urethane primer* with fl ex additive* (follow the instructions on the can for application and drying time).
7. Wet sand primer with 600 grit sandpaper. Be careful not to sand through the primer. If you do, you MUST clean those areas with plastic prep cleaner, apply adhesion promoter and prime. Once the primer has dried, wet sand the areas that were touched up. Your surface is now ready for paint.
Note: Make sure you PRIME and PAINT the areas where the 2-sided tape is used as you would if it was the outside of the part. The tape adheres best when it is applied to a painted surface.
