Installation Time
(approx) 2 Hours
Difficulty Level:
Light to Moderate mechanical skill required.
FREE 2 or 3-Day Delivery on Orders $119+ Details
$2,439.99 (kit)
FREE Shipping + $25.00 Oversized Item Fee Market Price $2,854.99 You Save 15% ($415.00)Add Local Shop Installation
Saved - View your saved items
We're sorry. We couldn't save this product at this time.
or use
Hey, guys. Adam here with americanmuscle.com. Today, we're taking a closer look at, listening to, and of course, installing the Corsa of Xtreme Cat-Back Exhaust with Twin Black Round Tips, available for the 2015 and newer 6.4 HEMI-equipped Challenger. You should be checking this out for your 6.4 if you're looking to upgrade from your factory exhaust, that is pretty limiting as far as volume and sound goes and pretty limiting as far as power goes to something that is the complete opposite. The Corsa Xtreme is one of the loudest options in the category as you just heard from our sound clips. I'm gonna give this one five out of five on our loudness meter. With that said, man, this thing is gonna blow your ears off. At cold start is extremely, extremely aggressive. At wide-open throttle, it'll wake the neighbors, of course, and at idle, it is a very deep, very aggressive rumble.One thing I will say, though, even though it is five out of five, it's not distorting. That's something I really, really like with the Corsa Xtreme and really all of Corsa's products, is once you get to the top of the volume chain, you typically hear some kind of distortion, but it's not the case with this product here. It keeps its tone throughout the RPM band and it keeps its quality with that as well. Now, of course, the higher you get on the RPM band, the more aggressive this thing's gonna get. And given that it does have that built-in a factory active exhaust system at wide-open throttle, it is just all out bark. Once this thing's warmed up and you're at a red light at idle, it is pretty tame. I will say it is very aggressive, but it's not loud and overwhelming and really the drone situation isn't what you'd expect. I expect all out drone when I'm talking five out of five. Now, while it does have some, especially at some highway speeds, it's not gonna be overbearing and it's not gonna take over a conversation you might be having in your car, or if you're listening to some music, you can definitely do so at highway speeds. So that's something I really like with this system, you know, not everybody is for the five out of five on the loudness meter. And if you're not, there's a lot of other options out there fitting the three or four, if you're not looking to go to the tip-top of the spectrum.With this, 304 stainless steel head to toe, mandrel-bent tubing, 2.75-inch diameter for the tubing, and for the twin black tips, you're looking at 3.5 inches for each tip. Now, that's a big upgrade. We'll take a closer at this, especially the quality of the system sitting next to our factory option in just a little bit. So stay tuned.Now, as far as the pricing is concerned, it's coming in right above the $1,900 mark. Now, guys, I know it's a heavy price tag to bear on this cat-back. As a matter of fact, it's one of the most premium price tags in the category, but for a very good reason. As I've already mentioned, the quality of the sound isn't lost at higher RPMs or at the top of the volume chain. That really plays a huge part in the price tag, and Corsa is a brand that doesn't lack in quality either as far as construction is concerned. I mentioned 304 stainless throughout, but they have some of the best welds in the category, some of the best construction for the mufflers, some of the best durability when it comes to their exhaust materials. Their tips are done very, very well. They don't fade, they don't chip over time, and it's just something that bears a very premium tag. So this is gonna be for the guys looking for the best of the best as far as volume, quality, and construction.Now, as far as install is concerned, two out of three wrenches on our difficulty meter because, guys, it does require some cutting. Because it has those active exhaust factory flanges, we're gonna have to cut those out of each tailpipe to transfer them over to our Corsa system. Now, it sounds really difficult, but once you make your measurements, which, by the way, you wanna measure twice, cut once, we'll be able to cut them off car and transfer them over. It's not the toughest job in the world, but if you're not comfortable handling a Sawzall or a cutting tool of your choice, you can always rely on a professional to get it done properly. With all that said, three out of three wrenches. I'm gonna call it two, maybe three hours from start to finish, depending on your personal experience and your level of expertise. I'll walk you through the tool list and then we'll start with the uninstall. So let's get to it.Tools used in this install include an impact gun, a ratchet, extension, 13-millimeter wrench, 13-millimeter swivel socket, universal swivel joint, 13-millimeter deep socket, 15-millimeter deep socket, a die grinder, clamp for your table, hanger removal tool, and a Sawzall with a thin curve metal blade. Step number one, grab your 15-millimeter deep socket. And I actually find it easier to have an extension joint on deck. We're gonna loosen up the bolts on our clamps up by our headers. They're 15 mils, one on each side.Now, taking a look at the valve or the actuators from our active exhaust on our Challenger, you can see that we have blue lines here, which we'll talk more about a little bit later on, but those are essentially the marks that we're gonna cuts at with our Sawzall later on in order to get this valve out of place. We'll talk about that again in just a little bit, but the next step here is gonna be to disconnect our sensor harness, connecting it to the actual actuator. So in order to do that, you're gonna use two hands, one hand to pull up on the wire, one hand to push this very small retainer clip in. Push that clip in and pull straight back. Now, do the same thing on the other side.All right. At this point, grab a hanger removal tool or something similar to pop your hangers out of the isolators above the factory actuators. Grab an extension and a 13-millimeter socket. I find it easier to use a swivel socket, but it's all personal preference. We're gonna go right up past our muffler behind our tip and I'm actually gonna unbolt this hanger bracket from the frame instead of trying to remove the hanger from the isolator. So that's gonna make life a little easier and then we'll take it off car on the floor. So what we're gonna do, back that bolt out. Now, it does wanna hang down. So keep that in mind. You can also use a pole jack or a floor jack to support the whole exhaust system so it doesn't drop down too far. Repeat for the other side.Now, at this point, we're gonna remove the entire factory exhaust in one piece. I'm gonna disconnect it from back by the headers. My buddy, Andrew, is gonna hold the tips. We're gonna pull it off and set it aside. All right.So we finally got our factory exhaust off of our 2018 Scat Pack 392. It's on the ground here next to our Corsa Xtreme. Now, there are actually a lot of similarities between the two kits, the biggest difference being, however, the size of the mufflers and the change in our mid-pipe resonators. We'll start at the front end of our vehicle. We are keeping the X-pipe style mid-pipe, which is great because the X-pipe is gonna allow a lot more airflow than a traditional H-pipe would, which would be a little bit more restrictive. So this here is gonna allow for a better airflow, less restriction, less kinks, and ultimately, a little more power and a little more sound and raspiness. With that said, however, the new kit is a 2.75-inch diameter tubing, head to toe 304 stainless steel mandrel-bent tubing. So that there along the entire length of the kit has a slightly larger diameter and it also has a nice bend to it to make sure there's no kinks.Moving forward here, as you can see, right at the end or the outlet side of our mid-pipe of that X-pipe, there is no resonator. So this has the dual resonators or the tunnel mufflers as Corsa refers to them as. They're getting deleted, so no restriction there, no sound baffling there. Straight piping all the way back to the mufflers. Moving on, you see that we left a gap in the system here. That is where we're gonna transfer over, we're gonna cut out the factory valves and the piping and place them into our Corsa system. Now, because there isn't any welded-on brackets, we're not able to unbolt the actuator and move it over. Instead, we have to move the entire pipe. So that will require some cutting before we can get to that portion of the install. So we're gonna move forward from there.Coming out of those factory pipe outlets, you're going to see that it's gonna match up to our new Corsa Xtreme mufflers. Now, the Corsa Xtreme mufflers are providing the sound that you heard earlier in our sound clips. The factory exhaust has more of a black coating to it, not the case here on our Corsa option. But with the upgrade in materials to 304 stainless steel, you can definitely expect corrosion and rust resistance and a long-lasting lifetime to pipe materials and their ability. Outside, we are completely changing the way that this looks at our rear ends. You're going from the rectangular tips about 5 inches long, 3 inches tall to 3.5-inch twin black tips on both sides. Now, the quad-tip look I think is a very aggressive, modern muscle car look. You're seeing that a lot of days with manufacturers like the Mustang and the Challenger. Getting this in the aftermarket, I think looks very, very good at the rear end, especially with the black tips. Now, they're not a matte black tip. It's not a powder-coated tip. Instead, it's more of a gloss black chrome look. Very reflective, very glossy, and it has the Corsa name right on top, of course, repping the Corsa name is something that Corsa likes to do with all of their exhaust systems.Now, getting this installed isn't gonna be too hard. We're doing it piece by piece as opposed to pulling it off in one piece like our factory option, but it does require some cutting. So we're gonna break out our Sawzall. We already made our marks, and I'll show you guys what the distance is there, and then we're gonna make our cuts.All right, guys, next step, I know, the dreaded cutting, but it's really not that bad. We've already made our measurements and we've made our marks. We used the neon marker just to make sure it's really obvious, we can see it very well. And you're gonna make sure you're following the directions for the distance that you need to measure. The driver side and passenger side are very different and measurements and the front and backside of the flange also has different measurements. Some are 5 and 5/8, 8 and 5/8. Some are 3 and 3/4, 3 inches, 4 inches. It all depends on which side it is. So make sure you're following the directions to a T. Measure twice, cut once. Measure three, four times as a matter of fact. Just make sure the measurements are correct. You wanna have a Sawzall or a cutting tool of your choice on deck, something you're comfortable with. If you are using a Sawzall like I am, have a thin curve metal bleed. You don't wanna have anything that's gonna demolish the metal. You want something that'll give you a clean cut. Third and final point I'm gonna make before we get started here is some of these cuts, especially the ones by our mid-pipe by the resonators here are at an angle. You wanna make sure you're cutting with the angle of the pipe. If you cut straight down or straight up and down on an angled pipe, it's gonna mess up the way that they connect when we go to install everything. So make sure you're cutting at the same angle that the pipes are angled at. So we'll tackle that in a second, but for now, we're gonna cut our driver side off here and we'll move on to the passenger.All right. Now, at this point, we're gonna cut off the rest of the flange. Now, like I said earlier, you wanna make sure you're cutting perpendicular to the angle of the piping. So this one's at a bit of a higher angle, so I'm gonna cut down this way. So let's get started.Next up here, we have the individual pieces that we just cut off of our factory exhaust clamp to the table. On each end, we're gonna have to debur the place that we just cut. So what happens is when you make the cut, although it may be clean, there's definitely some loose metal shavings on it. There's some rough edges. We're gonna take my diet grinder here and with a light grip piece of the sandpaper, we're basically gonna go around it and just smooth out all the edges, deburring it. Now, we're gonna have to do that to each side of both pieces. Now, it's a little tedious, but it's something you have to do to make sure all the pieces line up properly once we get it installed. All right. Now you can just repeat this for each side of each component.Now, the first step of actually installing it, we're gonna start with our X-pipe. You wanna make sure you have two of the 3-inch clamps around the inlet side that's gonna match up to our factory manifolds. You also wanna make sure that the welded-on plates on the bottom of the X-pipe are facing down. It says on the plates that that side's down, so you just wanna make note of that. I'm gonna get these to sit all the way back. Grab your 15 socket and tighten down the clamps.Next up, you wanna grab your passenger side pipe that has the bracket welded to the side here. That's gonna go on the inside. So on the passenger side, the bracket faces the driver, on the driver side of the bracket faces the passenger. Basically, take your pipe and another 3-inch clamp. We're gonna insert that over the outlet of our mid-pipe. Now, we're not gonna tighten down this clamp just yet. We're gonna move on to the driver side pipe, making sure that the brackets don't interfere with each other. We wanna make sure they're next to each other, but we might need to make some adjustments before that happens. Once they're both in place, we'll tighten the clamps. Just be mindful of where those brackets are interfering. Seat that all the way back, rotate it so the bracket as horizontal, rotate the passenger side up to line up the bracket holes. All right. Now, before we tighten anything down, we're gonna put the two bolts through the bracket to hold them in place. We're not gonna tighten them in, but we're just gonna put them in by hand and thread them in by hand, then we'll tighten up the clamps. Those will be one of the last things we do. Just loosely tighten the nut to the backend. Now, for these clamps, you don't wanna get them too tight. Just nice and snug, still leaving a little bit of room for adjustment. Same thing for the other one.Next up, we're gonna grab our passenger side actuator or valve actuator. We're gonna slide the hanger into the isolator. So I put PB B'laster in the hole there and on the hanger itself. We're gonna slide this into place. Once that's taken care of, we're gonna put a clamp on this end and connect these two pipes. Now, you don't need to go all the way in, just go far enough in that the slit is completely covered so there's no exhaust leak. We're gonna grab our 15 socket and tighten this down. All right. Now we can do the same thing for our driver side. Start with the exhaust hanger, going into the isolator. Grab clamp, put that over the piping. Grab your 15 socket, get that nice and snug.Next we're gonna move on to our passenger side pipe that's gonna go right under our lower control arm. You wanna make sure, again, you have a 3-inch clamp on the inlet side. All right. Lining this up where it needs to be angled, grab a 15 socket and get those clamps nice and snug. All right. Same thing on the other side.All right. Next up is our passenger side muffler. Make sure you have your brackets transferred over from your factory exhaust to your new hanger here. This is gonna bolt up straight up to the frame or the chassis. You also wanna make sure that you're using it on the correct side. They are side-specific. Have a clamp on the inlet side and pop her into place. All right. Now, at this point, lift up the exhaust by the tips and we're gonna line up the bracket and tighten down the 13-millimeter bolt to the frame. All right. Now we can do the same thing for the other side.All right. Two steps left. What we're gonna do is reconnect the harnesses to our factory actuators for the active exhaust valves and then we're gonna grab our 15 socket, go back and tighten down all of our clamps, including the brackets right by our mid-pipe. So first things first, let's reconnect these harnesses. Once you hear them click, do the same thing on the other side.Well, guys, that's gonna wrap up my review and install and sound clip of the Corsa Xtreme Cat-Back with Twin Round Black Tips, available for the '15 and newer 6.4 equipped HEMI. If you wanna get it, you can do so right here at americanmuscle.com.
Subscribe to our YouTube Channel
Features, Description, Reviews, Q&A, Specs & Installation
Brand | Corsa Performance |
Exhaust System Type | Cat-Back System |
Exhaust System Material | Stainless Steel |
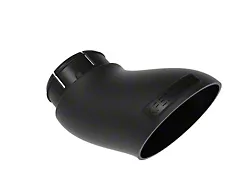
Exhaust System Tip Finish | Black, Black Chrome |
Exhaust System Tubing Diameter | 2.75 Inch |
Exhaust Loudness | Loud |
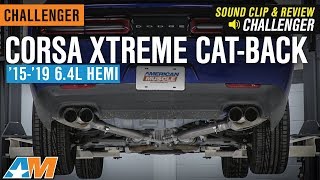
Aggressively Loud With a Touch of Rasp. Make your Dodge Challenger sound like an exotic race car with the Corsa Xtreme Cat-Back Exhaust featuring Twin Black Tips. This aftermarket upgrade consists of an x-pipe that gives the exhaust a bit of a higher tone with a touch of rasp. In terms of volume, this is one of the loudest-sounding exhausts in the market, but don’t worry about waking the neighbors. This Cat-back exhaust sports Corsa’s proprietary Reflective Sound Cancellation technology that guarantees absolutely no drone noise on cruise speeds.
Improved Gains. With the Corsa Xtreme Cat-Back Exhaust on your Dodge Challenger, you can expect at least 9% of increase in airflow. This means better engine breathability with some torque and horsepower gains.
High-Grade Stainless Steel. The Corsa Xtreme Cat-Back Exhaust features an all-stainless steel construction. The pipes are made with 304-grade while the mufflers use a 403-grade stainless steel. The bends on the pipes are mandrel-formed instead of the cheaper crush bends to ensure a wrinkle-free surface for free-flowing gases and air.
Hassle-Free Installation. You can install the Corsa Xtreme Cat-Back Exhaust with Twin Black Tips without hiring a professional mechanic. Since you’ll be using factory-mounting points, there’s no need to drill, weld, or cut anything. All you really need are a few jack stands and some basic tools.
Limited Lifetime Warranty Policy. The manufacturer warranties the Corsa Xtreme Cat-Back Exhaust with Twin Black Tips against material and workmanship defects as long as you own the vehicle the system is installed in and you have the proof of purchase. However, the warranty will be deemed void for exhaust systems with damage caused by installation, neglect, and unauthorized modifications.
Application. The Corsa Xtreme Cat-Back Exhaust with Twin Black Tips fits 2015-2023 Dodge Challenger 6.4L models.
Fitment:
Corsa Performance 14989BLK
CA Residents: WARNING: Cancer and Reproductive Harm - www.P65Warnings.ca.gov
Installation Info
Installation Time
(approx) 2 Hours
Difficulty Level:
Light to Moderate mechanical skill required.
What's in the Box
10 More Questions