FREE 2 or 3-Day Delivery on 10,000+ Items. Details

Talk to a Mustang Enthusiast
1-877-887-1105
M-F 8:30A-11P, Sat-Sun 8:30A-9P
$12k Summer Sweepstakes! Enter Daily >

Ford Performance Lowering W-Springs (18-23 Mustang GT w/ MagneRide; 15-20 Mustang GT350)

Item 399319
Call a Mustang Enthusiast at 1-877-887-1105
M-F 8:30A-11P, Sat-Sun 8:30A-9P
$0.00
Our Price

$310.99 (pair)

FREE Shipping Market Price $354.99 You Save 12% ($44.00)

Will this fit your Vehicle?

Select a different vehicle Help?
Update or Change Vehicle
Ship to: Ashburn - 20149
Sorry, please enter a valid US or CA postal code
We're sorry, zip can't be updated at this time.
    Create a list
    Add to New List

    Saved - View your saved items

    We're sorry. We couldn't save this product at this time.

    or use

      Video Review & Installation

      Today, we're going to be looking at and installing the Ford Performance lowering springs for 2018 GT Mustangs with MagneRide. You're going to want to be checking out the Ford Performance W lowering springs if you have a 2018 GT Mustang with MagneRide or a 2015 and newer GT-350 with MagneRide. These are going to be your go-to lowering springs for MagneRide cars. They lower the car 20-millimeters all the way around which is about three-quarters of an inch. The install will be a two out of three wrenches on the difficulty meter and I'll show you how to get these installed on the car now. We're going to start the install in the rear and because we are going to be lowering the subframe down in order to get the rear springs out, I have a pole jack here so I'm going to go ahead and get the pole jack in place. Next, we're going to undo the two upper shock mount bolts which are these right here, they're 18-millimeter. Next, we're going to do the brake line bracket with a 13-millimeter socket. Next, we're actually going to drop the subframe. There are four bolts holding the subframe in place, three are on the front side of the control arm right here, these two 13-millimeter right here, here's a 21-millimeter and then there's another one on the opposite side of the control arm. You guys want to make that you drop one side of the subframe at a time. So, we're going to go ahead and back out the two 13-millimeter bolts now. This right here is your last subframe bolt. That's also a 21-millimeter. So now, I'm going to lower my pole jack and that's going to lower my subframe and it's going to give me the space I need to just pull the spring out. So now we're just going to slide the spring out of place. All right, guys, a couple things to note here, the rear springs in a MagneRide car are side specific, so you need to make sure that you're installing the correct side. So, you can tell if you have the correct side by looking at the Ford part number. So, Ford will give you an L or an R at the end of the part number. So, I know I'm installing the left side right now. The other thing is you have to make sure the spring is in the correct orientation, so you want to be able to read the writing at all times and that's just a general rule of thumb for almost any aftermarket spring. So, we're installing the spring like this, it needs to sit like this. We're going to transfer over our isolators now. So, you want to make sure that you rotate your isolator so that it's flush against the end of the spring right here. One last thing to note before you put the spring in is that there is an isolator down here in the bottom of your control arm as well so you want to make sure that once again, it's going to be flush up against the end of your spring. So now, I'm going to rotate the spring so that it's seated in this isolator in the bottom of the control arm correctly. And now, we're seated in the isolator in the bottom of the control arm. So now I'm going to hold the spring so that it will sit correctly up here and I'm going to use the pole jack to bring subframe back up. All right. So now, we're going to put our subframe bolt in. I am going to start this by hand. All right. Same thing here. We're going to make sure our bracket is in the correct orientation. We're going to start this bolt by hand. With the subframe back in place, I'm going to remove my pole jack, lower the car down some, and get those shock bolts back in place. The last thing we're going to do on this side is get our brake line bracket bolted back down into place. So, once again, I'm going to start this by hand and then tighten down with my impact gun. We're gonna start this side the exact same way. I have my pole jack in place and I'm going to start by undoing the brake line bracket with a 13-millimeter. After that, I'm going to move on to the shock bolts up top there. Now, we're going to move on to the four subframe bolts which are in the same location as they were on the other side. With the subframe unbolted, we're now ready to lower the subframe enough so we can get the spring out. So, we'll pull our spring. You guys can see that it's free now and we're just going to wiggle it out. Real quick, taking a look at our factory springs on the table versus the Ford Performance springs, the first thing I'll say is that your front springs, when it comes to a MagneRide versus MagneRide car, are actually going to be the same. They look the same and they fit the same. Your big difference is going to be in the rear of the car. In a MagneRide car, you do have side specific springs so you'll have a left side spring and a right side spring and they're not interchangeable. They're actually wound the opposite way of each other. Because of that, you will need specific isolators but you are going to reuse your factory isolators with the Ford Performance springs here. When it comes to MagneRide, you're also not going to get a huge drop from a lowering spring and that's because MagneRide is really all about handling performance as opposed to simply lowering the car. These springs here will lower the car 20-millimeters which is just about three-quarters of an inch all the way around the car. And I know that that doesn't sound like a huge drop when it comes to the world of lowering springs but it is going to make a big difference in the 2018 Mustang and it is going to be enough to actually give you handling performance benefits too. One thing you might notice is a little bit of a harsher ride quality due to the spring rate in the Ford Performance spring and do keep in mind that you will need an alignment after the install. All right, guys. So, same thing as we did on the other side, we are going to slide our isolator into place and just make sure that it's seated in the spring correctly. We're going to check in the lower control arm for the same thing so we know exactly where our spring needs to sit. And from here, we'll slide this into place. All right. So now, I have the spring seated perfectly in the isolator down here in the lower control arm and from here, I'm going to raise a subframe up. With the spring seated and our subframe up close to the body, we're going to grab our bolts. Once again, start them by hand instead of just using my gun. I want to make sure I don't cross-thread anything. All right. Same thing as the other side, we are going to line our plate up. So, at this point, I'm going to pull the pole jack out from under the car. I'll lower the car down some because we still have to get those two shock bolts up top there and then the brake line bracket as well. All right. So, we're going to hand thread in our shock bolts. Switch back to 18-millimeters so we can tighten these down with the impact gun. The only thing left to do in the rear at this point is the brake line bracket. Then we'll move up front to do the front springs. So, since we will be disconnecting the MagneRide sensors in the front, we are going to disconnect the battery and that's always a good idea. Any time you're disconnecting your MagneRide sensors, just disconnect your battery as well. Now, we're going to undo the two 15-millimeter bolts that are on the back of the caliper. Before we pull our caliper off, we're going to undo the brake line bracket bolt right here so we can set our caliper aside. At this point, you can pull your caliper off the rotor and set it aside. At this point, we're going to use a mallet to knock the rotor loose. Some of you might not have to do this but our rotor's on here so we're going to use the mallet to knock it loose. All right. So, after you give your rotor a couple good whacks, if you need to, just pull it off. All right. Now, we're going to undo the MagneRide sensor which is right here. Sensor undoes from the bottom. Now, we're just going to use the fork here and we're going to remove our ABS line and the MagneRide from this side. We're also going to disconnect the two lines from up here as well. Next, we're going to undo our end link bolt. So, we'll need an open-ended 17 to hold the back of it and an 18-millimeter socket for the front. Next, we're going to remove the nut holding the MagneRide ride height sensor into place which is actually right down here, and that's a 13-millimeter. All right. Now, we're going to undo the two nuts that are on the spindle right here. They're 24-millimeter and I will say these bolts are pressed in, so I'm not going to hold this side, I'm just going to remove the nuts from this side of the bolt. All right, guys, I am going to use an air hammer to actually get these bolts out of the spindle. If you don't happen to have an air hammer, you can use a sledgehammer, a mini sledgehammer, a hammer, whichever works for you. All right. So now, we're just going to pull our bolts out. If you have a hard time, you can just push your spindle back. At this point, we're going to lower the car down and then remove the nuts that are holding the top of the strut into place. You have three nuts here that are holding your strut into place, they're 15-millimeter. I'm going to undo two and then on the third one, I'm gonna make sure I have a hand on the strut underneath because it's going to drop out. And now we have our spring and strut. All right, guys, for this next step, you will need a spring compressor. In the shop, we have this nice wall-mounted spring compressor. If you guys don't have something like this, it's not a big deal. You can always go to a local auto parts store and just rent a spring compressor for a day. Either way, you'll need a way to compress the spring so that you can remove the nut on the strut top here. So, I'm going to compress my spring down. Basically, what you want to see is that your spring is unseated from the bottom of the strut here. Now, that the spring is compressed and free from the strut, I'm going to a 21-millimeter socket, undo the nut on the top of the strut here and then my strut will be free. So now, I'm going to decompress this spring because I need the hat for the top of the strut. All right. So since our new spring is smaller than our factory spring, we actually don't need a spring compressor to get this on the strut. These do seat just like your rear springs, so you're going to want to slide your spring on, make sure that it's seated correctly down bottom here, grab the top, get your dust boot hooked back into place, grab the top of your strut, make sure everything's lined up and this is centered, grab the nut, and actually get it started. So, we are going to tighten this down in easy increments here so it doesn't spin the top of this strut. I'm just going to take it slow until we get tight. All right. And once you're tight, you're ready to get this back in the car. All right. So now we're back of the car. We have our spring all mounted on the strut and we're good to go. So, what I'm going to do right now is I'm basically lining this up by eye just to make sure that my strut mount bolts are in the correct position, my spindle is pointed outwards. From there, I'm going to raise this back up in the car and get some of these nuts on there. I'm just getting these started for now just to hold my strut and spring into place. All right. So now, I'm going to tighten these up. All right. So, at this point, we are going to line the spindle up and just try to get our bolts through. So at this point, we are just going to knock these in a little bit more because we want to get the spline seated a little bit more before we start with the nut. We've already tightened the top nut, now we're going to tighten the bottom nut. All right. Next, we're going to get our end link in place. You will need your 17-millimeter open-end in order to hold the back so you can tighten the nut down. Next, we're going to get the ride height sensor back into place. Next, we'll plug in our MagneRide sensors and the ABS sensor as well. So, we're just going to take these, get them back into place. And your MagneRide sensor wraps around the back of the strut and you'll plug your sensor back in. All right. Now, we'll get our rotor on. All right. What we're going to do is we're just going to throw a lug nut on the bottom here so our rotor stays lined up so we can get the caliper on. Now we'll grab our caliper and get that in place. We'll put one of the bolts in the back. All right. So, we have our top bolt started. Real quick, before you tighten anything down, you just want to double check your brake line. Make sure it's not kinked, it's still loose, so when we bolt it back down it'll be in the correct location. So, we're going to start our bottom bolt. So, we're going to tighten this lower bolt, tighten our top bolt. All right. The last thing we'll do on this side is get our brake line bracket back into place. All right. So, moving on to the other side, the first thing that we're going to do is the brake line bracket here and then we'll unbolt the caliper and set that aside. Now, we're going to wiggle our caliper off the rotor and set it aside. Just like the other side, now we're going to pull our rotor. Next, we'll do the sway bar end link, so back to the 17-millimeter open-end for the back and the 18-millimeter socket. Now, we'll undo the MagneRide sensor on this side. It just unclips. So now we're going to switch over to a 13-millimeter so we can grab our ride height sensor right down here. All right. So now, we're back to the spindle nut, so we switched back to our 24-millimeter. Okay. So same thing on the side, we're going to use the air hammer to knock these bolts out of the spindle for us. All right. Now, we're going to remove our spindle bolts. We have the top bolt replaced back in, so it'll hold the bottom bolt both for us. Okay. So now, we're going to undo the three nuts that are on the strut tower top. I'm going to undo two and leave the third until I can reach under and grab the strut. All right. So, same thing as the other side. We're going to slide this up into place, grab some of our hardware and get it into place real quick. Now, we'll tighten them down with our impact gun. Now, we'll get the spindle back up into place and slide our bolts through. All right. Next, we have our sway bar end link. The same thing as before, 18-millimeter on the front, 17-millimeter open-end holding the back. All right. Now, back to the ride height sensor. All right. Now, we're going to plug our sensor lines back in. We'll slide our rotor into place. The last thing we have to do at this point is our brake line bracket. That's going to wrap things up for this review and install. Keep in mind that you can always check these springs out more online right here at americanmuscle.com.

      Product Information

      Features, Description, Reviews, Q&A, Specs & Installation
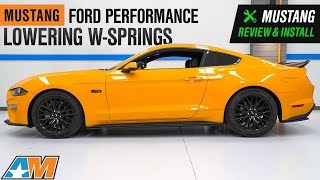
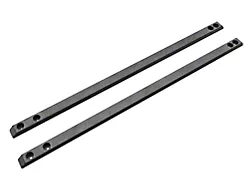
      Features

      • Aggressive Muscle Car Stance
      • Lowers Center of Gravity for Improved Handling
      • Standard Linear Spring Rate
      • Blue Powder Coated Finish
      • Estimated Drop: Front - 0.78 Inch; Rear - 0.78 Inch
      • Clears Stock and Aftermarket Wheels & Tires
      • Professional Installation Recommended
      • Sold as a Set of 4 Springs
      • Compatible on MagneRide Equipped Vehicles
      • Fits 2015-2020 GT350 and 2018-2023 GT Mustangs with MagneRide Suspension

      Description

      Improves Handling Performance. Upgrading to a set of Ford Performance Lowering W-Springs will lower your MagneRide equipped Mustang's center of gravity, which will help to reduce squat during acceleration, body roll in the corners, and excessive nose-dive under hard braking. Ford's W-Springs are ideal for daily driving, street, and even occasional track use. Please note that the ride quality may be slightly harsher when compared to your original factory springs.

      Aggressive Stance. Not only does a set of Ford Performance Springs improve the handling performance of your Mustang, but they also improve its overall appearance. By lowering the ride height approximately 0.78 inches (20mm) both front and rear, that huge tire to fender gap is eliminated, providing your Mustang with an aggressive muscular stance.

      Linear Design. Linear springs (also known as standard rate springs) are engineered with a constant spring rate that stays the same as the spring compresses. This linear rate of compression allows for optimum traction and a more predictable handling feel at both low and high speeds. Linear springs will have a slightly rougher ride when compared to progressive springs. Linear rate springs are a popular choice for track and road course driven Mustangs.

      Clears Stock and Aftermarket Wheels & Tires. These lowering springs were engineered to be compatible with your factory size wheels and tires, as well as AmericanMuscle's pre-configured wheel and tire combo kits (specific to your generation), to assure proper clearance with no rubbing issues.

      Professional Installation Recommended. Seeing that a spring compressor is required for installation of these Coil Springs, AmericanMuscle recommends professional installation. With the proper tools installation can be completed in about three hours. Please note that an alignment is highly recommended after installation.

      Application. This set of four Ford Performance W-Springs are designed specifically for use on the 2015-2020 Shelby GT350 and GT350R Mustang Models, as well as the 2018-2023 GT and Bullitt Mustang Models equipped with the MagneRide Suspension.

      Application Note. These Springs are not intended for use on non-MagneRide equipped vehicles.

      Fitment:

      Details

      Ford Performance M-5300-W

      CA Residents: WARNING: Cancer and Reproductive Harm - www.P65Warnings.ca.gov

      Installation & What's in the Box

      Installation Info

      What's in the Box

      • (2) Rear Springs
      • (2) Front Springs
      5.0

      Customer Reviews (10)

        Brand Image

        Reviews of Ford Performance Suspension products have an average rating of 4.8 out of 5

          Questions & Answers

          10 More Questions

          Will It Fit My Mustang

          • Bullitt - 19, 20
          • EcoBoost - 23
          • GT - 18, 19, 20, 21, 22, 23
          • GT350 - 15, 16, 17, 18, 19, 20
          • GT350R - 15, 16, 17, 18, 19, 20
          • Mach 1 - 21, 22, 23

              Related Mustang Categories