FREE 1 to 3-Day Delivery on Orders $149+ Details
How to Install Maximum Motorsports 1994-1995 Cobra Master Cylinder Installation Kit (80-86 5.0L) on your Ford Mustang

Shop Parts in this Guide
Read all instructions before beginning work. Following instructions in the proper sequence will ensure the best and easiest installation.
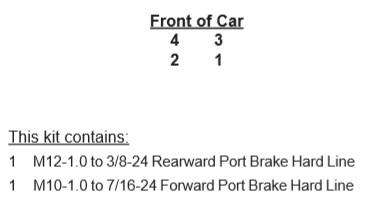
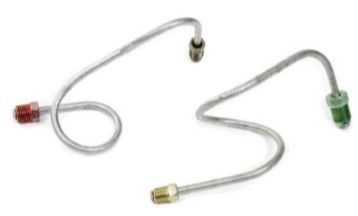
Thank you for purchasing the Maximum Motorsports 1994-95 Cobra Master Cylinder Adapter Kit, MMBAK-9. This adapter kit is required when installing a 1994-95 Cobra Mustang master cylinder into a 1979-86 Mustang. The MMBAK-9 uses only high pressure rated fittings and lines that are designed for use in automotive brake systems. No cutting or flaring of brake lines is needed with this kit.
The MMBAK-9 kit allows installing a 1994-95 Cobra Mustang master cylinder in a 1979-86 Mustang with the stock location proportioning valve. It provides brake lines (with the proper fittings on each end) that fit the master cylinder while retaining the rest of the vehicle’s stock brake line routing.
NOTE: The master cylinder must be installed before proceeding with the following installation steps. See the pre-installation guide below.
NOTE: New master cylinders should always be bench bled before installation.
NOTE: If you are unfamiliar with brake bleeding techniques, consult a service manual for further information on bleeding air from the brake system.
Pre-Installation
The brake booster pushrod must be adjusted before installing the new master cylinder. Follow the steps below if the pushrod has not been properly adjusted.
1. Measure the pushrod bore depth and record this dimension as D1. Be sure to measure from the back face of the master cylinder to the very bottom of the radius in the pushrod bore.
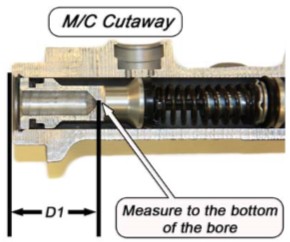
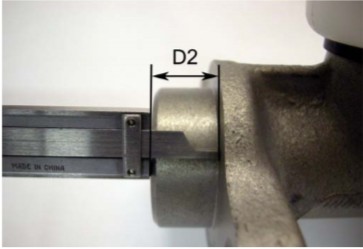
2. Measure the distance from the back of the master cylinder to the back face of the mounting flange and record this dimension as D2.
3. Subtract D2 from D1 and record this dimension as D3.
4. Measure the distance that the pushrod protrudes from the master cylinder mating surface on the brake booster. Be sure to measure to the tip of the pushrod. Adjust the length of the pushrod to be slightly less (.005" to .010" than D3 from Step 3. This will prevent accidental pre-load of the master cylinder from the brake push rod.

5. Install the new master cylinder onto the brake booster. Torque the nuts to 25 ft-lbs.
Installation
6. If still connected, remove the two brake hard lines that connect to the top of the stock proportioning valve, located on the driver side strut tower.
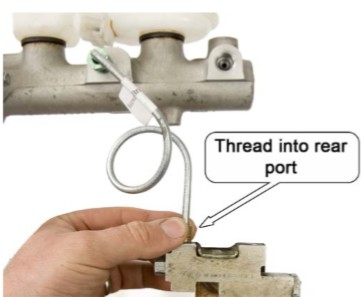
7. Thread the M12-1.0 bubble flare end of the “Rearward Port” labeled brake hard line into the rear, side port of the master cylinder. Position the free end of the brake hard line above the stock proportioning valve.
8. Thread the free end of the brake hard line installed in Step 7 into the rear port of the stock proportioning valve (3/8-24 fitting).
NOTE: Due to vehicle production tolerances, some of the supplied brake hard lines may need to be slightly adjusted for final fitment.
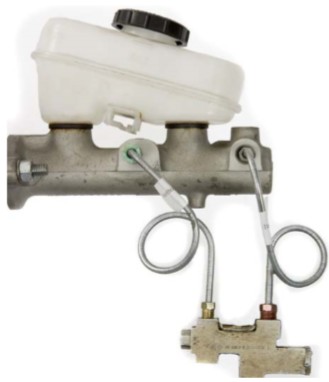
9. Thread the M10-1.0 bubble flare end of the “Forward Port” labeled brake hard line into the front port of the master cylinder. Position the free end of the hard line above the stock proportioning valve.
10. Thread the opposite end of the brake hard line installed in Step 9 into the front port of the stock proportioning valve (7/16-24 fitting).
NOTE: Due to vehicle production tolerances, some of the supplied brake hard lines may need to be slightly adjusted for final fitment.
11. Tighten the ends of the brake hard lines to 12-16 ft-lbs at the master cylinder and the proportioning valve.
12. Bleed the brakes in the order shown below and check all fittings for leaks.