 FREE 1 to 3-Day Delivery on Orders $149+ Details
How to Install Maximum Motorsports Adjustable Clutch Pedal Stop (05-14 All) on your Ford Mustang

Shop Parts in this Guide

Tilton multi-disc racing clutches require a properly adjusted pedal stop to prevent damage to the clutch assembly. This adjustable pedal stop limits travel of the clutch pedal to prevent over-stroking the pressure plate. It must be adjusted to allow just enough pedal travel to disengage the clutch, but no more. MM designed this product specifically to fit the stock clutch pedal of 2005-2014 Mustangs.
Over-stroking can cause significant damage to the clutch assembly because the throw-out bearing will push the diaphragm spring into the disc, harming the diaphragm spring, the throw-out bearing, and the discs. The clutch then won’t release, and all those ruined parts will need to be replaced.
Read all instructions before beginning work. Following instructions in the correct sequence will ensure the best and easiest installation.
WARNING: Installation of the MM clutch pedal stop requires removal of the clutch and brake pedal assembly. Do not service the brake pedal and pedal assembly without first removing the brake light switch and the cruise control deactivator switch. Remove these switches with both the brake and clutch pedals in the at-rest (not engaged) position. Attempting to remove the switches when the plungers are extended will damage the switches. The switch plungers must be compressed for the switches to rotate in the bracket. Do not push or pull on the pedals during removal or installation.
Read all instructions before beginning work. Following instructions in the proper sequence will ensure the best and easiest installation.
Supplemental Installation Notes
• Ford considers the locking pin that connects the brake master cylinder to the brake pedal a one-time use item for the 2011-2014 model years, and recommends it be replaced anytime it is removed. (Ford P/N: 2L523)
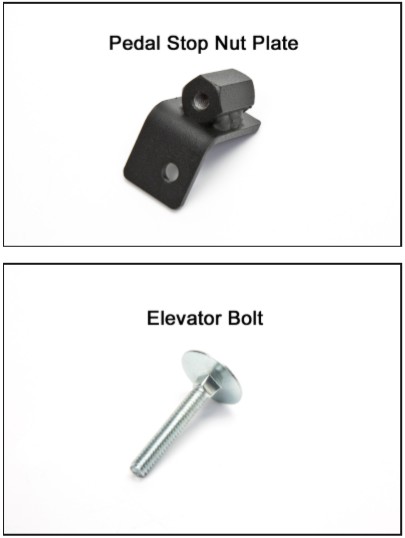
This Kit Contains
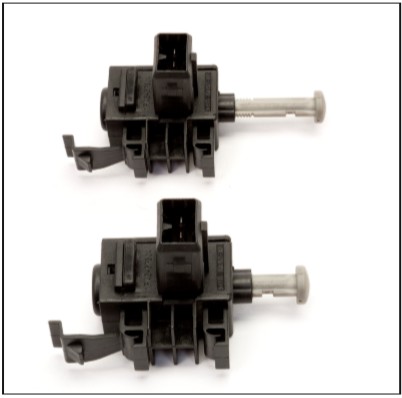
Component Identification
Installation
1. Remove the brake light switch by rotating it clockwise about one-eighth turn and pulling it out of the bracket.
2. Remove the cruise control deactivator switch by rotating it counterclockwise about one-eighth of a turn and pulling it out of the bracket. Disconnect the switch from the wiring harness and set it aside.
3. Disconnect the clutch pedal position switch electrical connector.

4. Disconnect the clutch pedal low-pressure hydraulic hose from the master cylinder reservoir.
NOTE: It‘s likely that fluid will drain or drip whenever disconnecting hydraulic lines or hoses. You can drain the reservoir to limit this, but always be prepared with a rag or bucket. Brake fluid is very corrosive and will eat paint and stain cloth.
5. Remove the hairpin clip and disconnect the clutch pedal high-pressure hydraulic hose from the clutch master cylinder.
NOTE: It’s best to use a set of pliers or vice grips to keep hold of the clip, as it can easily be dropped and lost during removal and installation.
6. Remove the brake booster push rod locking pin.
NOTE: On 2005-2009 vehicles, do this step by removing the self-locking pin cover and the self-locking clip from the pin, and then removing the pin and bushing from the brake pedal. On 2010-2014 models, use an 11mm 12-point socket or wrench to compress the two locking tabs on the locking pin, and pull it out from the opposite side. Ford considers this locking pin a one-time use item and recommends it be replaced anytime it is removed. (Ford P/N: 2L523)
7. Remove the four brake booster nuts.
8. Remove the two vertically mounted brake pedal bracket bolts at the top of the bracket.
9. Remove the pedal assembly from the vehicle.
10. Install the MM Clutch Pedal Stop in the unused hole next to the clutch pedal position switch.
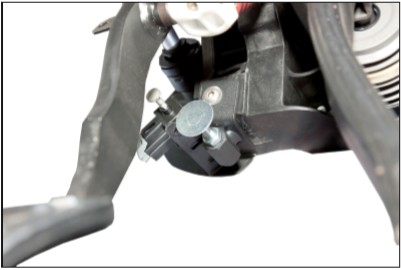
11. Install the button-head socket cap screw through the MM Clutch Stop, and then through the pedal bracket assembly. Install the washer and nut. Torque the button-head socket cap screw (5/32” Allen) and nut (7/16” socket) to 16 Nm (12 lb-ft). Do not over-tighten!
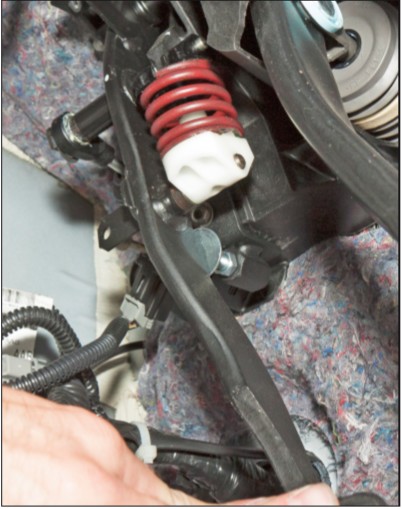
12. Place the pedal assembly back into the vehicle.
13. Install the two vertically mounted brake pedal bracket bolts at the top of the bracket and four brake booster nuts, torqueing them to 25 Nm (18 lb-ft).
14. Install the brake booster push rod locking pin.
15. Install the high-pressure hydraulic hose on the clutch master cylinder and reinstall the hairpin clip.
16. Install the low-pressure line from the brake master cylinder reservoir onto the clutch master cylinder.
17. Reinstall the brake and clutch pedal switches in reverse of how they were removed.
NOTE: Check brake master cylinder fluid level now.
18. Connect the clutch pedal position switch.
19. Bleed the clutch master cylinder.
NOTE: The clutch master cylinder on 2011-2014 vehicles is self-bleeding. Upon reinstallation, pump the clutch pedal until all the air is forced back into the brake master cylinder reservoir.
Pedal Stop Adjustment
20. Safely support the rear of the car on jack stands.
21. A helper is required at this point. With the engine off, the car in gear, and the parking brake off, slowly depress the clutch pedal until you can rotate the driveshaft by hand.
22. Push the pedal down an additional ¼” of travel, measured at the pedal pad. Thread out the stopping pad until it contacts the clutch pedal arm.
23. Tighten the jam nut against the pedal stop bracket.
24. Depress the clutch pedal until it hits the pedal stop, and verify that the driveshaft can still be rotated by hand. If not, repeat Steps 20-23.
25. After adjusting the MM Clutch Pedal Stop, reset the clutch pedal position switch. The grey plunger is extendable; pull it out until you hear its ratcheting mechanism release.
26. Depress the clutch pedal to reset the switch, and try starting the vehicle. If it doesn’t crank, repeat Step 25.
27. With the rear tires still off the ground, put the transmission in first gear. Depress the clutch pedal to disengage the clutch. Start the engine, keeping the clutch pedal fully depressed. If the rear wheels rotate when the clutch pedal is fully depressed, the clutch is not fully disengaged. Repeat the adjustment procedure and retest.
28. Safely lower the vehicle back to the ground and test drive.
